

In this AWS training tutorial, we are going to explore AWS (Amazon Web Services) in detail with a real-time demo of AWS Console. This beginner’s guide fastens your AWS exam preparation and improves your confidence to take up the real exam. Let us start learning AWS!
Getting started with Amazon EC2
When you launch your application, predicting computing power required to run the application efficiently is one of the most difficult tasks. We will either end up in setting up more computing power than required and will be paying more or we will end up in over utilization that will lead to application crashes.
That is where the Cloud providers solve this issue by providing compute powers in a pay-as-you-go model with elasticity. In this article, we will see some of the basics of AWS EC2.
What is Elastic Compute Cloud (EC2)?
The Elastic Compute Cloud (EC2) is a web service offered by AWS (also known as instances) that provides a resizable compute power in the cloud. EC2 can easily scale up or scale down the number of instances and provides elasticity. An instance can be described as a small part of the large computer with its own operating system, network configurations. There can be multiple virtual machines (instances) on a single physical machine.
Why Amazon EC2?
Amazon EC2 is more flexible than traditional machines and offers a lot of other possibilities as well. We can start with small instances and we can increase the size when the traffic is increased and that can be done within minutes. It’s easier to increase the storage capacity as well. You don’t have to worry about security patch updates, etc since these are taken care of by AWS. The cost is another important factor to consider using EC2. We will be paying only for what we have used.
Types of EC2 Instances
The nature of our application or task will decide which type of instances we need. AWS offers different types of instances optimized for different use cases or workloads.
- General Purpose Instance
- Compute Optimized Instance
- Memory Optimized Instance
- Storage Optimized Instance
- Accelerated Computing
General Purpose Instances
The general purpose instances are divided into two varieties, T and M. This type of instance is suitable for applications that require to balance performance and cost. T and M instances are based on the virtualization types PV and HVM. T instances are more suitable for testing environments and M instances are suitable for production workloads.
Compute Optimized Instances
The compute optimized instances (C type) are recommended for the workloads which require a lot of processing power from the CPU. More suitable for data analysis and data processing applications.
Memory Optimized Instances
If the application is heavy and needs a lot of RAM but doesn’t require a lot of CPU power, then memory optimized instances are the best choice.
Storage Optimized Instance
Storage optimized instances are provisioned with more storage capacity. H, I and D instances belong to this group. When the application is huge and has a lot of data to be stored on the local disk, this type of instance would be a better choice.
Accelerated Computing
P and G instance types belong to this group. These types of instances are more suitable for the applications which require heavy graphics rendering. These instances have their own graphics card and GPU based on the instance size.
Elastic Compute Cloud (EC2) Pricing Options
AWS offers different purchase options for EC2:
- On Demand Instances
- Spot Instances
- Reserved Instances
- Dedicated Hosts
- Dedicated Instances
- Capacity Reservations
On-Demand instances are used when you don’t want any upfront payment and long term commitment. Follows pay-as-you-go pricing model and recommended for unpredictable and short term workloads.
Spot Instances can give discounts of up to 90% compared to on-demand instances. This pricing option enables you to bid on unused EC2 instances. Price fluctuates based on the availability of instances. Recommended for batch processing and not recommended for critical jobs.
Reserved instances save a significant amount of cost compared to on-demand instances. In this type you reserve the instance for a specific period of time.
There are three payment options available for reserved instances:
- All Upfront
- Partial Upfront
- No Upfront
There are two term lengths available to select from:
- One-Year
- Three-Year
There are two different classes available in the reserved instance type.
- Standard Reserved Instances
- Convertible Reserved instances
Dedicated Hosts is a physical server with EC2 instance capacity that is dedicated for your use. This is the more expensive instance type and suitable for companies which have a strong compliance need.
Dedicated Instances are running on the dedicated hardware. May share the hardware with other instances running on the same account which are not dedicated instances.
Learn the AWS pricing model before progressing your services for better cost optimization!
What is Amazon Machine Image (AMI)
The Amazon Machine Image (AMI) contains the information required to launch an EC2 instance. Multiple instances can be launched using a single AMI.
An AMI includes:
- One or more EBS snapshots. A template for the root volume in case of instance-store backed AMI.
- Launch permissions
- A block device mapping
Creating Own AMI
You can customize the instance and save the configurations as custom AMI. New instances can be launched using custom AMI with the configurations you have done.
What is Elastic Block Store (EBS)
Elastic Block Store (EBS) is a persistent block storage service offered by AWS and that acts as a network drive that can be attached to an instance when it’s running. EBS scales up and down easily. EBS volumes are restricted to the availability zone (AZ).
What is Persistent storage?
Persistent storage(also called as non volatile) is a data storage device that will retain the data even after the system is shut off.
Types of EBS Volumes
EBS offers four types of volume types.
Solid State Drives (SSD)
Solid State Drive (SSD) is faster than HDD in general. Performance of an SSD is measured in IOPS. That means how input and output operations per second the server can handle.
General Purpose SSD (gp2) is the default EBS volume and provides maximum performance by balancing the performance and price.
Provisioned IOPS SSD is recommended for mission critical applications and it provides high performance for I/O intensive applications. Size of this volume ranges from 4GiB to 16TiB. IOPS ranges from 100 IOPS to 32000 IOPS.
Hard Disk Drives (HDD)
There are two types of hard disk drives available and their performance is measured in terms of throughput.
Throughput Optimized HDD(st1) is recommended for large, sequential workloads. Provides low cost magnetic storage. This type of volume provides throughput of 500 MB/s. This type can not be used as EC2 root volume.
Cold HDD(sc1) is the cheapest magnetic storage type and uses a burst model. This volume type provides throughput of 250 MB/s and is recommended for infrequently accessed workloads.
How to Create an EC2 Instance?
We have learnt about the EC2 basics in our previous tutorial. In this demo, we will dive deep into the EC2 instance in management console and see how to create an EC2 instance. I assume that you have an AWS account already or you can also use Whizlabs Hands On labs environment to get AWS login credentials.
Login to AWS management console and navigate to the EC2 dashboard by clicking on the Services tab and EC2.
 Now, click on the “Launch Instance” button. Give a name as you wish and select the AMI type. We will create an Ubuntu 20.04 with SSD volume for this type.

Now, we need to select the instance type. The t2.micro is a free tier eligible instance type so that we will be creating t2.micro for this tutorial. You can select any instance type as per your needs (please check the pricing before launching the instance).

We need a key pair to connect to the EC2 instance. We can either select the existing key pair or create a new one. For this demo, we will create a new key pair. Click on “Create new key pair” and give a name then click on create key pair. Save the file in your local.

Leave the network settings as it is or enter your settings. I have enabled HTTP traffic to this instance.

Next, we need to select storage for the instance. Add the storage you need and select the storage type. I have selected a general purpose SSD (gp2) for this demo.

Review the settings and click on launch instance.

Within a few seconds, our instance will be created. Navigate to the EC2 dashboard and you should be able to see the instance in the running state.

That’s it! We have successfully created an EC2 instance.
Connecting to EC2 instance
Let us now connect the instance which we have created using SSH. We have created a keypair with the name whizlabs-demo.pem. We need to change the file permission for this file. Run the following command to change the permission (replace the file name with your keypair file name).
chmod 400 whizlabs-demo.pem
Run the following command to connect to the instance. Replace the ip address with your public ip address.
ssh -i “whizlabs-demo.pem” [email protected]

Configuring Elastic IP
Now, we have a public IP assigned to our instance but that’s not a static IP address. If we restart the instance, this IP will be replaced with another one. Elastic IP resolves this problem. We will see how to assign elastic IP to the instance in the following steps.
Go to the EC2 dashboard and click on the Elastic IP.

Click on “Allocate Elastic IP Address” and leave the settings as it is and click on allocate.

An IP address has been allocated but not associated with any resource. We need to associate it with the instance which we have created. Select the Elastic IP and click on actions then click on associate elastic ip address.

Select the instance id and click on associate.

You can verify this by navigating to the EC2 dashboard.

Cleanup
As we don’t want to be billed, we will terminate the instance and release the Elastic IP as well. Note that, if the elastic ip address is kept unassociated with any resource, we will be charged for that as well.
Go to EC2 console, select the instance, click on instance state and select terminate instance.

Then navigate to the Elastic IP section, select the IP address and click on release IP address.

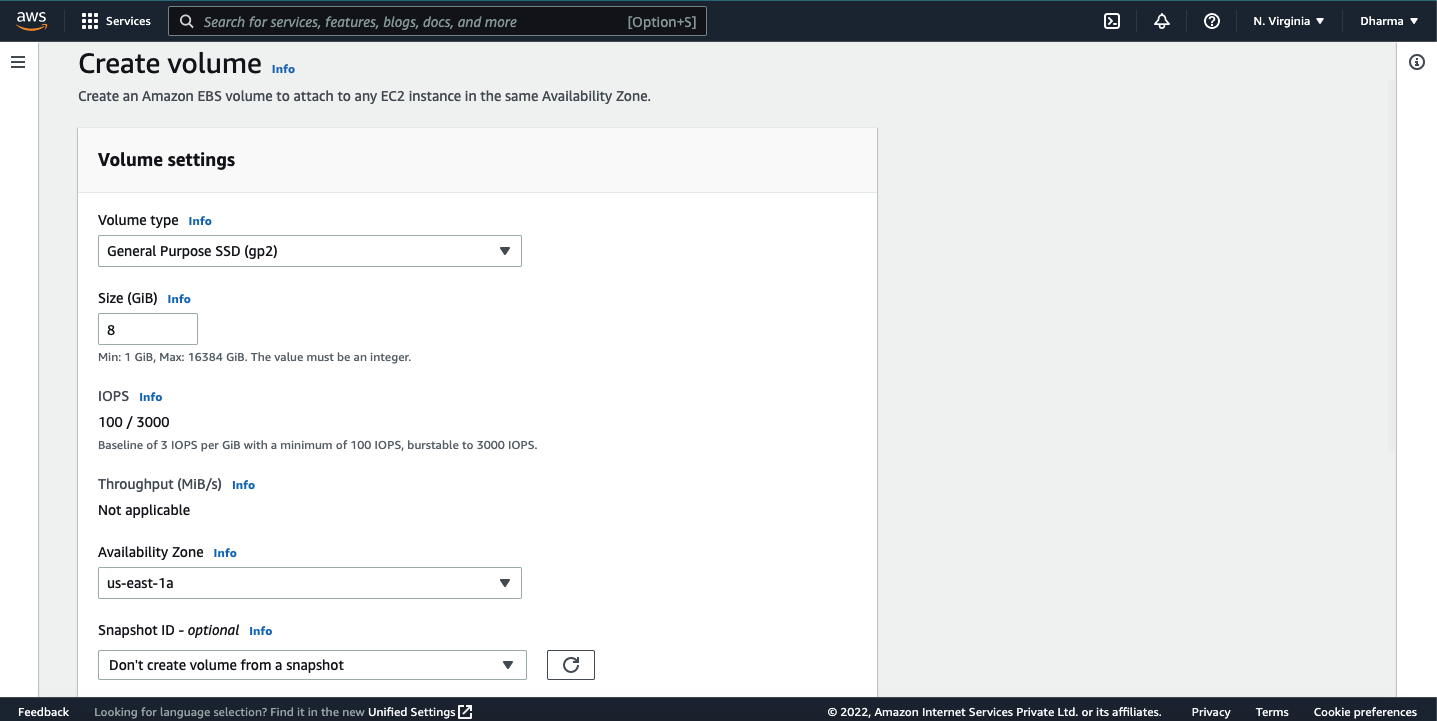
How to Create an EBS Volume and Attach to EC2?
Login to AWS console and navigate to EC2 dashboard. Under Elastic Block Store, click on Volumes.

Choose volume type. I am selecting gp2 for this demo. Enter the volume size and select the availability zone where you want to attach. If you want to encrypt the disk, you can select the option “Encrypt this volume” and select the default KMS key. For this tutorial, I am creating a volume without encryption. Review the settings and click on create volume.

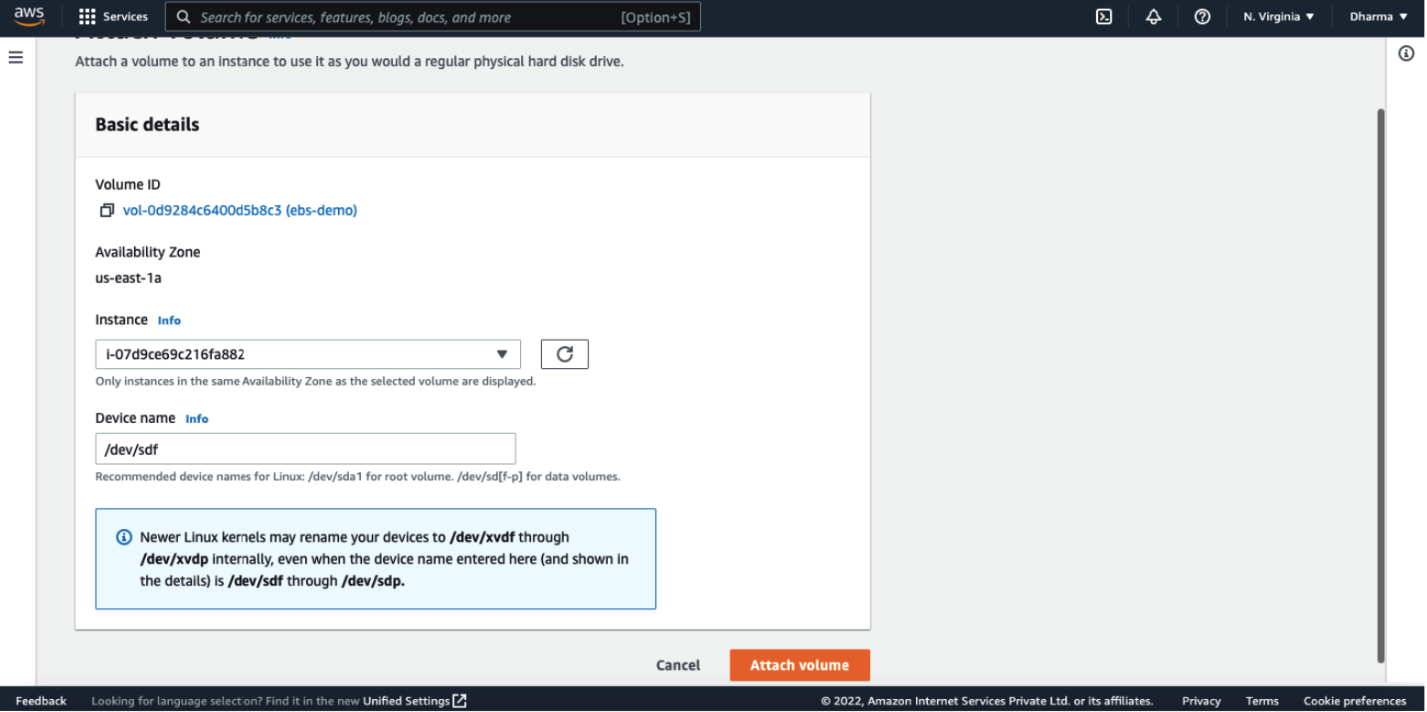
Navigate to the EBS dashboard to see the volume. Let us see how to attach this volume to an EC2 instance.
Click on the volume ID and click on Actions dropdown and select the option “Attach Volume”.

Select the instance ID and click on attach.

Migrating EC2 instance from one region to another
As we know that AWS has regions and availability zones. Most of the AWS services are region specific. If you are running your servers on AWS, you may come across a situation where you want to migrate an EC2 instance running on one region to another region or one AZ to another AZ. In this article, we will see how to move EC2 instances from one region to another and one AZ to another AZ and one VPC to another VPC.
What is a Region?
Regions are the physical data centers of Amazon located around the world. Each region has different data centers which are physically isolated from each other and called availability zones.
Migrate EC2 instance from one region to another
I have an EC2 instance already created in the us-east-1 (N Virginia) region and I will migrate the instance to us-east-2(Ohio) region.

To migrate the instance, we need to create an Amazon Machine Image (AMI) from the existing instance and have to create a new instance in the new region.
Select the instance and click on the actions dropdown, and select “image and templates” and click on the “create image”.
Give a name and optional description then click on “create image” button.

Once the image is created, it needs to be copied to the destination region. In our case, it’s Ohio(us-east-2). Select the image and click on actions dropdown and select copy ami.

Give a name and description, select the destination region. Then click on the “Copy AMI”.

Once the AMI is copied, the same will be visible on the destination region as well.

Now, we need to launch an EC2 instance using the newly copied AMI.

That’s it, we have successfully migrated the instance from the N Virginia region to the Ohio region.

Setting up Performance Monitoring for EC2 Instance
Monitoring your cloud infrastructure is one of the major challenges you face when you migrate your servers to the cloud. Most of the AWS services integrate seamlessly with AWS CloudWatch, which is Amazon’s built- in service that helps you to configure monitoring and alerts in just a few clicks.
Amazon EC2 allows you to create instances on the cloud within minutes. Since it’s a managed service, it’s recommended to utilize the monitoring tools provided by AWS.
AWS CloudWatch Overview
CloudWatch is a monitoring tool or service offered by Amazon for the infrastructure and the applications running on it. CloudWatch can be used to monitor various AWS services and create metrics and alarms. It enables real time monitoring for AWS services like EC2 instances, RDS, etc.
Namespaces: A container for CloudWatch metrics. Metrics in one namespace are isolated from another namespace.
Metrics: Set of time-ordered points published to CloudWatch.
Dimensions: A unique identifier for the metric.
Statistics: Metric data aggregated over the time period.
Alarms: Used to initiate actions on your behalf. Alarm monitors the metrics based on time interval and performs the suggested actions.
Configuring CloudWatch Alarm
We will see what are the basic alarms that need to be configured while deploying an EC2 instance. For this demo, we will configure default and custom metrics for the deployed EC2 instances. We also configure healcheck and HTTP errors.
- CPU Utilization
CPU utilization is a CloudWatch metric that is available by default. To configure this metric, login to the AWS management console, navigate to the Management tools and select CloudWatch.

Click on the Alarms on the left then click on create alarm.

On the next screen, click on the select metric.

Select the metric “CPU Utilization” for the EC2 instance which you want to monitor. I have selected the instance named as cloudwatch-demo.

On the following screen, you will have an option to give a name and conditions for the alarm. Enter the details and click on next.

On the next page, we need to configure the alarm actions. Define when the alarm should perform the actions and select the SNS topic. We can create a new SNS topic from this page if we don’t have the existing one.

Apart from sending the notifications, CloudWatch alarm can also perform other actions like autoscaling and EC2 state change, etc. For example, if the metric goes beyond the desired value, we can set the alarm to reboot the instance.

Click on next, you will see a review page. Review the settings and click on create alarm.

Once done, you can see the alarm created on the CloudWatch dashboard.

If you click on the alarm name, you would be able to see a detailed view of an alarm.

System Status Check
StatusCheckFailed_System is another important metric for the EC2 instances. This metric is also available by default. To configure alarm for this metric, repeat the previous steps and select the metric as “StatusCheckFailed_System”.

Please remember that there are two status checks performed. System status check and Instance status check.
System Status Check monitors the AWS system required to use our instance. This check will fail in case of:
- Loss of network connectivity
- Software or Hardware issues on the physical host
- Power issues
Usually these failures will be fixed by AWS or by rebooting the instance.
Instance Status Check monitors the configuration and softwares of an instance. This status check will fail in case of:
- Incorrect network configuration
- Exhausted memory
- Corrupted disk/filesystem
Usually these failures need our involvement to be resolved.
For this demonstration, I have selected a metric as “StatusCheckFailed_System” to create an alarm. Apart from selecting SNS topics to send a notification, the preferred EC2 action for this alarm would be the “recover this instance”.

In this demonstration, we have created an EC2 instance, connected to the instance using SSH and allocated an Elastic IP address to the instance. We have also learnt how to create EBS volume and attach to EC2 instances. We have also seen how to migrate instances from one region to another. Hope you are able to follow along and the tutorial helped you.
Compare Amazon RDS and Amazon EC2 for MySQL
Choosing from various services is a common scenario you will come across when you decide to migrate databases from on-premise to AWS cloud. MySQL can be installed directly on the Amazon EC2 instance. AWS also provides dedicated service RDS for databases. In this article, we will see the pros and cons of Amazon RDS and Amazon EC2 for MySQL.
What is EC2?
Amazon Elastic Compute Cloud (EC2) is a compute service offered by AWS which can scale up and down easily. EC2 is compute power which can be used for any purpose. To run database services, we need to provision EC2 instances and install database engines on the instance.
What is Amazon RDS?
Amazon Relational Database Service (RDS) is a managed Database-as-a-Service (DBaaS) which is available for popular database engines like MySQL, MariaDB, PostgreSQL, Oracle and MsSQL.
It makes it easier to manage the operations. Amazon RDS also supports Amazon Aurora compatible with MySQL and PostgreSQL.
Difference between RDS and EC2
Let us now compare how the RDS and EC2 instance differs in various aspects such as High Availability, Scalability, Backups, etc.
Administration
|
RDS |
EC2 |
| RDS takes full responsibility like configuration, management, maintenance and security. RDS is a cost effective solution and easy to set up. It eliminates the routine maintenance activities.
With RDS, we don’t have control over the system. |
EC2 gives more control over the softwares, OS and database. EC2 allows database administrators to manage backups and replication. We need to take care of the daily maintenance activities like security patch updates, replication, backup, etc.
EC2 offers complete control. |
High Availability
|
RDS |
EC2 |
| RDS creates a primary DB instance and replicates the data in another availability zone. | We need to configure the instance for high availability. |
Scalability
|
RDS |
EC2 |
| RDS can scale seamlessly both horizontally and vertically. Increasing the instance capacity can be done in a few clicks and adding more instances to scale horizontally can be automated. | In case of EC2 instances, we need to configure the scalability feature. This includes setting up an auto scaling group, load balancing, etc. |
Backups
|
RDS |
EC2 |
| Backups can be automated with RDS. Backup events can be monitored using CloudWatch. It’s also possible to get the snapshots on-demand. | We need to take care of the backups and need to use other monitoring tools to monitor the backup activities. |
Performance
|
RDS |
EC2 |
| RDS offers provisioned IOPS which allows you to get faster and consistent Input/Output performance. | EBS is the backbone of EC2 instances. By selecting the right type of EBS volumes, we can achieve the desired IOPS. |
Monitoring
|
RDS |
EC2 |
| RDS integrates seamlessly with the other AWS services and CloudWatch gives the insights of database performance. | CloudWatch can not be used to monitor the performance of databases installed on EC2 instances. We need to configure a third party tool for the same. |
Storage
|
RDS |
EC2 |
There are 3 types of storage options available in RDS.
|
Based on the EC2 instance type and EBS volume type, high IOPS can be achieved.
Refer to EBS optimized instances to know more about the maximum possible bandwidth, throughput and IOPS. |
Compatibility
|
RDS |
EC2 |
| RDS supports Amazon Aurora, MySQL, PostgreSQL, MariaDB, SQL Server, Oracle. | Since the database engine installation is manual with EC2 instances, we can any database as we need. |
Security
|
RDS |
EC2 |
| Data in RDS is encrypted both at rest and in transit. The read replicas are also encrypted at rest. | In the case of EC2, the data is stored in EBS volumes. The EBS volumes can be encrypted at rest and in transit. |
Pricing
| RDS | EC2 |
| RDS is slightly costlier than EC2 since most of the maintenance activities are taken care of by Amazon. | If the instance is optimized properly with correct instance type and EBS volumes, slightly cheaper than the RDS instances. |
Choosing between RDS and EC2
If you are looking for a more automated solution RDS is a better option than EC2. However, it depends on your needs. EC2 provides more control over the system.
Running MySQL Database on Amazon EC2 Instance
In the following steps, we will see how to setup MySQL on the EC2 instance. I assume that you have an EC2 instance created and is in running state. If not, please navigate to the EC2 dashboard and launch a new instance.
Go ahead and launch the instance.


Connect to an EC2 instance
Connect the running instance via SSH. I have created an Ubuntu instance for this tutorial. Commands may vary depending on the OS.
sudo apt update
sudo apt install mysql-server
Check the status by running the command sudo systemctl status mysql

Let’s login to MySQL as root and set a password.
sudo mysql
mysql> ALTER USER ‘root’@’localhost’ IDENTIFIED WITH mysql_native_password BY ‘password’;
mysql> FLUSH PRIVILEGES;
Now, exit and login again with password.
sudo mysql -u root -p
Let’s create a database and name it as mysql_db
CREATE DATABASE mysql_db;

That’s it! We have created an EC2 instance and installed a MySQL server in it.
Connect using MySQL Workbench
MySQL Workbench is a popular database administrator tool. Let us use this tool to connect to our database running on the EC2 instance.

Click on the plus symbol to add a new DB connection.
Give a name to the connection and the connection type as “Standard TCP/IP over SSH”. The SSH hostname is the public DNS of our EC2 instance. SSH keyfile is the pem file we have downloaded while creating the instance.

Review the settings and click on OK. You should be able to see the connection name.

Click on the connection name and enter the database user password. Once connected, you should be able to see the databases and tables.

In the query area, we can write any SQL queries and execute them.
In this tutorial, we have seen the difference and comparison of RDS instances and running MySQL server on EC2 instances. We have also seen how to install MySQL server on EC2 instance and connect to the database using the MySQL Workbench tool from our local system. Hope this helped you to learn.
How to Deploy an Application to Elastic Beanstalk?
As we know that Amazon Web Services (AWS) provides various services including IaaS, PaaS, SaaS, Elastic Beanstalk is one of the popular services offered by AWS. In this article, we will see what the Elastic Beanstalk is and what are its components. We will also see how we can deploy an application to it.
What is Elastic Beanstalk?
![]()
Elastic Beanstalk is a Platform as a Servier (PaaS) offering of Amazon Web Services (AWS). Unlike the IaaS offerings like EC2, Elastic Beanstalk allows you to use preconfigured servers for the application. With Elastic Beanstalk, deploying and scaling the applications become easy. Elastic Beanstalk provides support for popular programming languages like Go, Ruby, Python, Java, .Net, Node.js and Docker containers. When deploying the applications using Elastic Beanstalk, we don’t have to worry about the underlying infrastructure.
Benefits of Elastic Beanstalk
AWS offers various computing services like EC2, ECS and serverless platforms like AWS Lambda. Then why do we need to use Elastic Beanstalk? The following are some of the benefits of using Elastic Beanstalk to deploy your applications:
- Easy to Begin and Faster Deployments
Elastic Beanstalk makes the application deployment easier. Deployment can be done using AWS management console or visual studio. Elastic Beanstalk manages the capacity provisioning, availability, autoscaling, and application monitoring.
- Simplified Operations
There is no need to focus on server configuration, firewalls, networks, etc. Most of the regular operations are taken care of by AWS. As an application developer, you have more time to focus on developing features and review code.
- Resource Control
Even though the Elastic Beanstalk is a PaaS offering, it still offers freedom to select the AWS resources like EC2 instance type, and also allows full control over the AWS resources.
- Scaling
Elastic Beanstalk provides an adjustable auto scaling setting so our application can handle the workloads in peak times without any issue.
Components of Elastic Beanstalk
We have seen what AWS Elastic Beanstalk is and some of its benefits. Before deploying an application to the Elastic Beanstalk, let us see some of the key concepts or components of it.
Application
An Elastic Beanstalk application is similar to a folder. The application is named the same as the project home directory. It’s a collection of components like environments, versions and environment configuration.
Application Version
An application version is a labeled iteration of deployable code of the web application.
Environment
We can configure different environments like development, testing, production. Each environment will run a single version of the application.
Environment Tier
Elastic Beanstalk offers two environment tiers.
- Web Server Environment : Applications installed on this environment handle all the HTTP requests received from the users.
- Worker Environment: This handles the background process and assists the web server environment.
Architecture of Elastic Beanstalk
Let us get an idea of the architecture of Elastic Beanstalk.
Elastic Load Balancer : When the application receives a large amount of requests from the users, Route53 forwards that request to the ELB and the ELB distributes these requests to EC2 instances placed in an auto scaling group.
Auto Scaling Group: Auto scaling group automatically adds additional instances to accommodate the load when it’s increased and removes the instance when the load decreases.
Host Manager: Host manager is a software component that will run on the EC2 instances and used to generate logs, instance level events, etc.
Security Groups: Security group acts as a firewall for the instances. The default security group for Elastic Beanstalk allows HTTP port 80.
Deploying Nodejs application on Elastic Beanstalk
In this section, we will discuss the steps involved in deploying an application to the Elastic Beanstalk. I will deploy the sample Nodejs application.
Login to AWS console and navigate to the Elastic Beanstalk.

Click on the create application button, on the next screen you will get an option to enter name and tags.

We need to provide the application information such as the platform. Select the Node.js as a platform.

For this tutorial, I am not going to upload my code. Instead I will select the sample application and continue. If you have your nodejs application ready, select the option upload and add your application code. Once done with the configuration, click on create application. It may take few minutes to start an environment.

After a few minutes, you can see that the application was created.

Click on the application name and view more details like URL, health status, etc.

Open the application URL to verify if the application is accessible.

Deploy an application using AWS CLI
We have deployed our application from the AWS management console. Let us now see how this can be achieved by using AWS CLI.
I assume that you already have AWS CLI installed on your local machine and the aws credentials are stored.
The next step is to install EB CLI. To do that run the following command. It may take a couple of minutes to install.
pip install awsebcli –upgrade –user

Once we have the EB CLI installed, run the following command.
eb init

You will be prompted to enter a default region, which application to use and if you want to use Codecommit.
I will be creating a new application for this demo.

Give a name to your application and you’ll be prompted to select a platform and a version.

Optionally, you can set up SSH to the instance by selecting or creating a keypair.
To create an environment run the command eb create <env-name> and run the command
eb deploy.
Once the application is deployed, the next step is to set up a custom domain name and SSL certificate. Route53 can be used to map your domain with the URL generated by AWS. SSL certificates can be obtained for instance by visiting a certificate manager.
Hope this tutorial helped you to learn what Elastic Beanstalk is and how it works. We have also seen how to create and deploy applications to Elastic Beanstalk, hope you were able to follow along. Feel free to post your comments if you face any issues while deploying your application.
How to create EC2 (EBS) automated backup?
Backing up the data is critical for any company regardless of where you store your data. Bacup and restore is the must have disaster recovery method. Assuming that you run your servers on AWS cloud, in this tutorial we will walk you through how to backup EC2 instances using AWS cloud native services. We will be automating the EC2 instance backups.
How to backup EC2 instances?
When we talk about backing up EC2 instances, we are actually talking about backing up Elastic Block Store (EBS) volumes by creating a snapshot. EBS snapshots are stored in amazon S3.
Different ways to backup EC2 instances
There are different services and methods available to automate EC2 instance backup. We will see one by one in this demonstration.
- Using AWS Backup
- Using Data Lifecycle Manager
- Using CloudWatch Events
Automate EBS Snapshot Backup using AWS Backup Service
AWS Backup is a fully managed AWS service which is used to automate AWS backups. It can be used to backup EBS volumes and RDS instances, DynamoDB and EFS file systems. To follow along, create an EBS volume which needs to be backed up.
Login to AWS management console and navigate to the AWS Backup service.

Click on “Create Backup Plan”.

In the create backup plan page, we have an option to create a plan from scratch, use a template and define a plan using JSON.

If you select, start with the template option, you will see the available templates in the dropdown such as daily 365 day retention.

For this tutorial, we are going to create a new plan. So, select the option “ Build a new plan” and give a name as you wish.
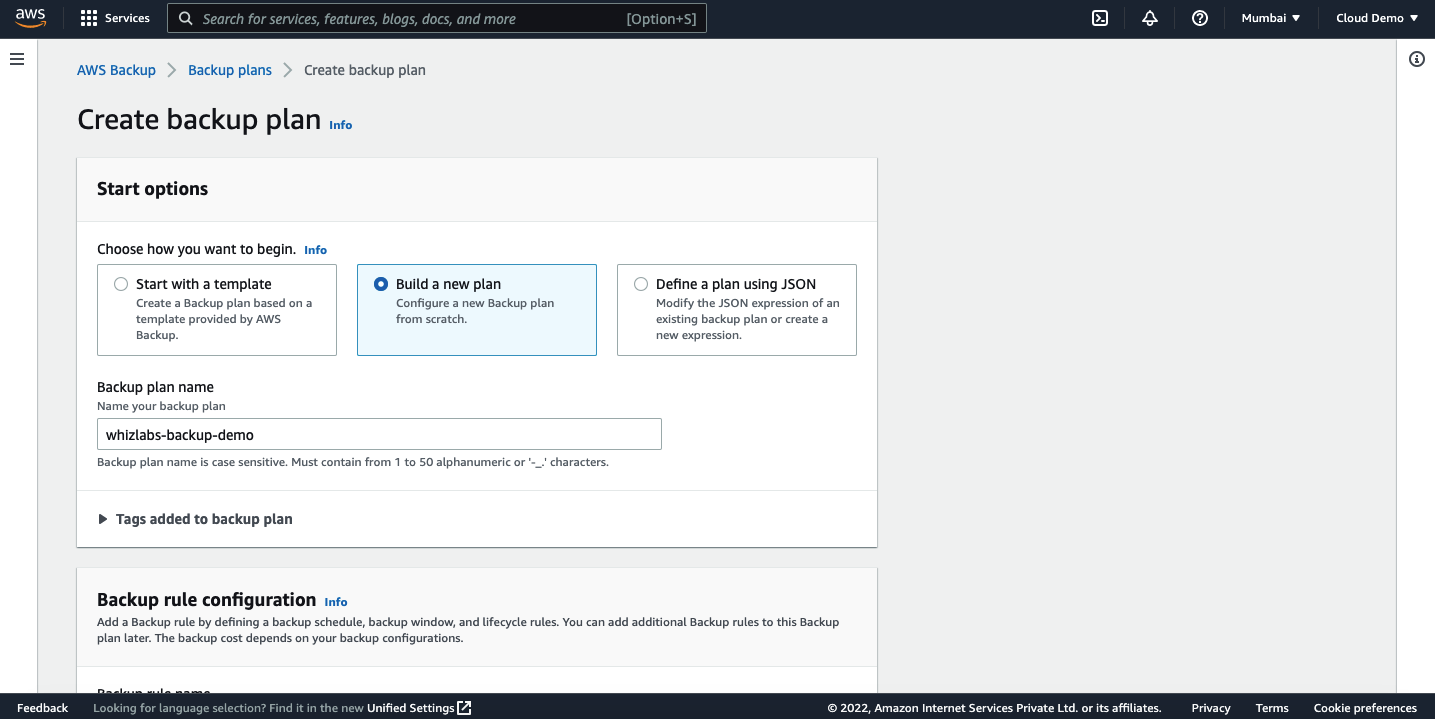
Now, we need to configure the backup rule. Give a name to the rule. You can either create a new rule or select the default one. I am going to leave the default one for this demo.
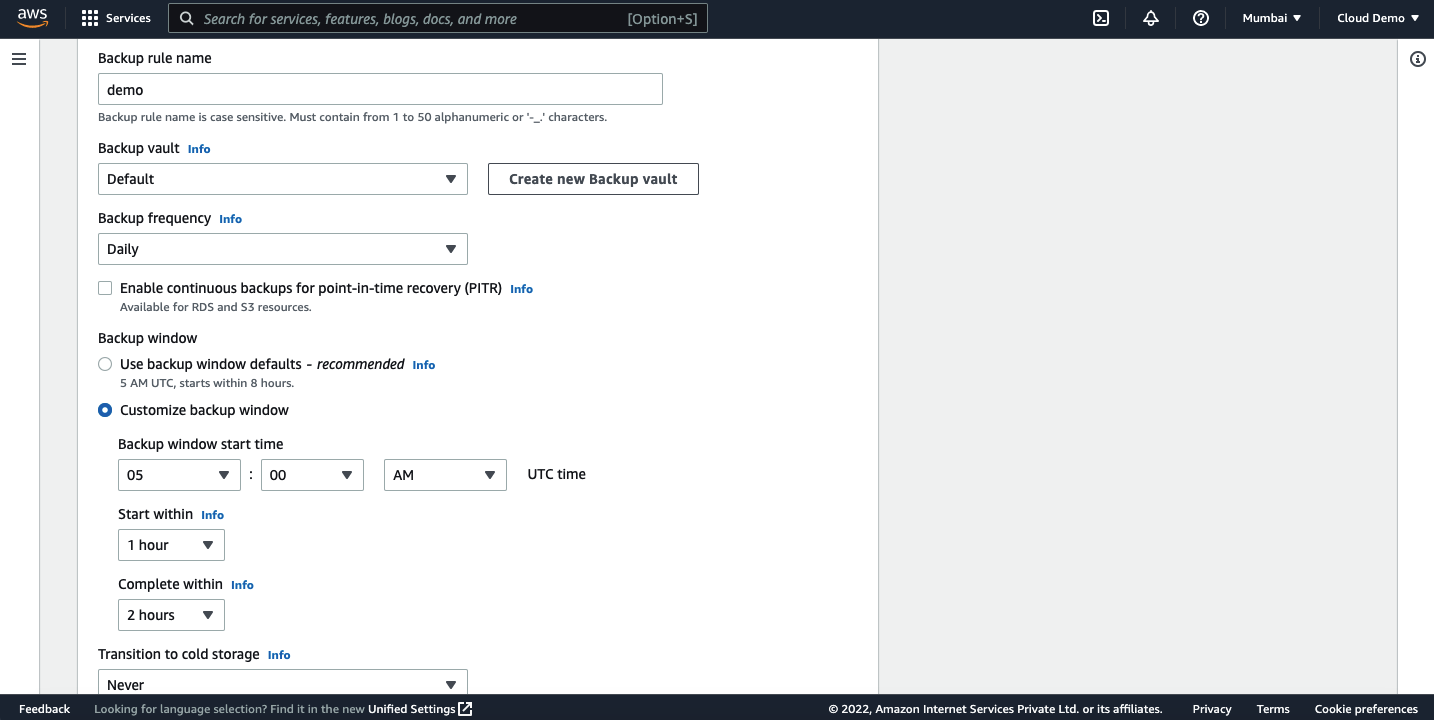
Select the retention period and destination region.

Review the settings and click on create plan.
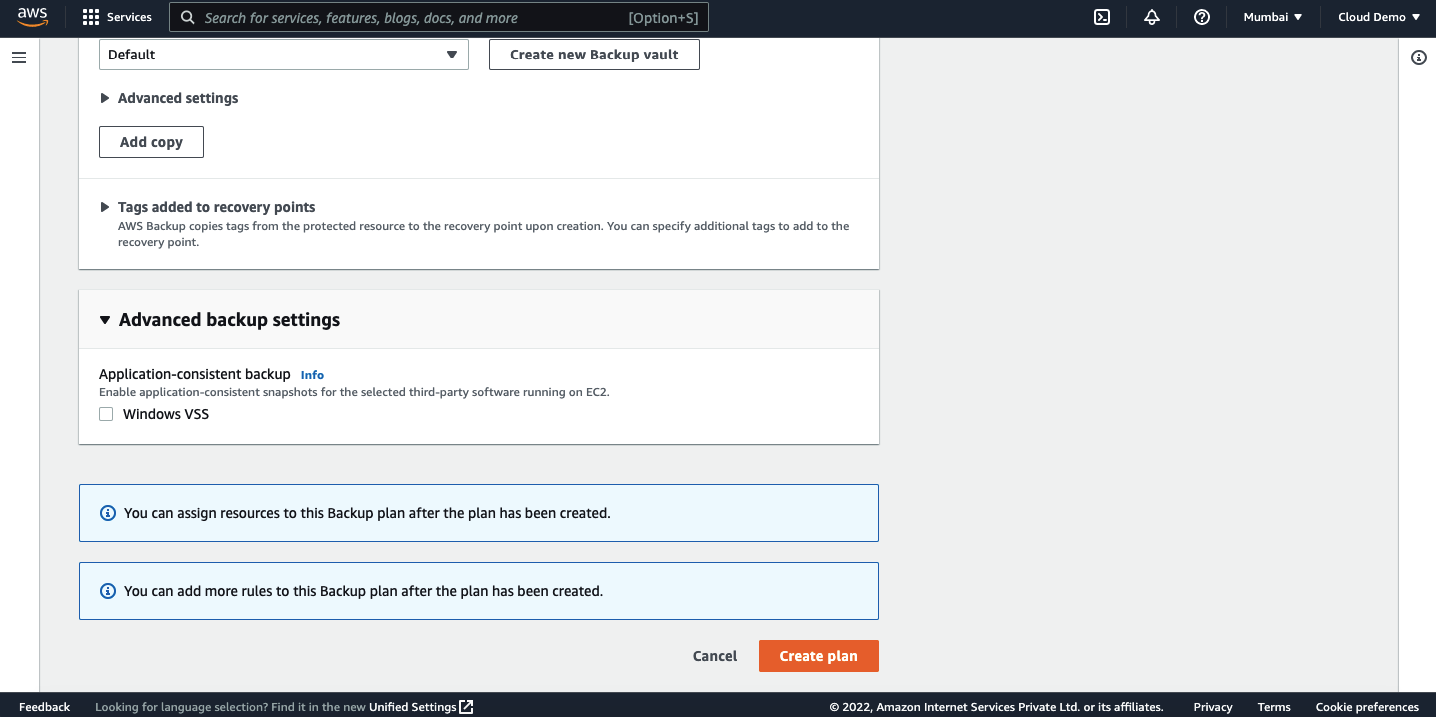
Once the backup plan is created, we need to assign the resources to the plan.
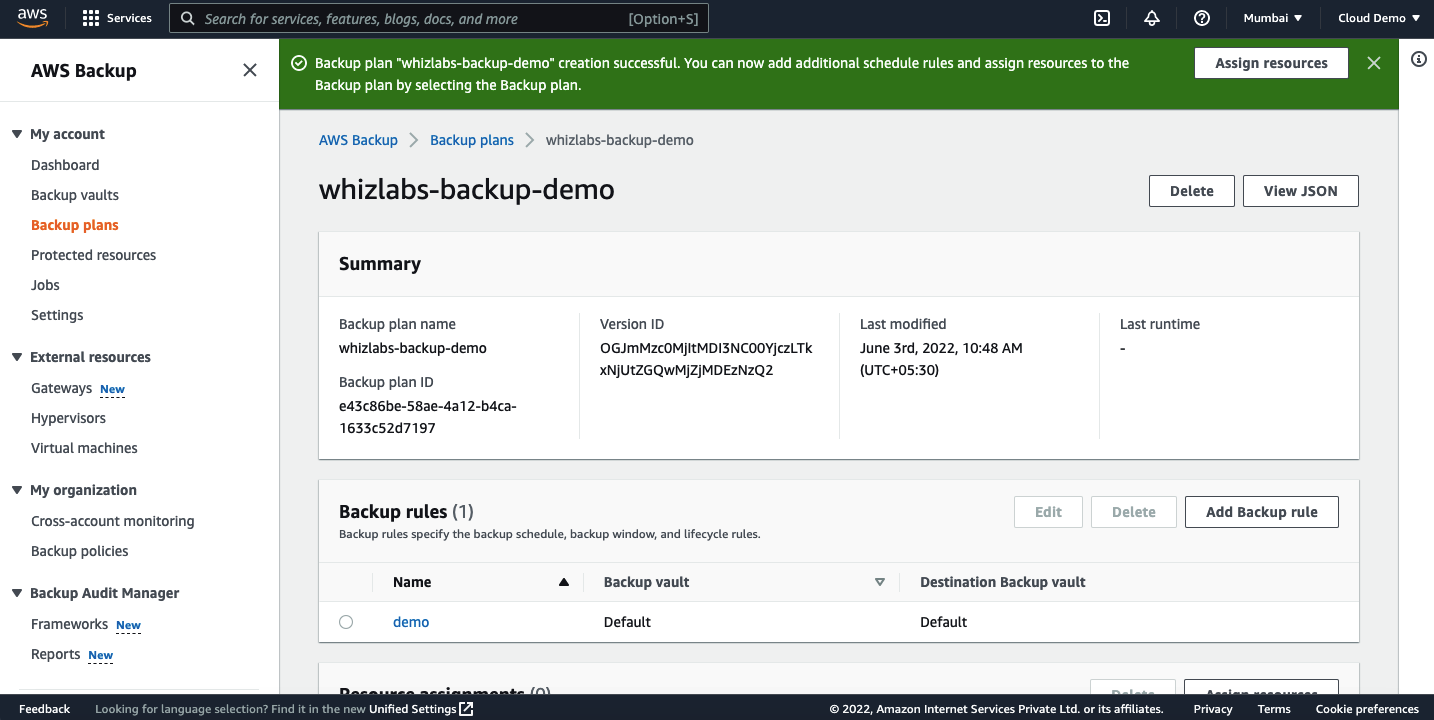
Click on the Assign Resources.

We can add the resources by selecting the resource type and resource ID or we can also use tags to select the resources.
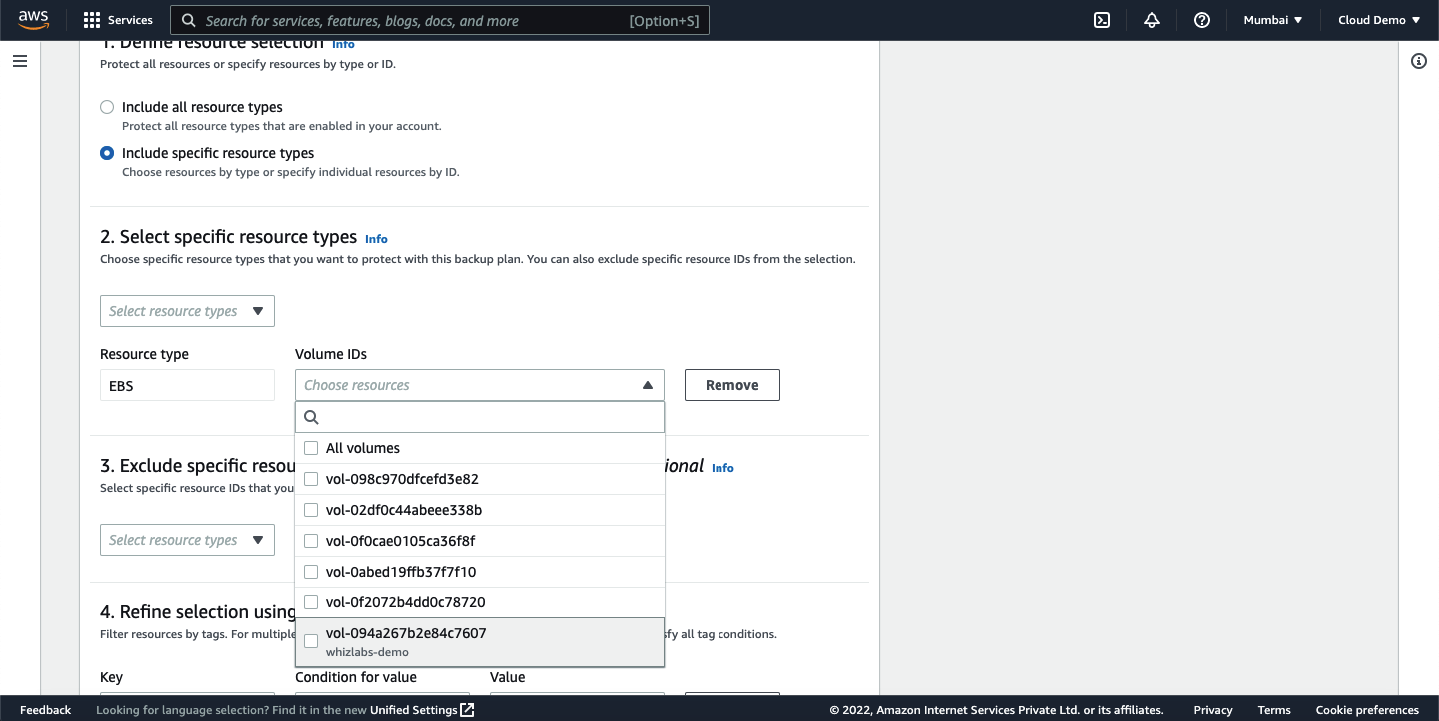
You would be able to see the assigned resource on the dashboard.
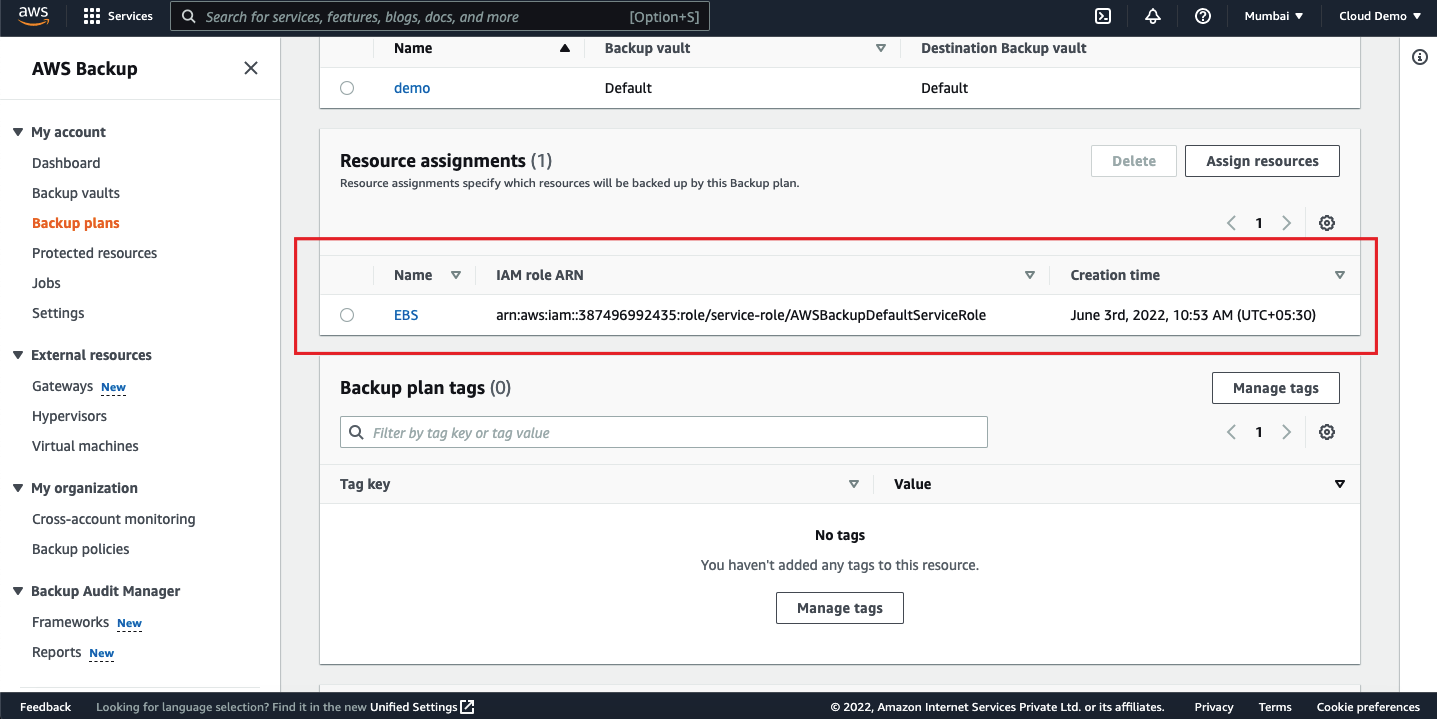
We have created the plan and assigned the resource to it, that means our backup is ready now.
Automate Backup Using Data Lifecycle Manager
Amazon Data Lifecycle Manager is a service offered by AWS to manage AWS resource lifecycle which also supports EBS volumes and snapshots. We will see the steps involved to automate EBS backup automation using DLM.
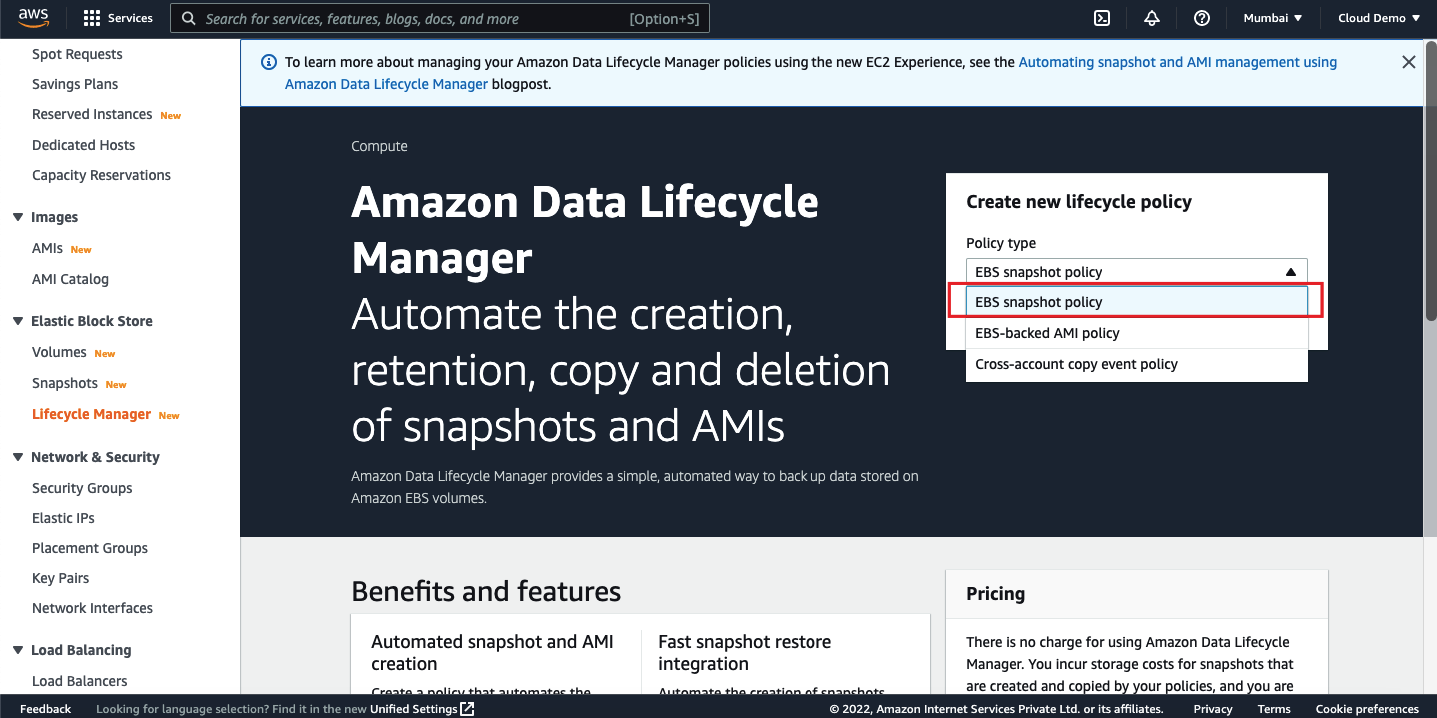
Login to AWS management console and navigate to the EC2 dashboard and click on the “Lifecycle Manager” under Elastic Block Store.
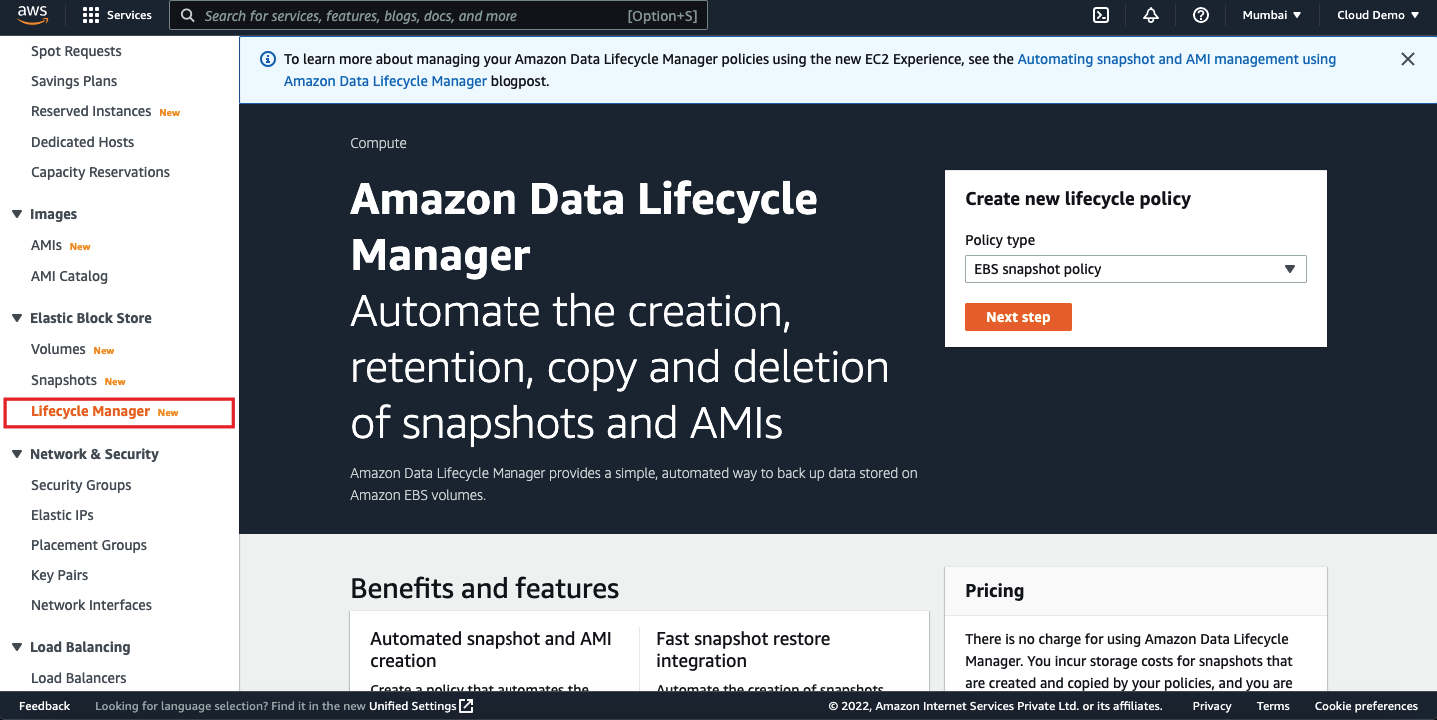
We can start creating new lifecycle a policy. I have selected the type as EBS snapshot policy.
The DLM lifecycle policies work by looking at the tags. Tagging the resources is mandatory for the lifecycle policy to work.
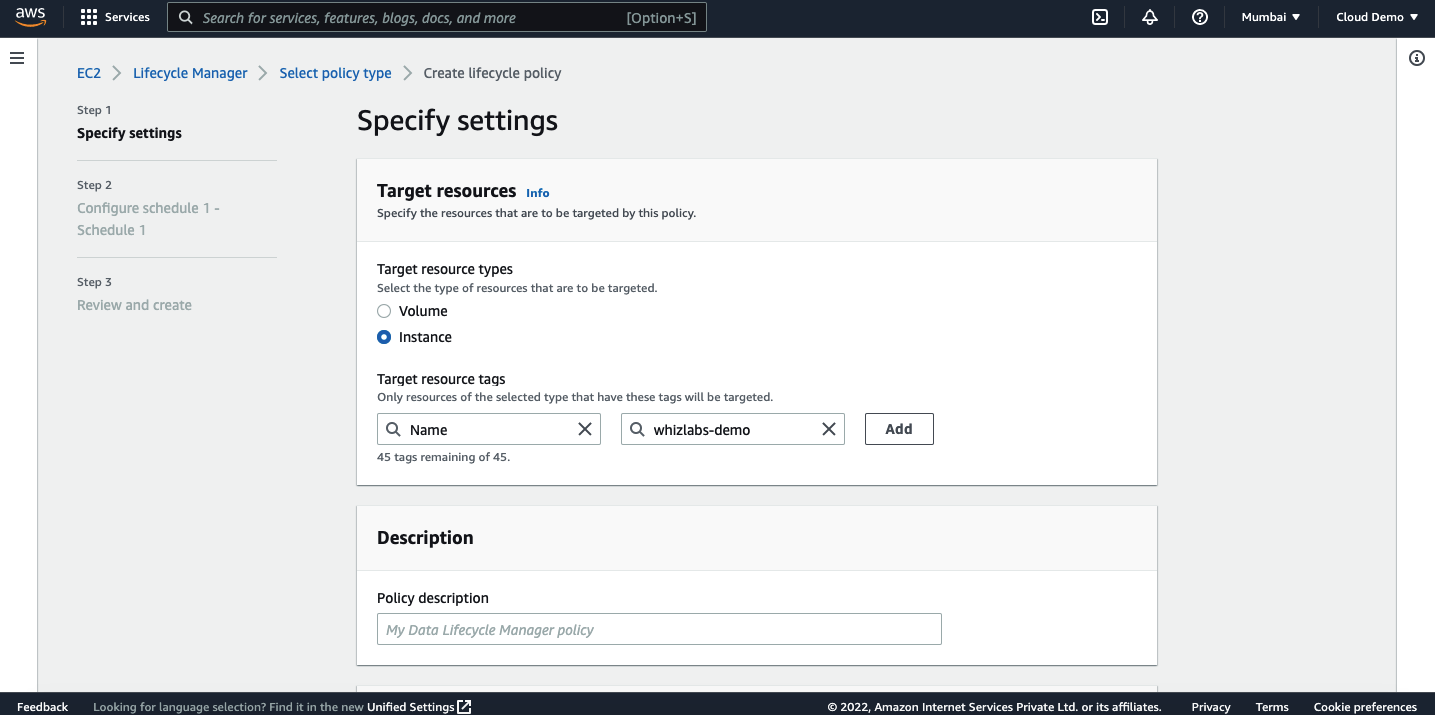
Click on next. On the next page, you will have an option to enter the schedule.
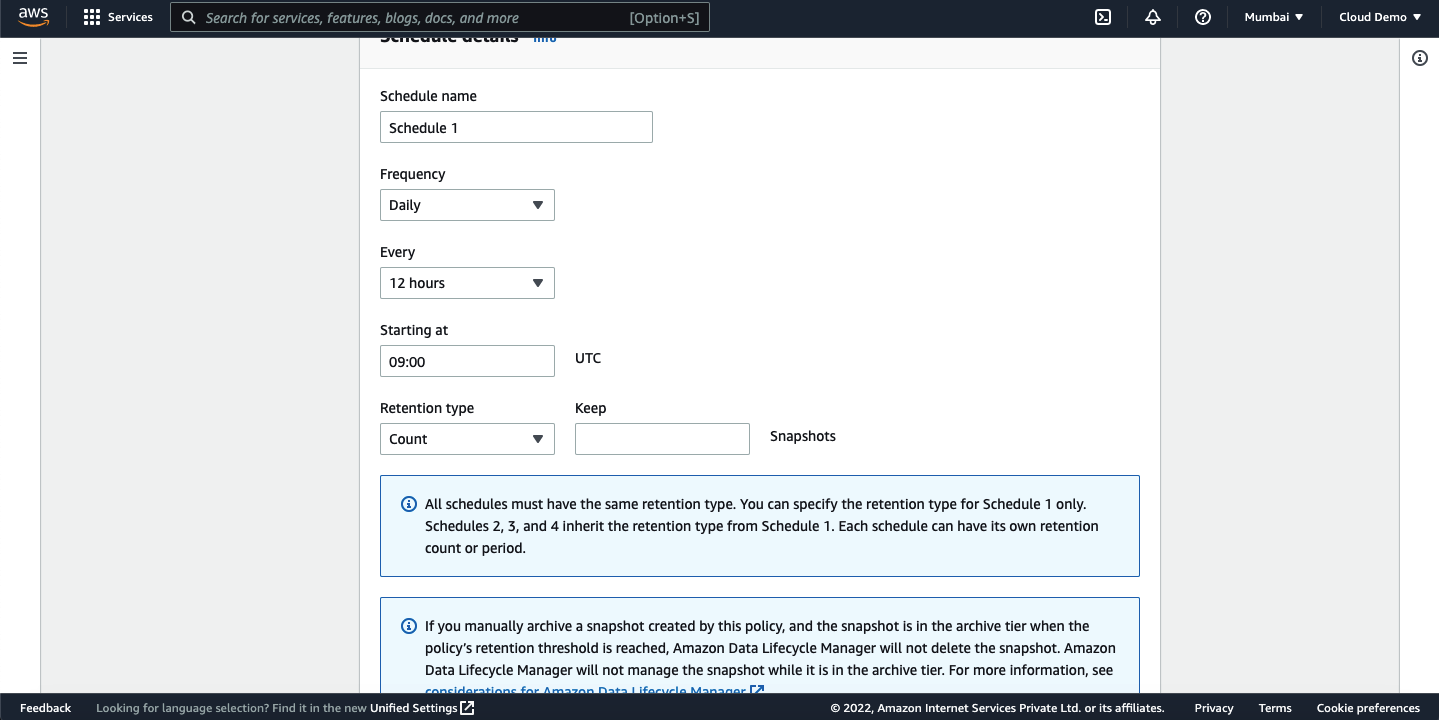
Review the policy settings and click on create policy.
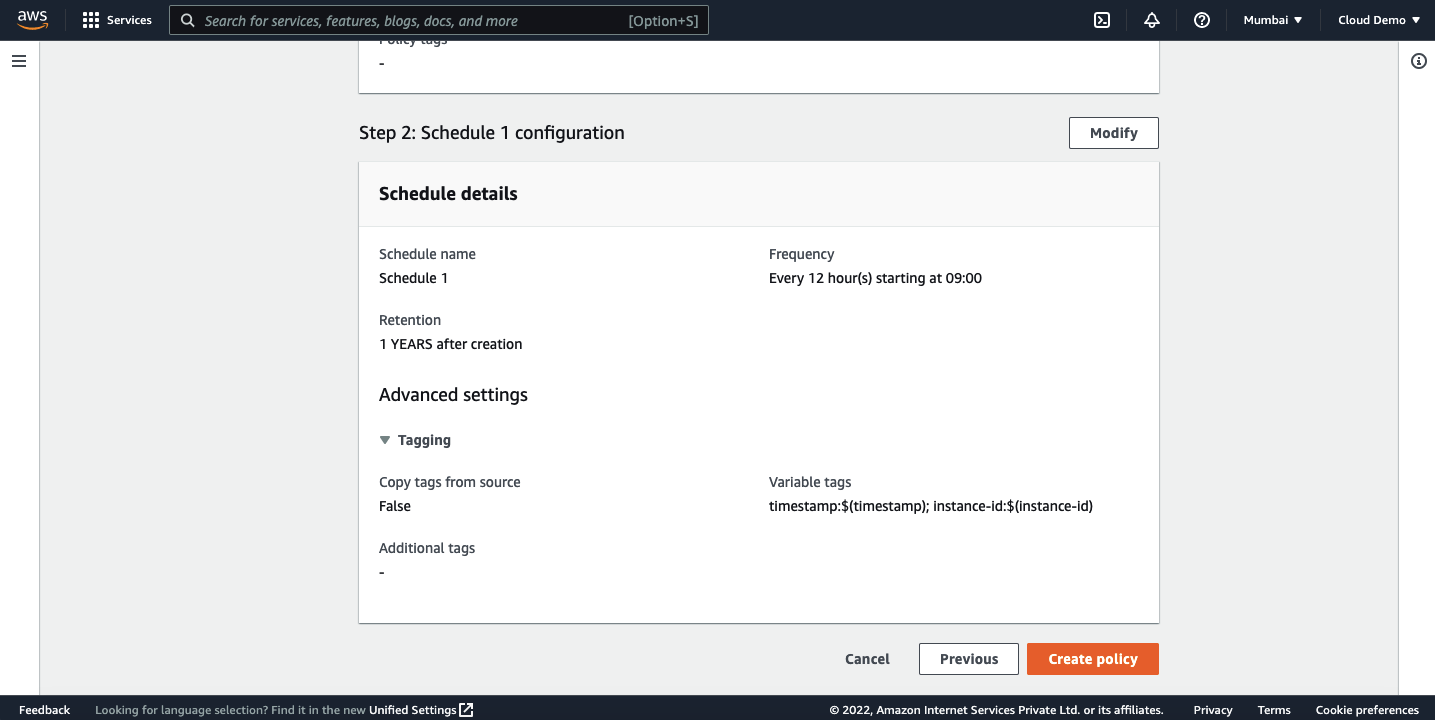
Once created, you should be able to view the policy on the dashboard.

Automate EBS backup automation using CloudWatch Events
Another method to automate taking EBS snapshots is using the AWS CloudWatch Events. As you know that the AWS CloudWatch is a monitoring and management service offered by AWS. We will be using the CloudWatch rule to implement the EBS snapshots creation.
Login to AWS management console and navigate to the CloudWatch dashboard.
Click on Events and select the rules.
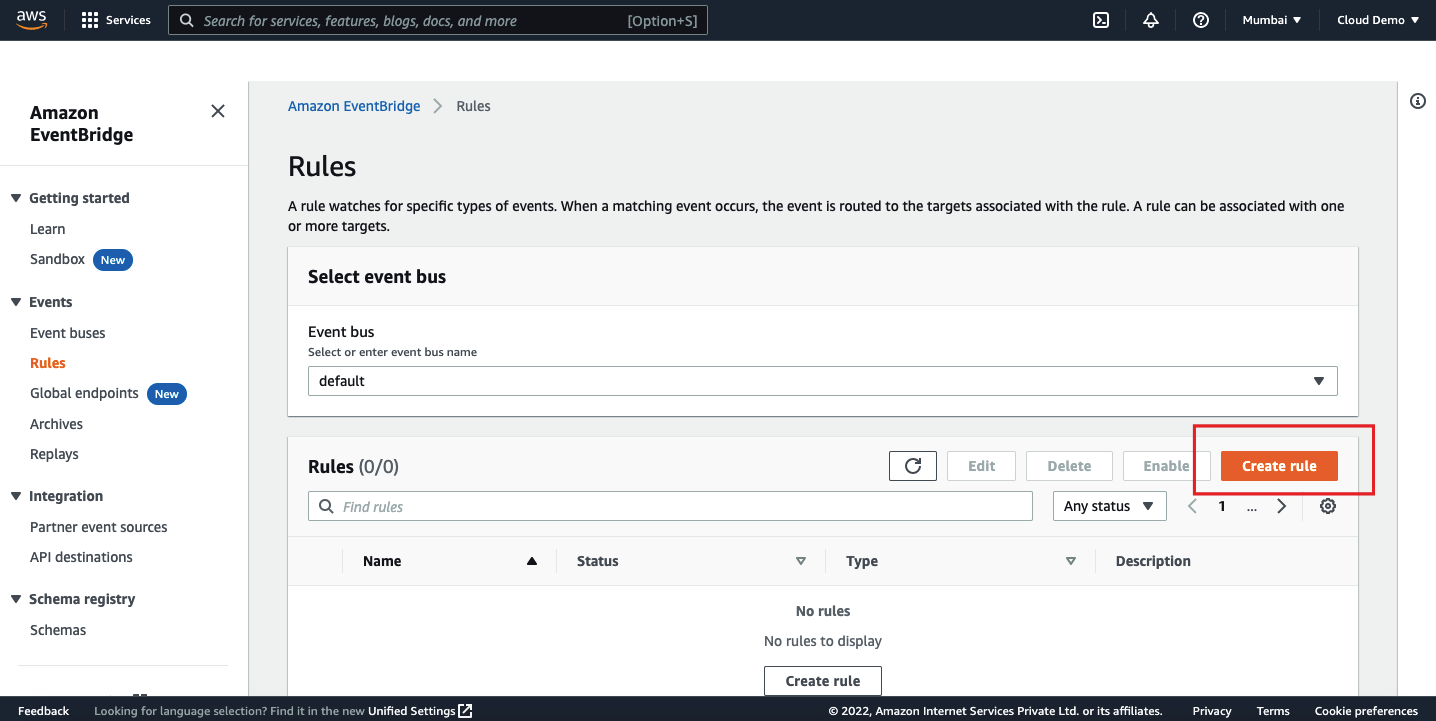
We will have two options here. We can either set the rule triggered for every N minutes or we can use the cron expression.
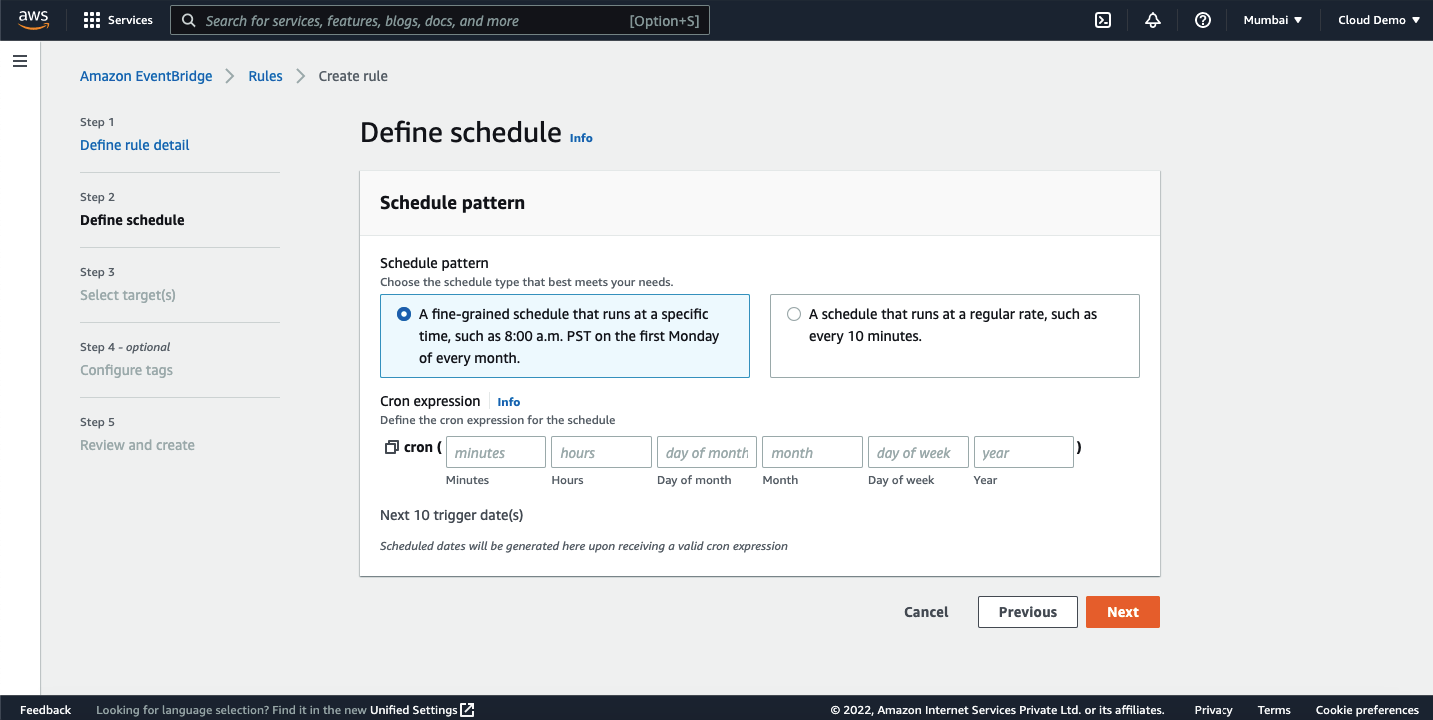
On the next step, we need to select the target. Our objective for this demo is to create EBS snapshots so select the target as EBS create snapshots.
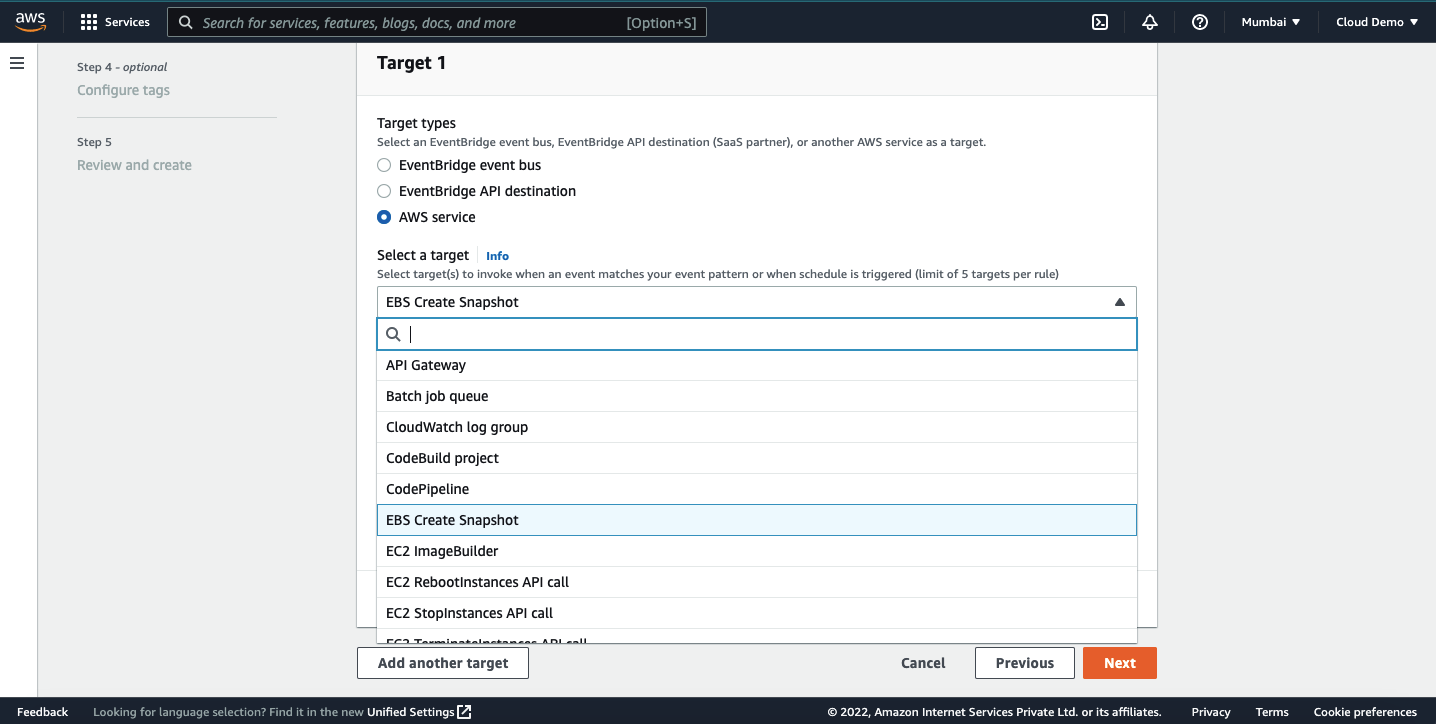
Select the volume ID which we need to take a backup. We are ready to take the snapshots.
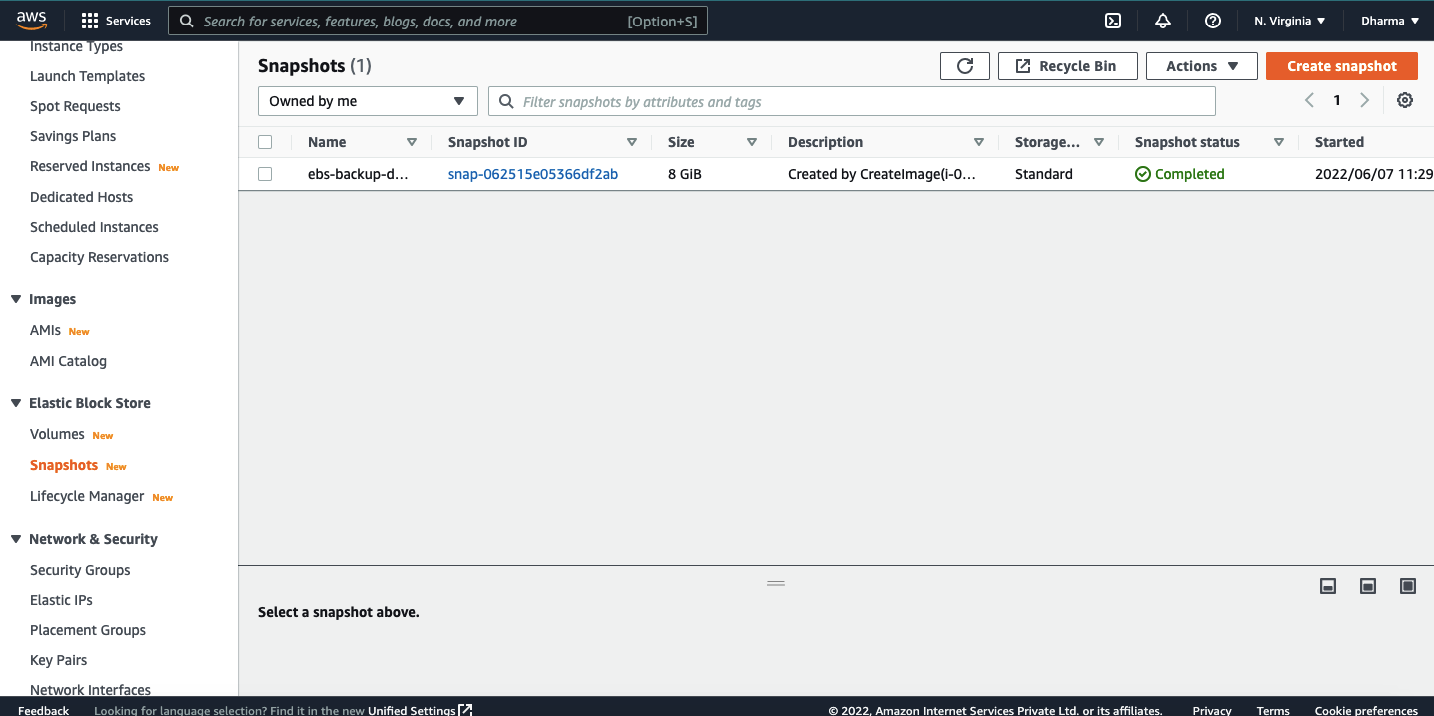
How to restore EC2 from the snapshots?
We have seen how to take snapshots of the EBS volumes. Now, let’s see how we can restore the EC2 instances from the snapshots.
We have the snapshot taken in the previous steps.
Now, we need to create an image from the snapshot. For that, select the snapshot, under actions select the option create image from snapshot.
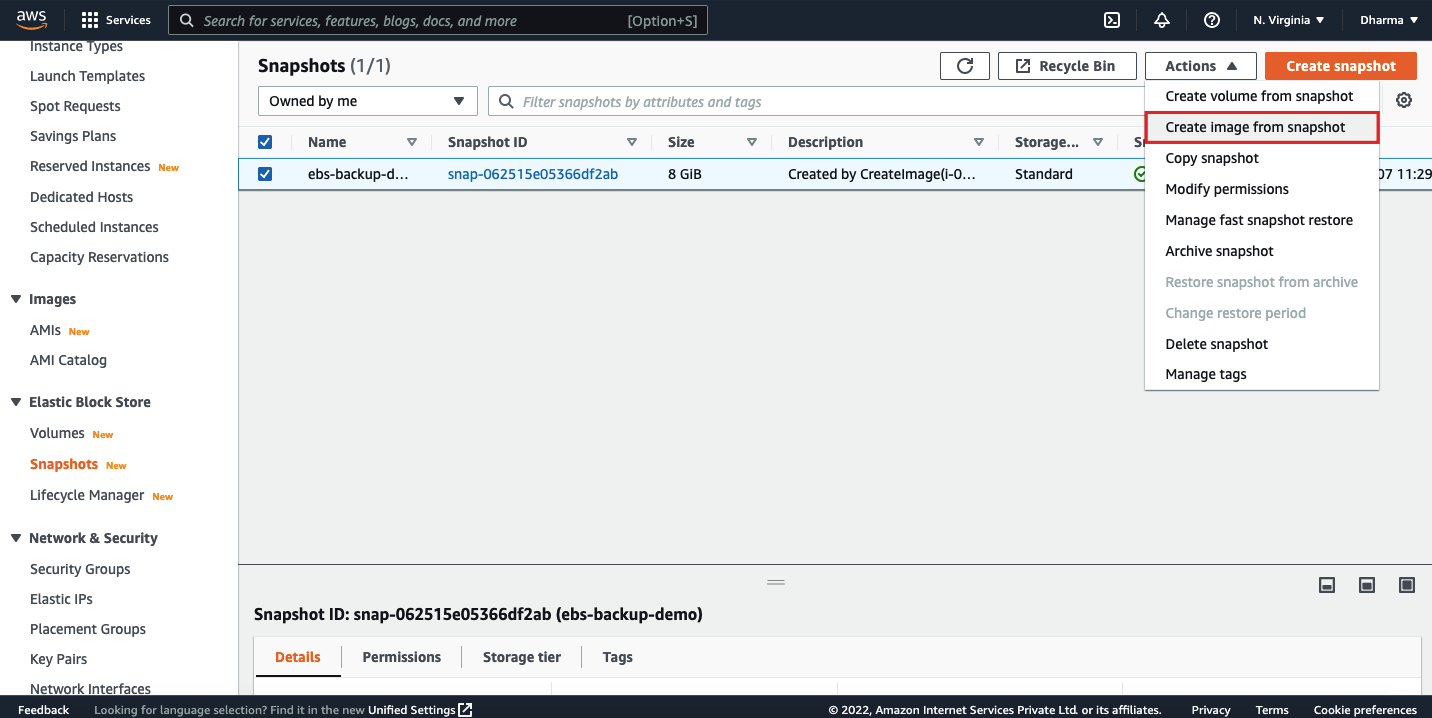
It will prompt you to enter name, description and select the architecture, root device name and virtualization type.
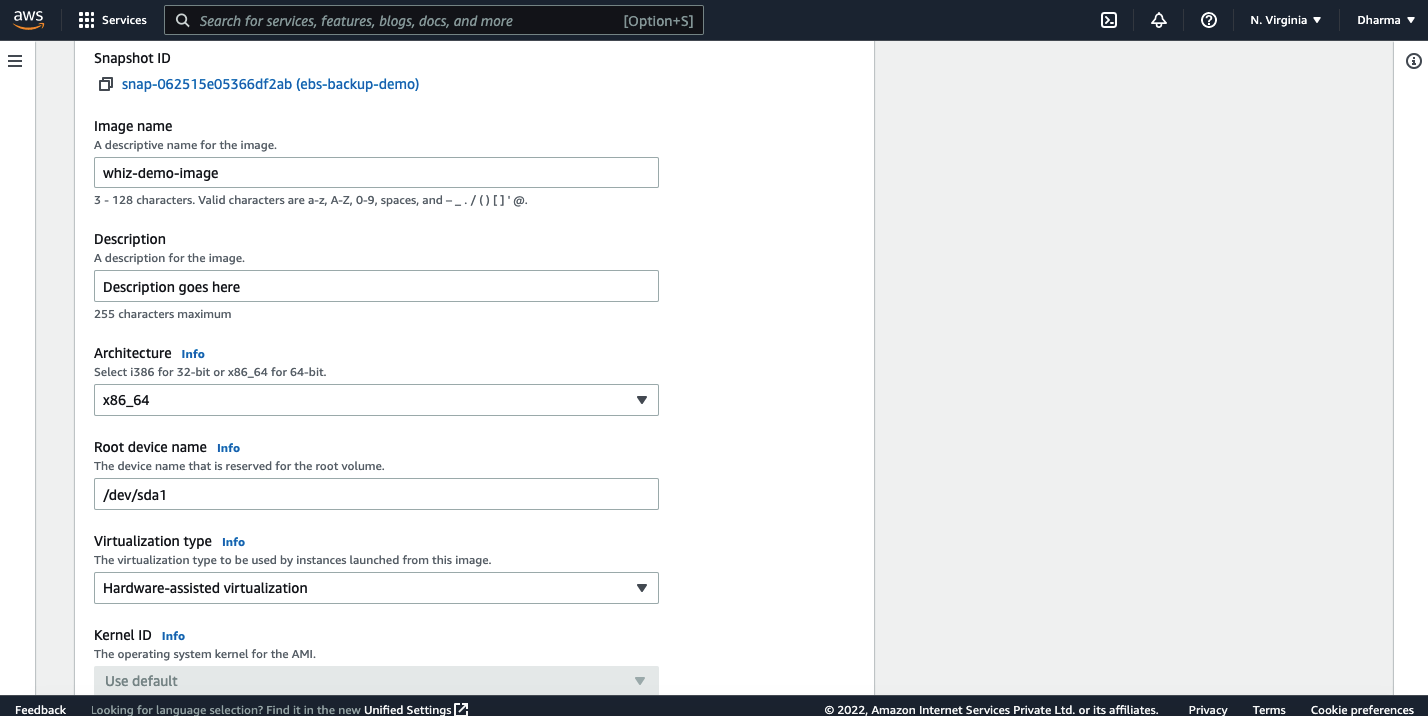
Review the configuration and click on create image. An image will be created in few seconds and will be available in the AMI dashboard.
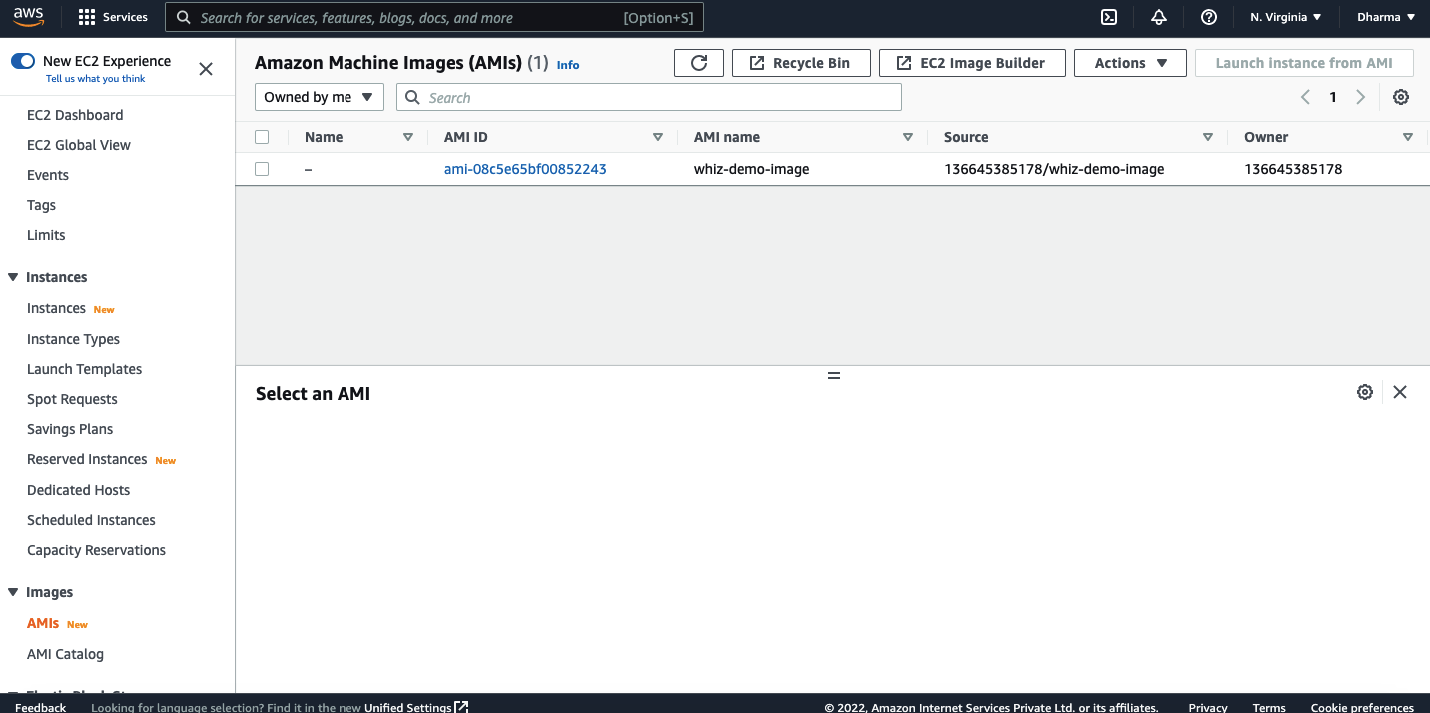
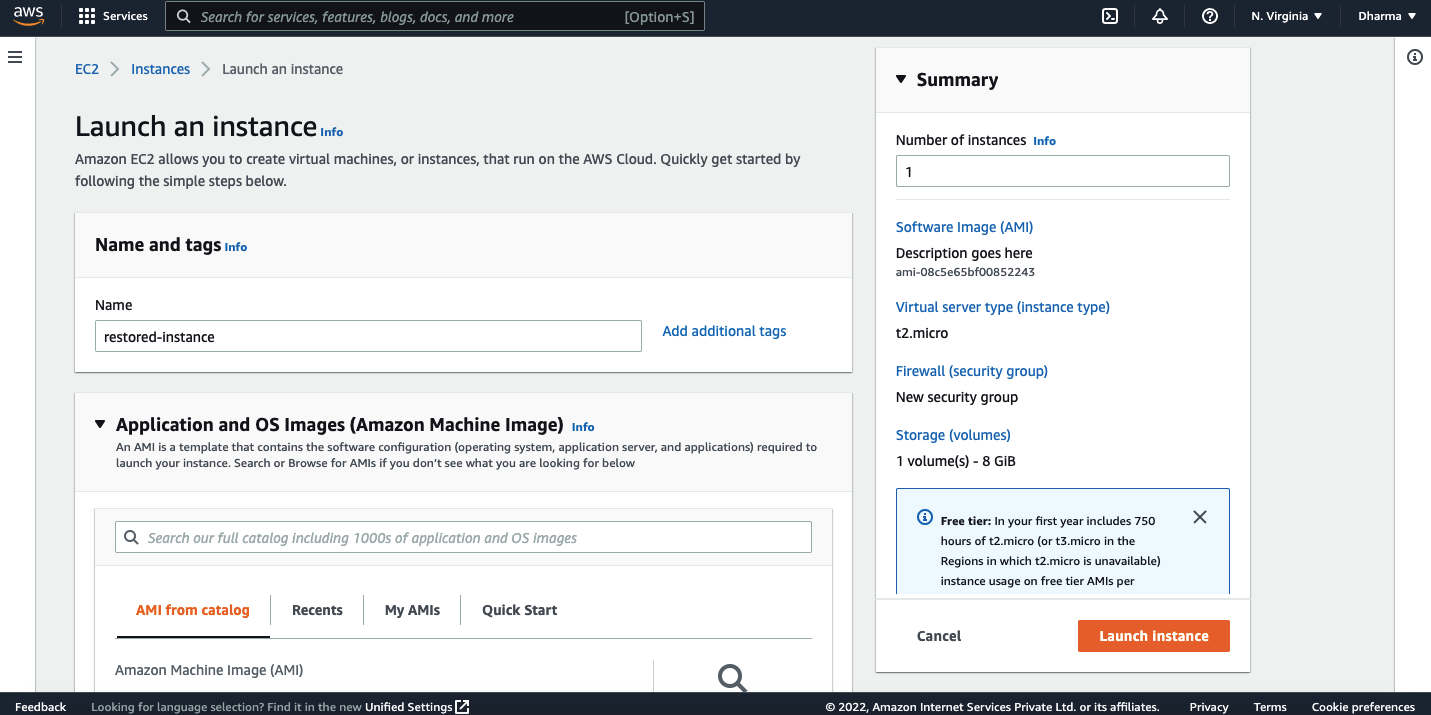
To restore the instance, select the AMI and click launch instance from AMI.

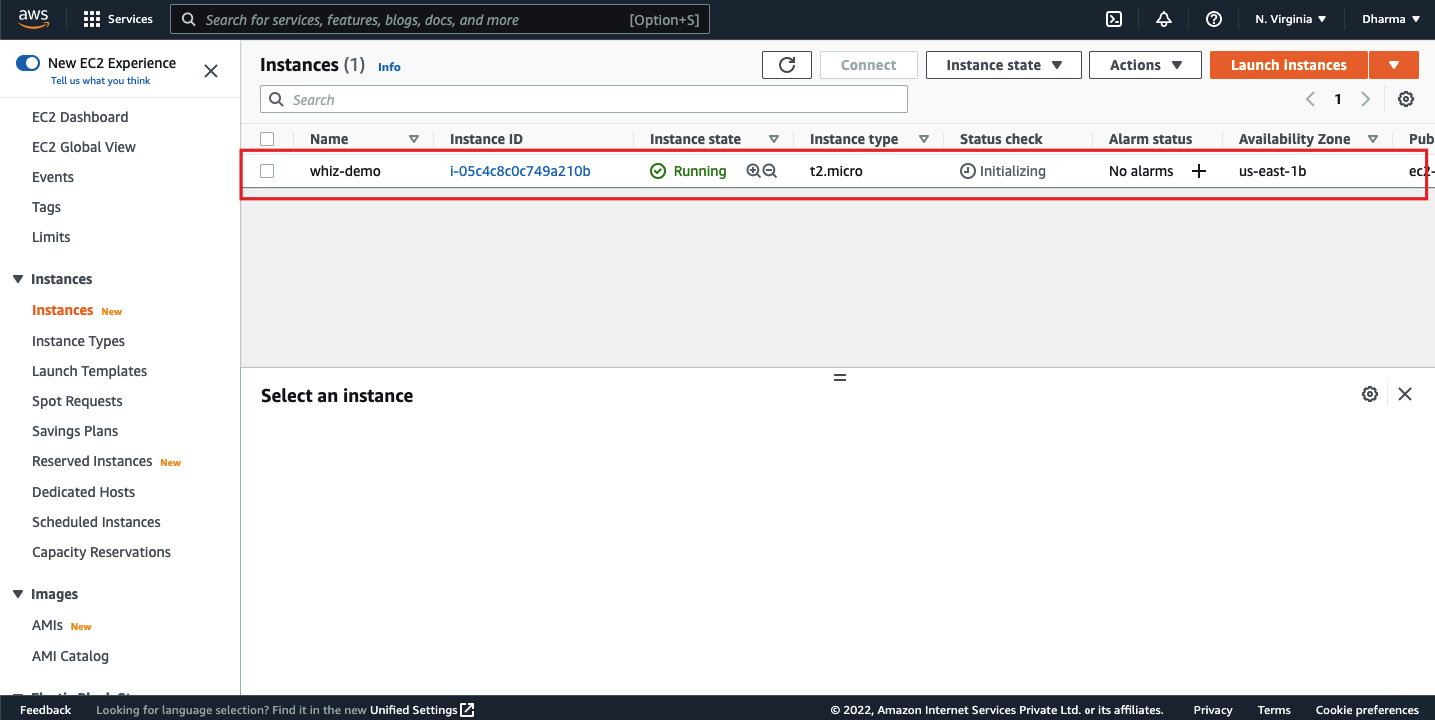
You will be redirected to the EC2 instance creation page. Repeat the steps and the instance will be restored.
In this tutorial, we have learnt how we can automate the EBS snapshots using different methods and we have used AWS Data Lifecycle Manager, AWS Backup and CloudWatch Events. Hope this was helpful.
How to resize EBS Volumes and extend the filesystem?
As we know that the Cloud platforms are known for elasticity. This applies to computing power as well as storage capacity.When it comes to AWS EC2 instances, Elastic Block Store (EBS) is the mostly used storage type and backbone of EC2 instances. EBS offers high availability as well as high durability. AWS provides an easy way to increase the EBS volumes without even restarting the instance.
In this tutorial, we will see how to extend the EBS volume that is attached to an EC2 instance without having a downtime.
Please note that it is always recommended to take a snapshot of the volume before making any changes to it. We will be able to resize the volume without this step but in order to avoid any kind of data loss, take a snapshot of the volume and continue with the following steps.
Resize EBS Volume on AWS console
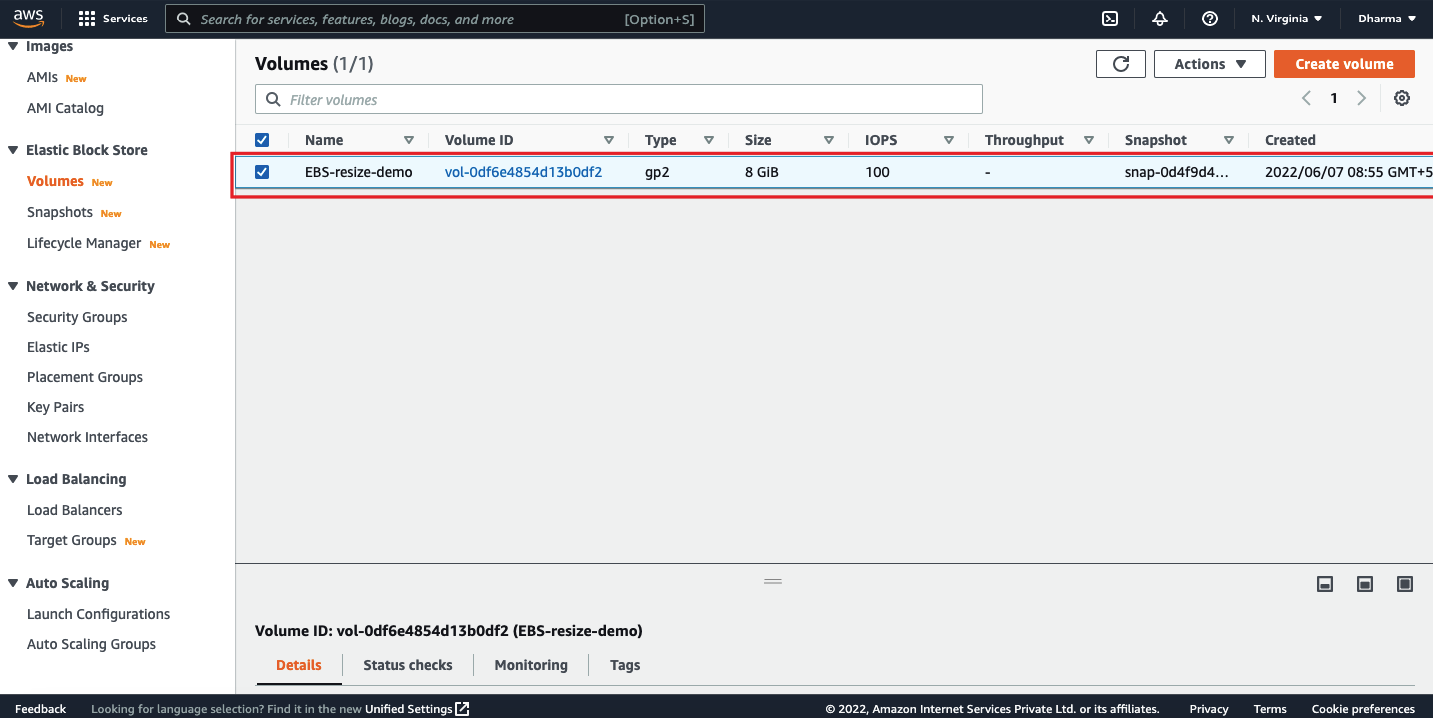
For this tutorial, let’s assume that the application is running on an EC2 instance and it has a small volume size of 8GB attached to it. This is a linux instance which is running on Ubuntu OS. Login to the AWS management console and navigate to the EC2 dashboard.
We have an instance named as whiz-demo and an EBS volume named as EBS-resize-demo.
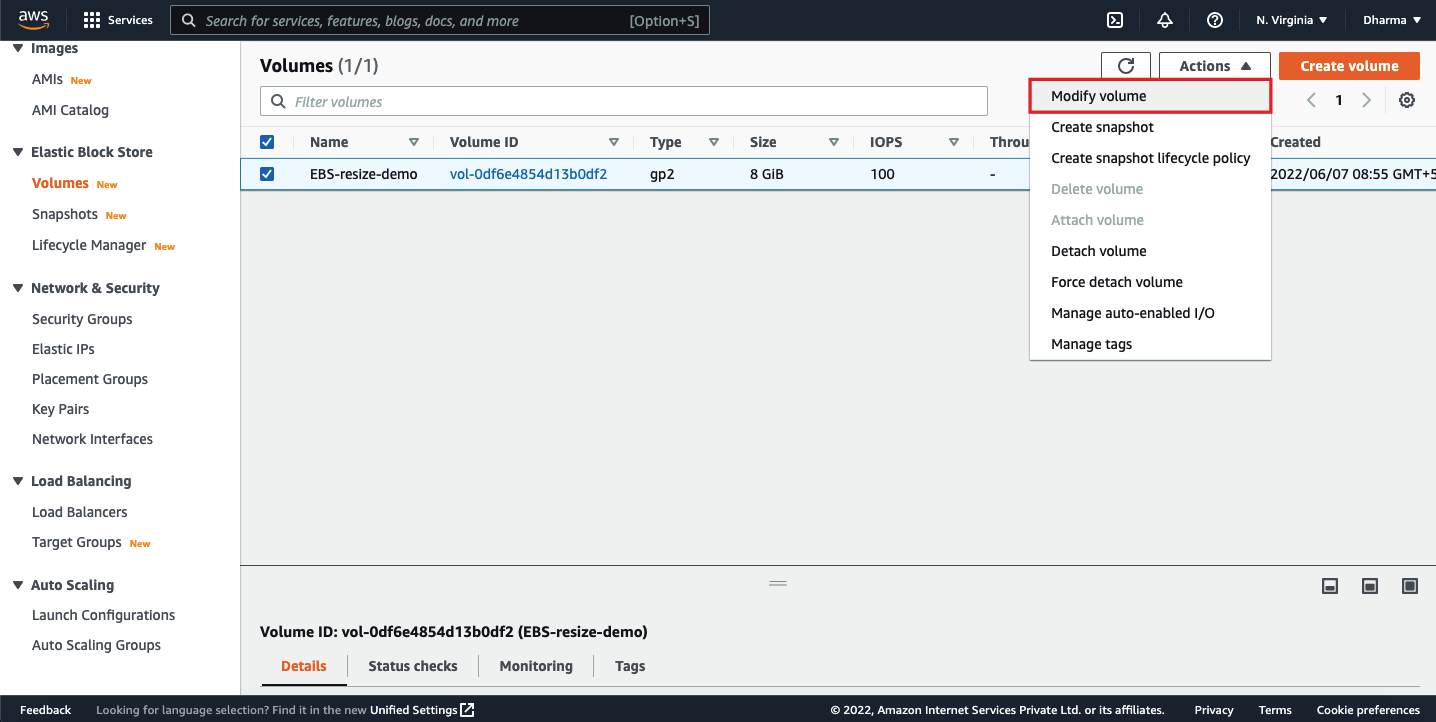
Select the volume and click on “Modify Volume” under Actions.
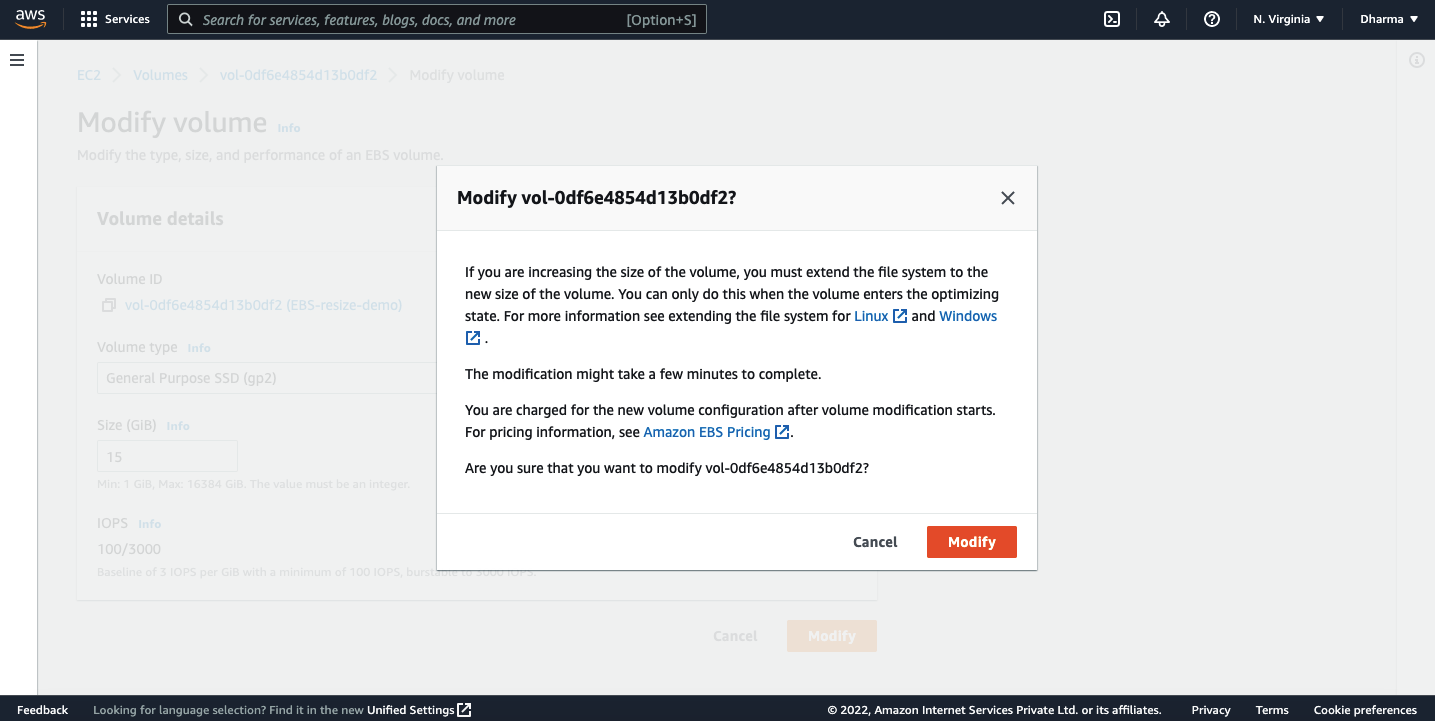
On the next page, you will have an option to change the volume size and volume type. The type I have created for this demo is general purpose SSG (gp2), if needed we can change the type as well. For this demo, I am keeping it as gp2 and just changing the volume size.

You will get a confirmation popup to modify the changes.
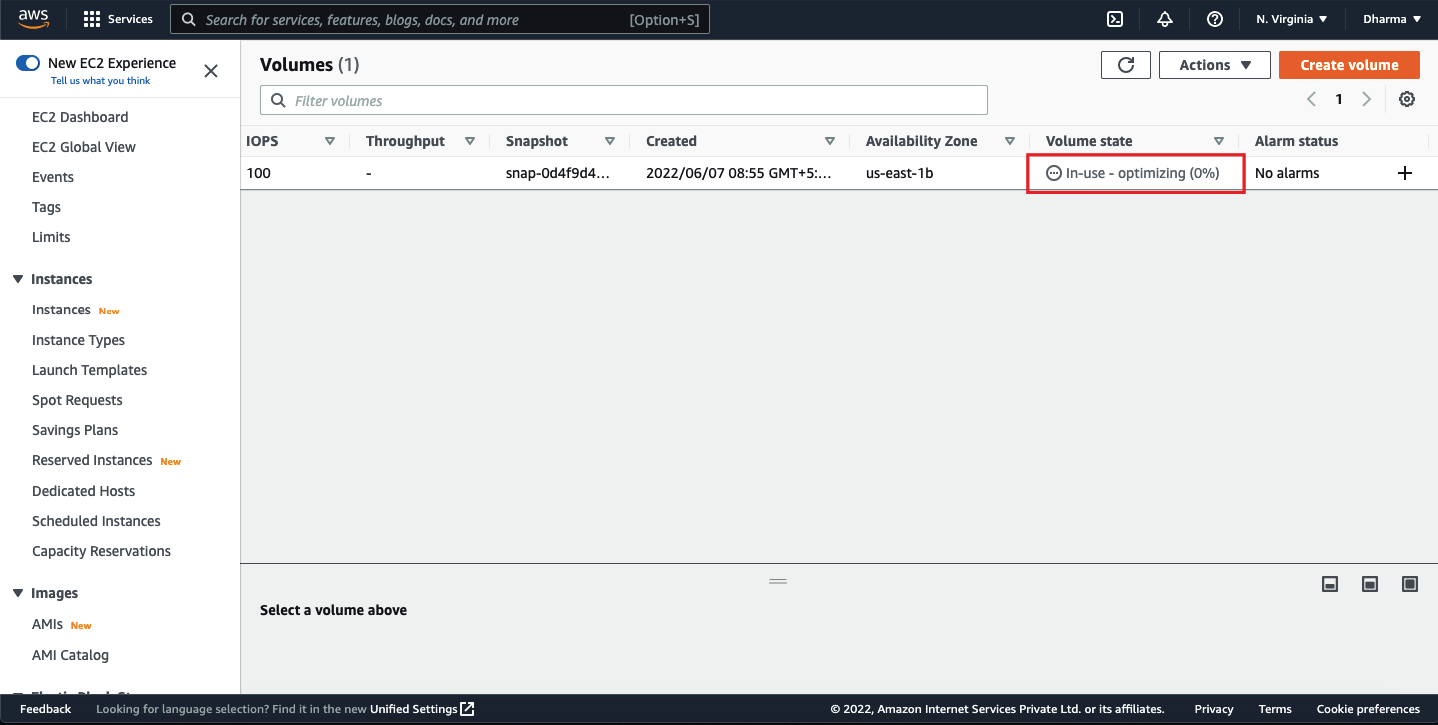
You can now see that the volume size has been changed from 8GB to 15 GB.
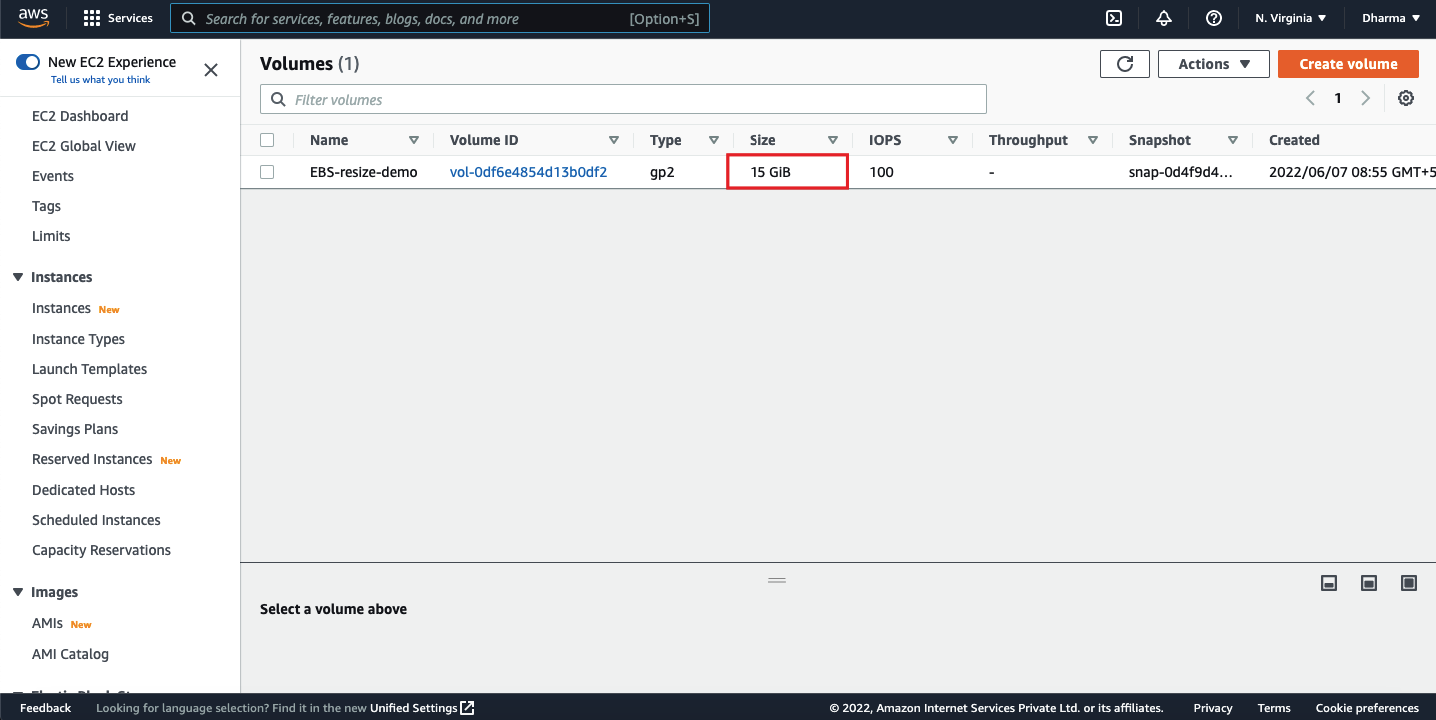
However, the volume state will show as in-use-optimizing. The volume will start optimizing and it will take a few minutes to be completed depending on the size.
Resize EBS Volume on EC2 Linux instance
Modifying the volume size on AWS console will not directly change the volume size in the instance. Once the volume size has changed and the state becomes in-use, we need to extend the file system on the EC2 instance.
Lets extend the volume on the EC2 Linux instance. Connect to the EC2 instance via SSH with root privileges.
Once logged in, check the partition size by running the command “lsblk”.
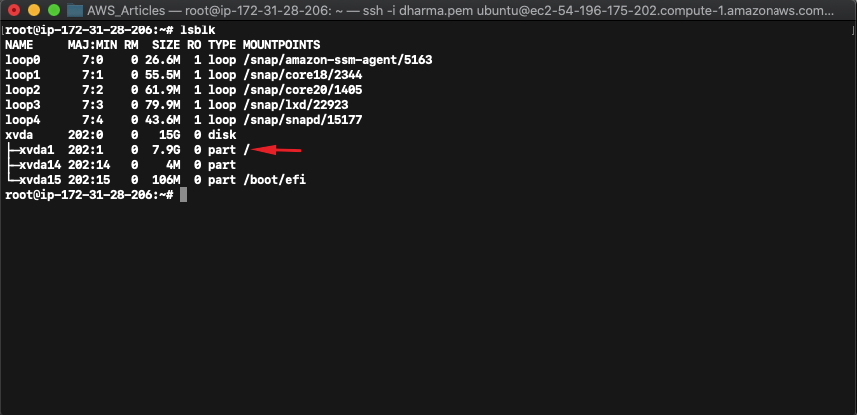
The above screenshot shows that the volume size has been extended to 15GB but the partition xvda1 has the old value. To allocate the newly extended size, we need to run the growpart command.
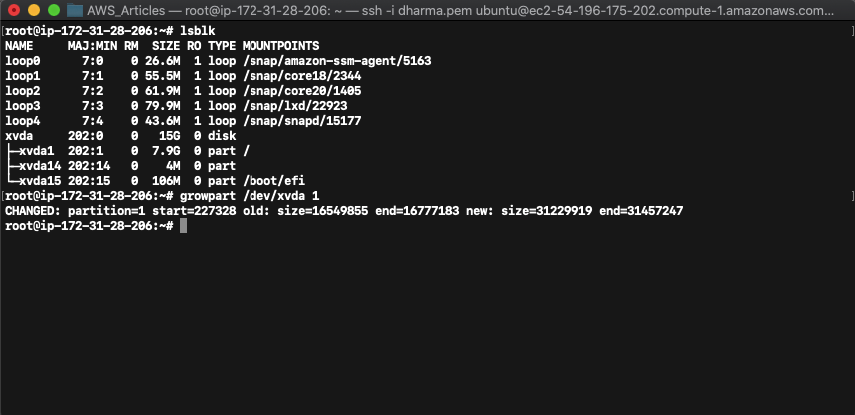
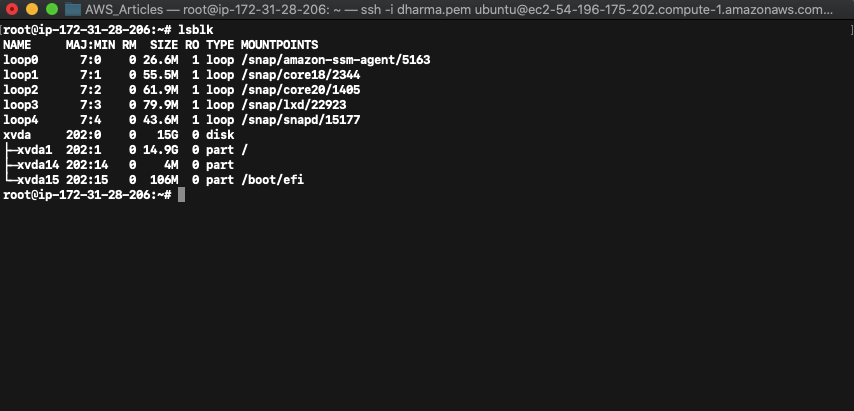
Now the partition has been changed to match the volume size.
Checking the file system
To check the disk sizes, run the command df -h.
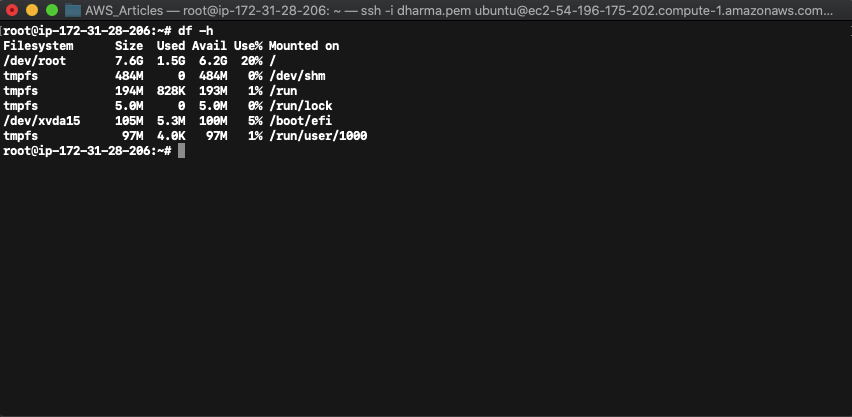
In the above screenshot, the size of the root volume still shows as 7.6GB which is the older value.
Running the command file -s /dev/xvd* will show the current filesystem.
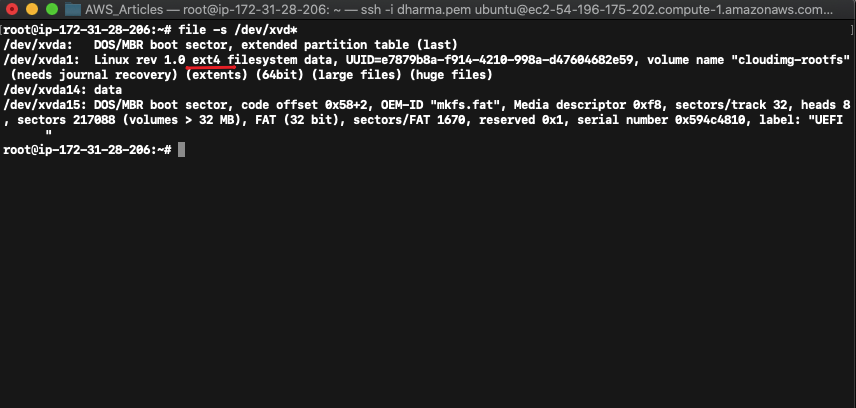
In our case, the file system used in ext4. Run resize2fs /dev/xvda1 to resize the disk.

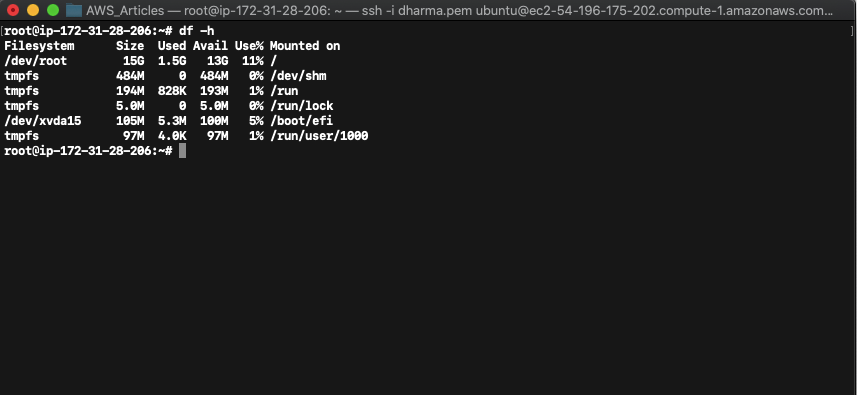
You can now see that the root disk size has been changed to 15 GB.
The volume is now resized and ready for use. Restarting an instance will do this for you automatically but there will be a small downtime.
Resize EBS Volume on EC2 Windows Instance
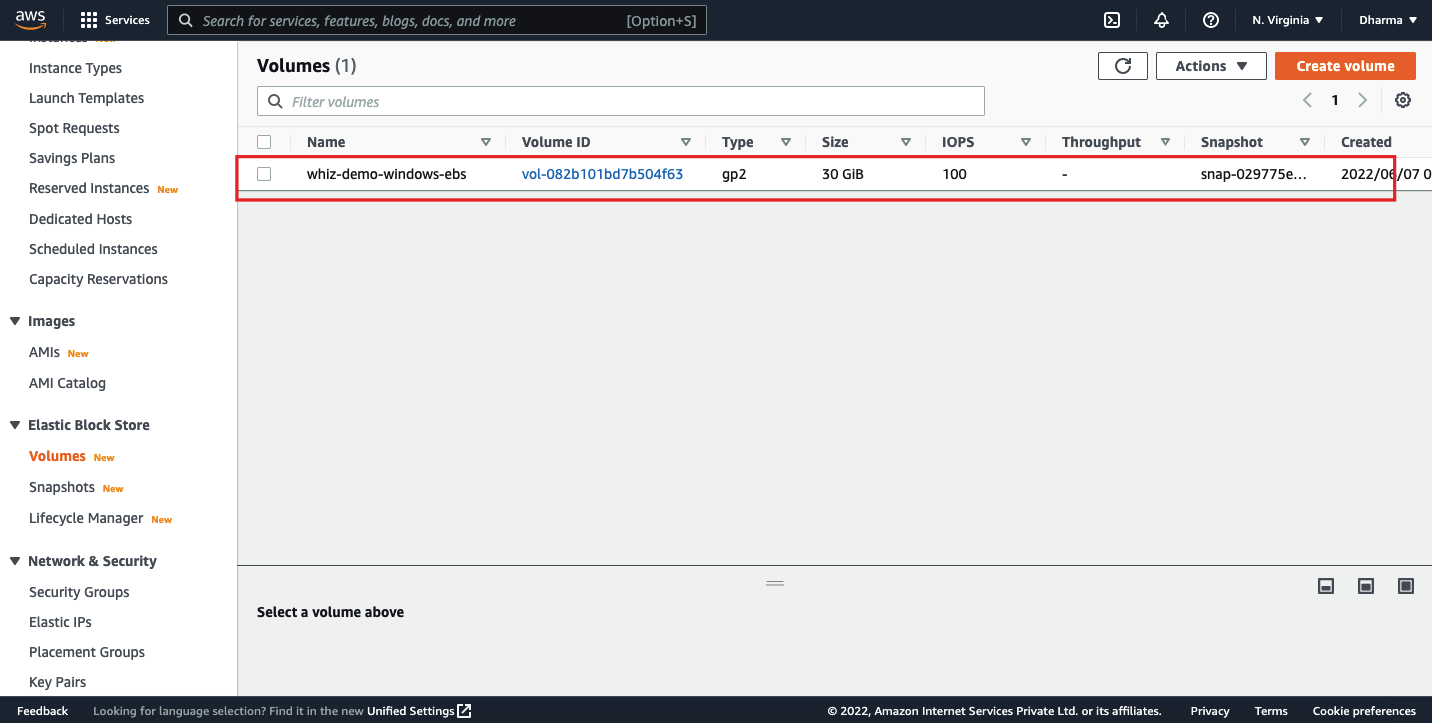
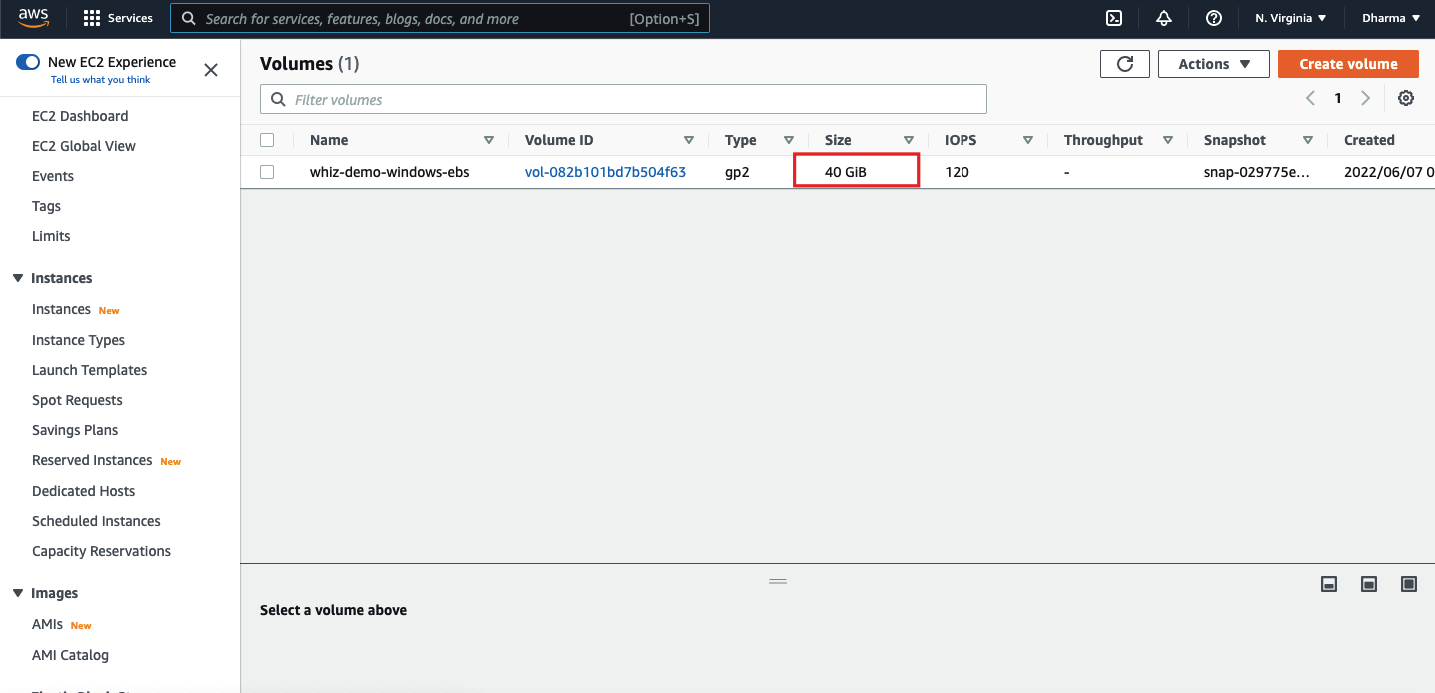
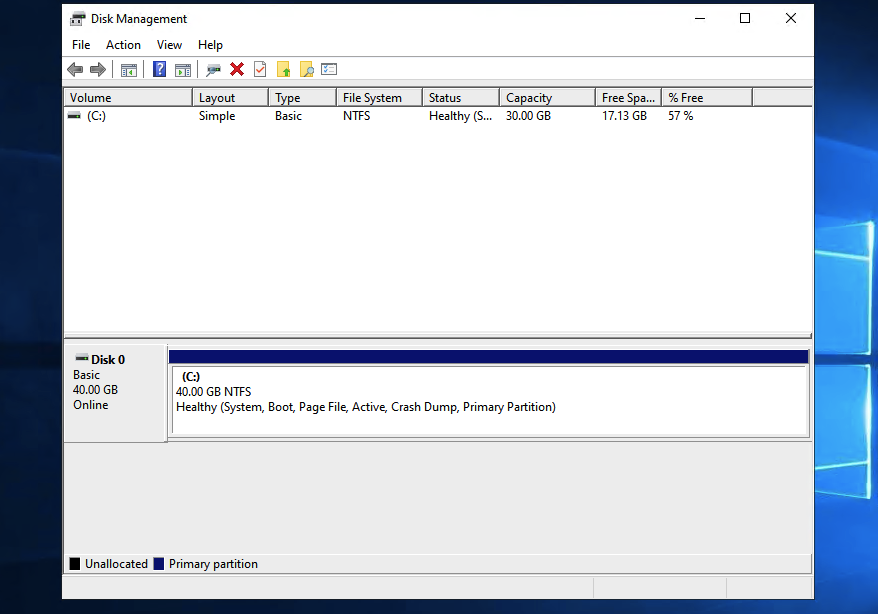
Now, we will see how to resize the volume that is attached to the windows instance. We have an EBS volume named as whiz-demo-windows-ebs with 30GB size.
Now, go ahead and modify the volume size from 30GB to 40GB.
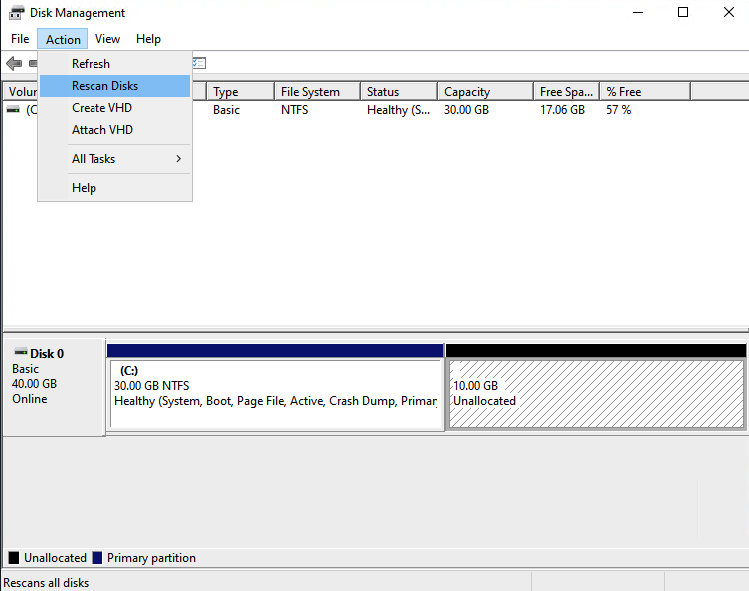
Login to your Windows instance using RDP and open the disk management. You can see that the volume size is 30GB.

Click on the action button and select rescan disks. Unallocated space will be visible here.
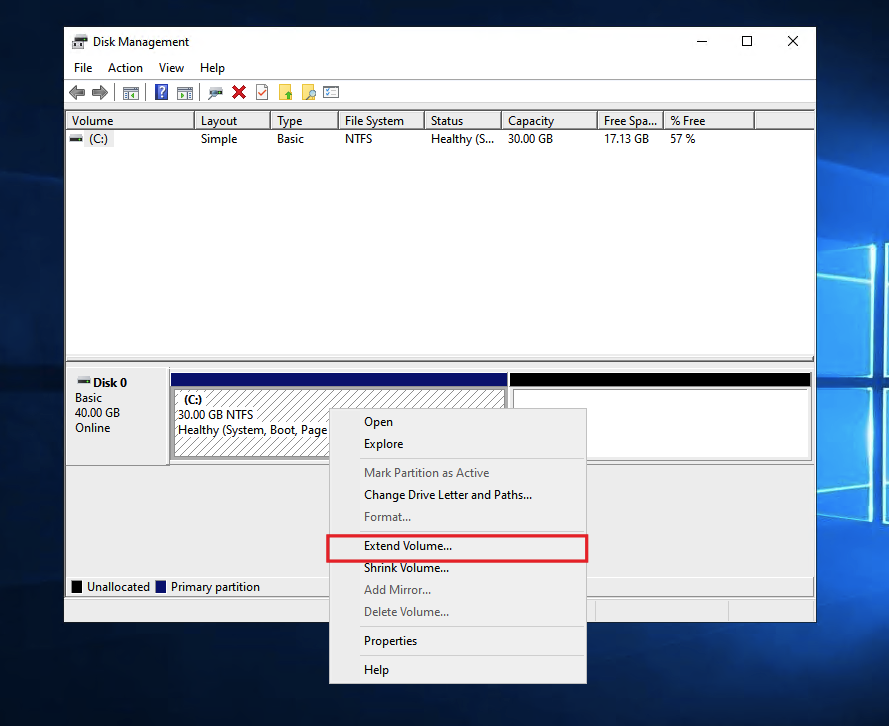
To add the unallocated space to the existing disk, right click on the disk and click on extend volume.
On the next page, you will have an option to enter the amount of disk space to be extended.
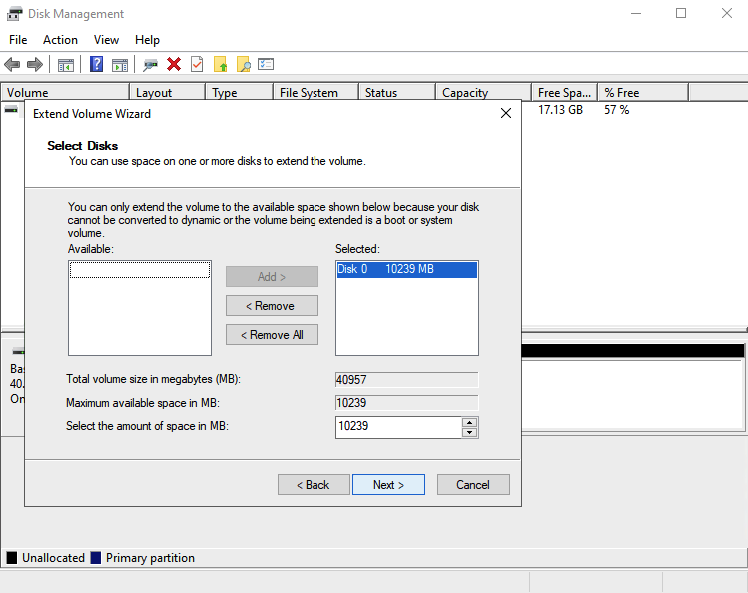
Enter the desired amount and click on next. You should be able to see the updated disk space.
How to shrink EBS Volume?
EBS volume size can only be increased and unfortunately AWS does not allow to reduce the size. However this can be achieved by creating a new volume and attaching it to the instance.
Mount an EBS volume to EC2 linux instance
AWS allows us to add more than one EBS volume to an EC2 instance. In this section, we will see how to attach more than one EBS volume to an EC2 instance. Let us see how to do it.
Login to the AWS console and navigate to the EC2 dashboard. Create a new EBS volume.
Once created, go to the EC2 dashboard and select the EBS volume which we have created. Under actions, click on the attach volume option.
Mount the EBS Volume
To mount the newly created volume, we need to login to the instance. Login using SSH and run lsblk command to view the available disks.
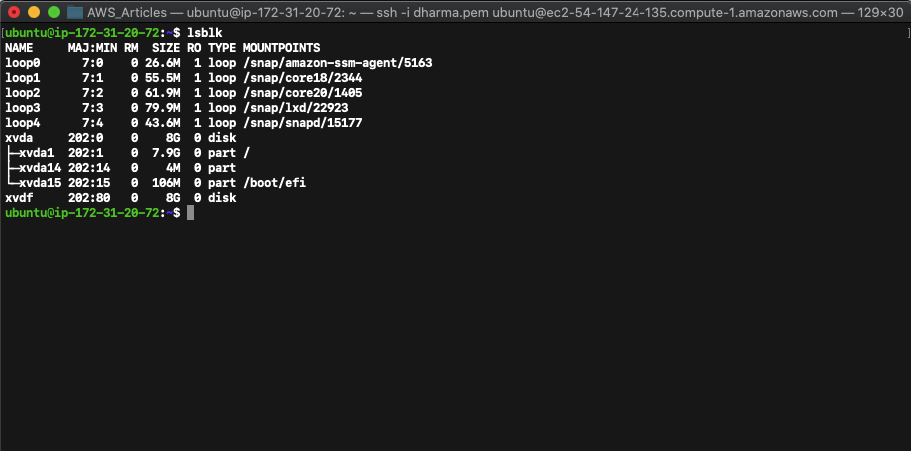
To make sure there is no data available in the newly created disk run the command sudo file -s /dev/xvdf (we have given the name as xvdf while attaching to the instance).
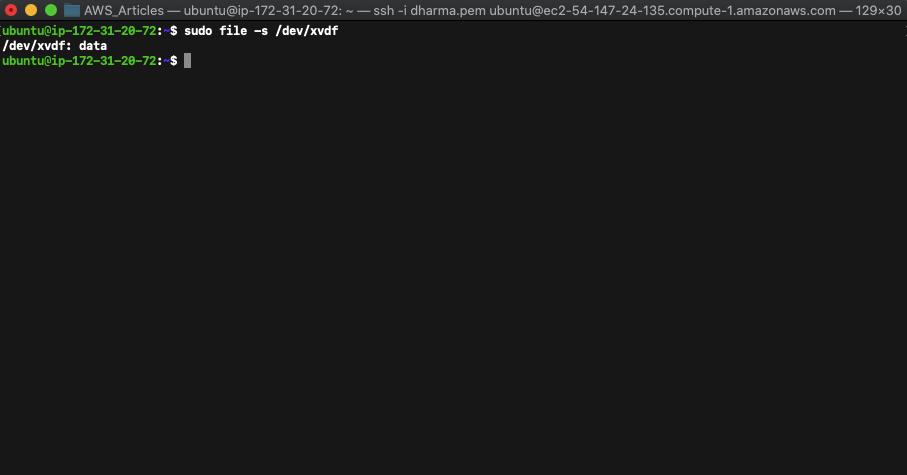
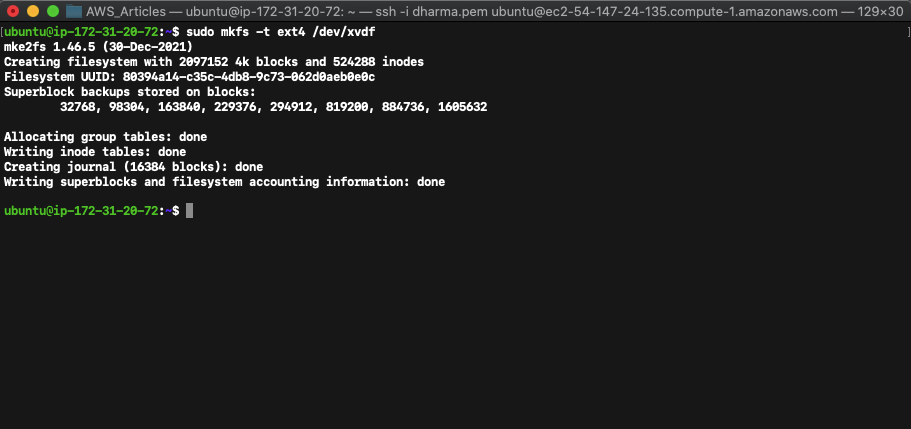
The output of /dev/xvdf:data confirms that there is no data available in this disk. Now, we need to format the volume with the ext4 file system. To do that run the following command.
sudo mkfs -t ext4 /dev/xvdf
Create a folder and mount the volume.
sudo mkdir /newdata
sudo mount /dev/xvdf /newdata
To check the volume status run the df -h command.
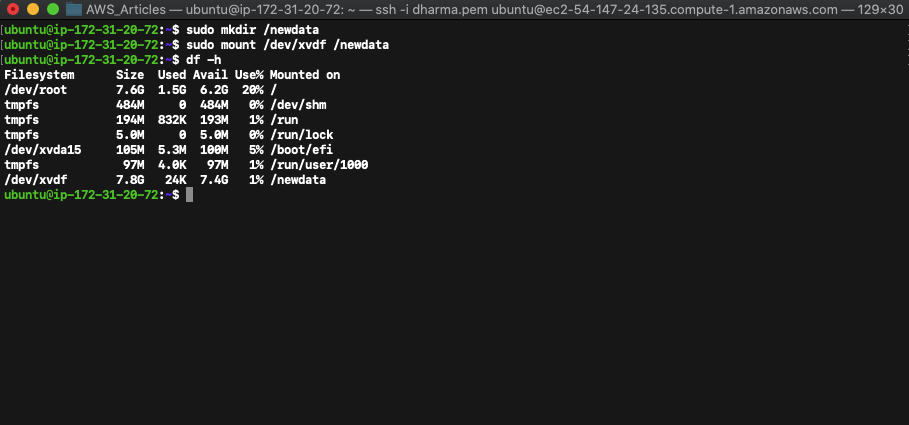
We can see that the volume xvdf is mounted. To unmount the disk, run the command unmount /dev/xvdf.
Mount an EBS volume to multiple instances
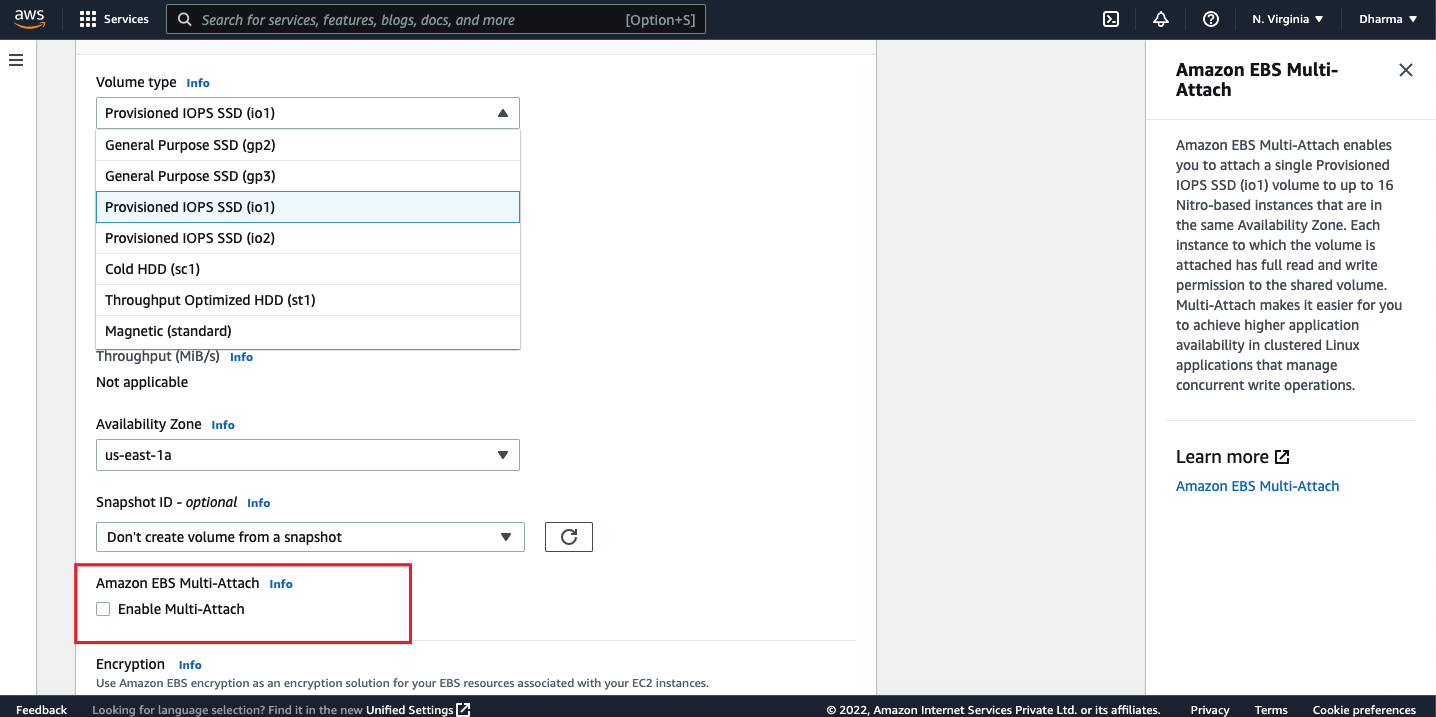
If we have a scenario where multiple instances need to read or write to the same storage then this can be achieved using EBS multi-attach functionality. AWS allows the EBS volume to be attached into more than one instance. This option is available for the provisioned IOPS EBS type.
If you select the type as provisioned IOPS, you will get an option to enable the multi attach feature.
Maximum of 27 EBS volumes can be attached to a single instance. This may vary based on the instance type.
In this tutorial, we have seen how to modify EBS volume size on AWS console and extend the attached disk to Linux instance and Windows instance. Hope you were able to follow along and learn the same.
A Beginners Guide to Amazon RDS
Amazon Relational Database Service (RDS) is a service offered by AWS to set up a relational database in the AWS Cloud. RDS makes it easier to set up, operate and scale the relation databases on AWS. With a few clicks, we will be able to spin up new database instances. In this article, let’s discuss more about the RDS and see the steps involved in creating a database.
Databases Supported by Amazon RDS
RDS itself is not a database and it’s a service that manages the databases. The following are the database engines supported by RDS.
- Amazon Aurora: It’s an Amazon’s own relational database engine and Amazon claims Aurora is 5x faster than the RDS MySQL instance. Aurora is compatible with MySQL and PostgreSQL
- MySQL: It’s one of the widely used open source databases which uses SQL to access the data.
- PostgreSQL: It’s another popular open source database engine.
- MariaDB: As per Wikipedia, MariaDB is a community developed fork of the MySQL RDBMS.
- Oracle DB: It is an object relational database management system by Oracle.
- SQL Server: It’s a relational database management system created by Microsoft.
Components of RDS
Let us have a look into the major components of the RDS. We will see one by one in detail.
DB Instances
This is an isolated database environment in the AWS cloud. A DB instance can have multiple databases and can be accessed using the same tools which are used to access standalone databases. The capacity of the database instance depends on the instance class. There are three types of instances:
Standard Instances (m3, m4)
Memory Optimized (r3)
Burstable Instances (t2)
Regions and AZ
Regions are physical data centers isolated from each other. Each region can have more than one availability zone. Availability zone is an isolated physical location within the region. In case of one AZ failure, another AZ will be active in that region.
Security Groups
A security group acts as a firewall and controls the access to database instances. We can specify the range of IP addresses or EC2 instances which can access the database instance.
DB Parameter Groups
DB parameter group contains the configuration values that can be applied to one or more instances. If not applied, a default parameter group with default values will be assigned.
DB Option Groups
For simplifying the management, some DB engines offer some tools and DB Option Group is used to utilize them.
Features of Amazon RDS
We have seen what RDS and its components, let us see some of the features and advantages of RDS.
Minimized administrative tasks
RDS makes the initiation and deployment of databases easier. It can be accessed from AWS console, AWS CLI and API calls. Security patches and other updates are taken care of by RDS.
RDS handles the backup activities for you. There are two options available to backup. An automated backup where we set a time to backup the instance. DB instances which can be taken manually.
Scalability
Scaling the compute and storage resources of the database can be done in a few clicks with no downtime.
High Availability and Durability
RDS offers a point in time recovery feature. DB snapshots can be taken any time and can be stored in S3. RDS provides a multi AZ feature, which provides high availability. RDS also supports read replicas. Snapshots are created from the source database and the read traffic is distributed to the raad instance. Updates to the instances are applied in a maintenance window that can be drained during creation of the instance.
Security
RDS integrates with other AWS services like IAM and KMS. Databases can be encrypted with AWS Key Management Services (KMS). Using Amazon’s VPC and subnets features, we can run our databases on virtually isolated networks and set up firewall.
Cost Efficient
Like other AWS services, RDS also comes with a pay as you go pricing model. We will be paying only for the resource which we use and no upfront payment is needed. RDS also pricing another purchase option “Reserved Instances” which comes with a discounted price when we commit the usage for 1 or 3 years. RDS is billed based on the following parameters:
Instance type
Storage
Running time
I/O requests per month
Data transfer
Management
RDS provides various operative metrics and integrates with AWS CloudWatch. With the help of SNS, RDS can trigger notifications to the users. This makes the daily operations and monitoring easier.
Hands-On: Creating RDS MySQL Instance
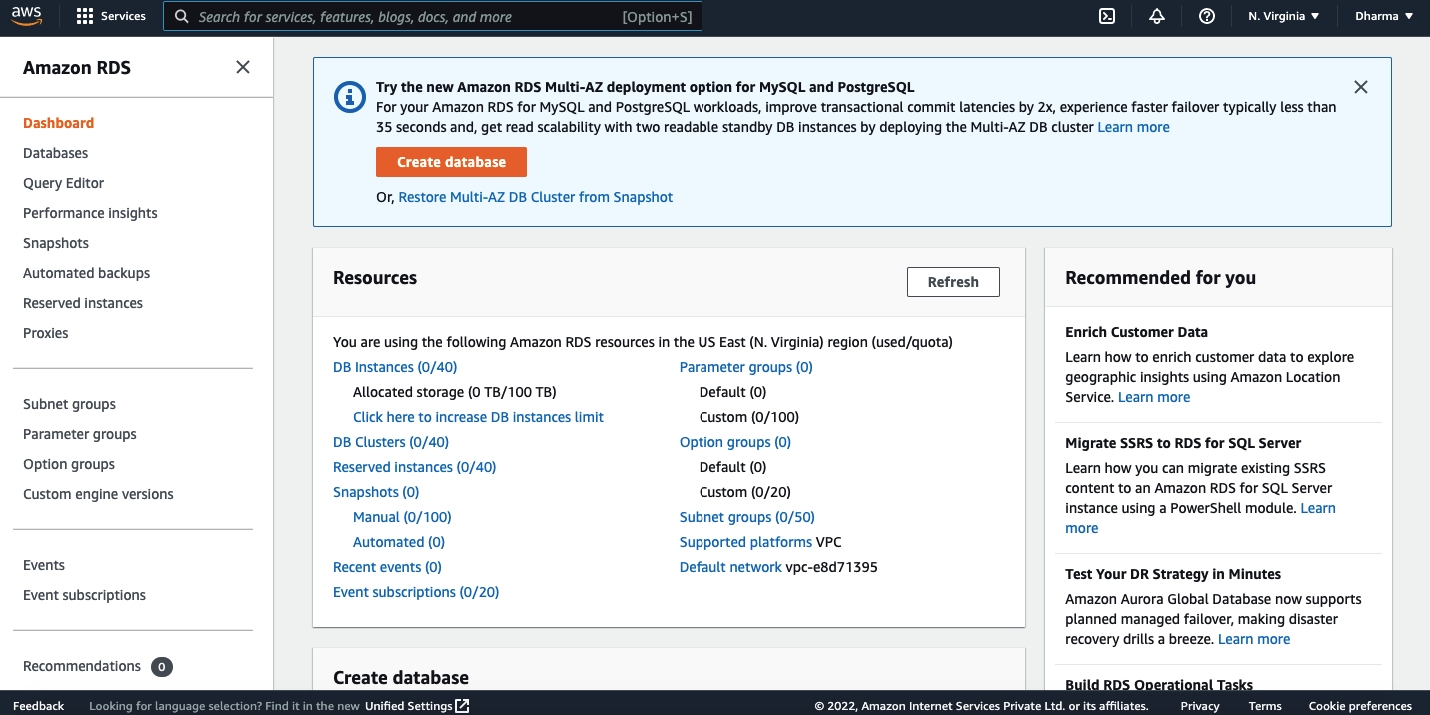
Let us go ahead and create an instance in the AWS console. Login to AWS management console and navigate to RDS under databases.
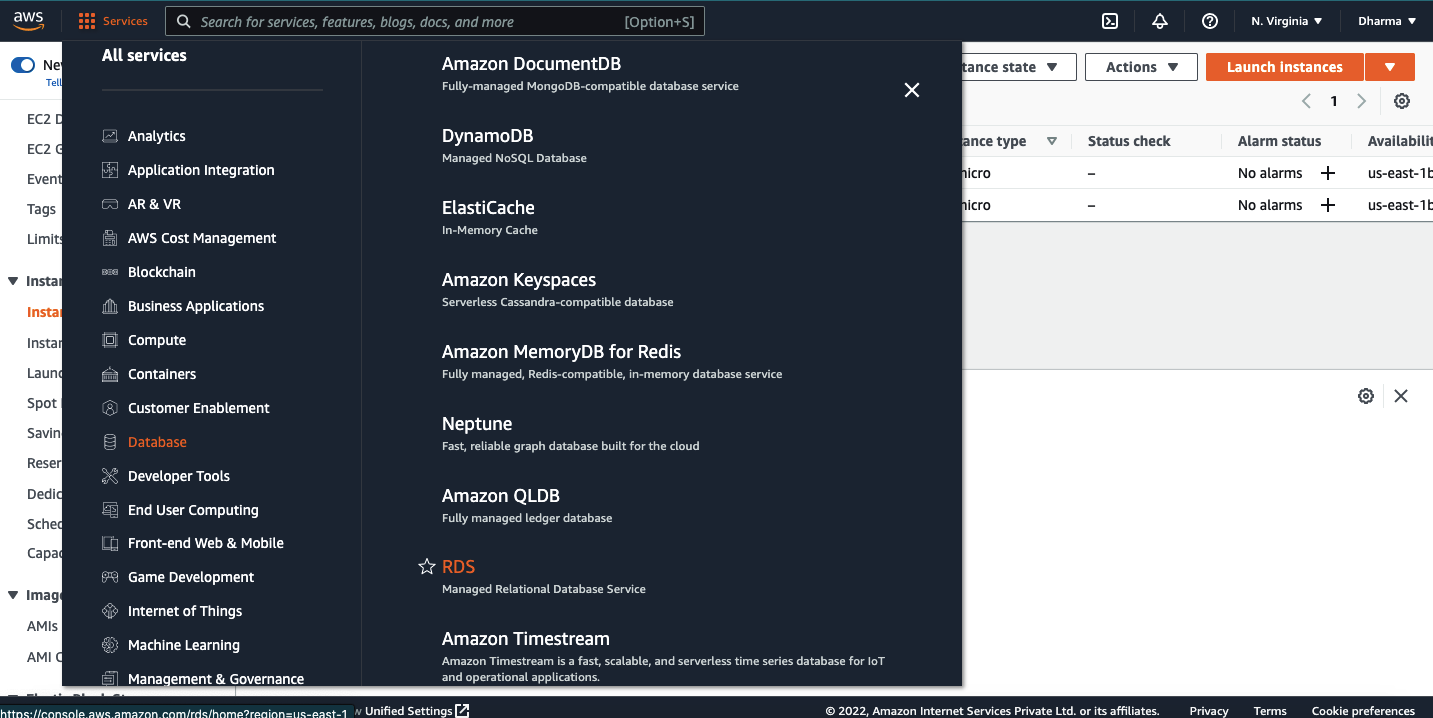
Click on the create database button, you will be prompted to select the database engine and version.
For this demonstration, I will be selecting the MySQL DB engine.
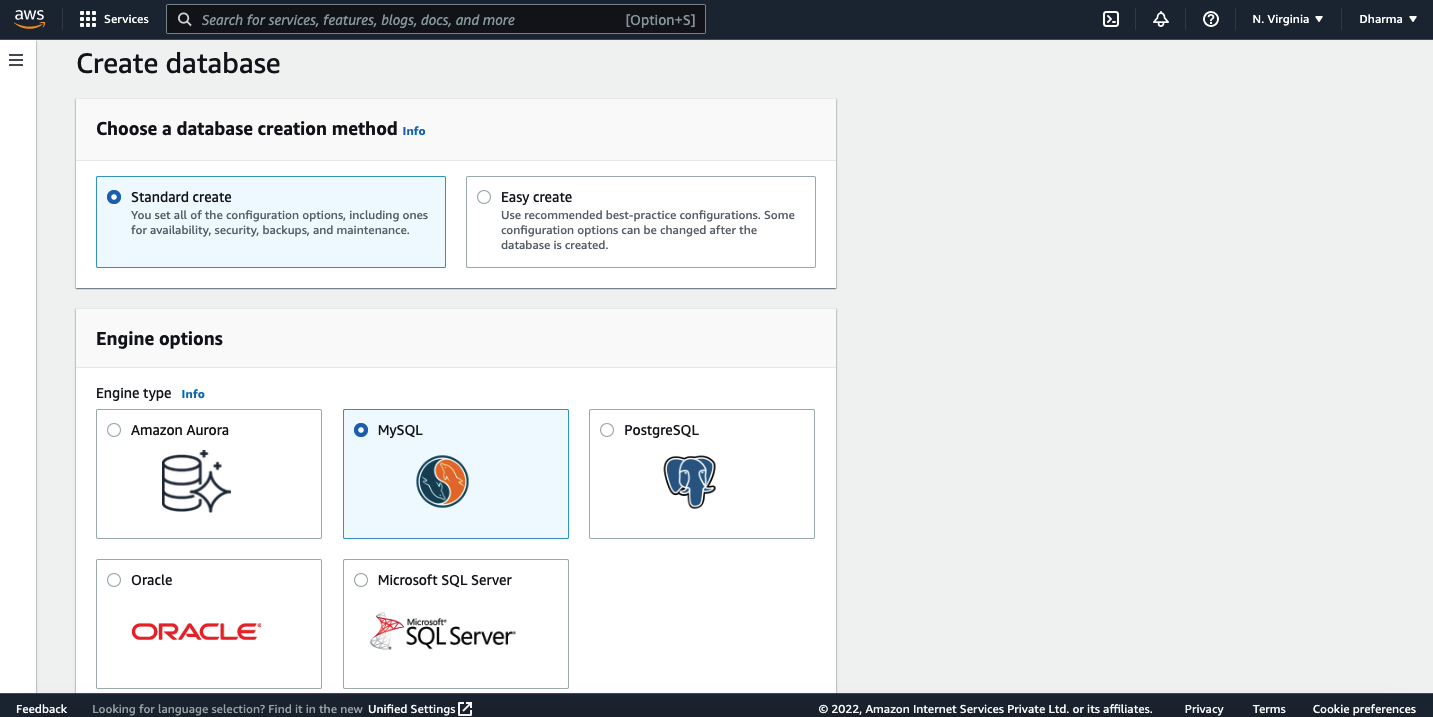
In the templates section, select the option Dev/test as we are creating this instance for demo purpose.
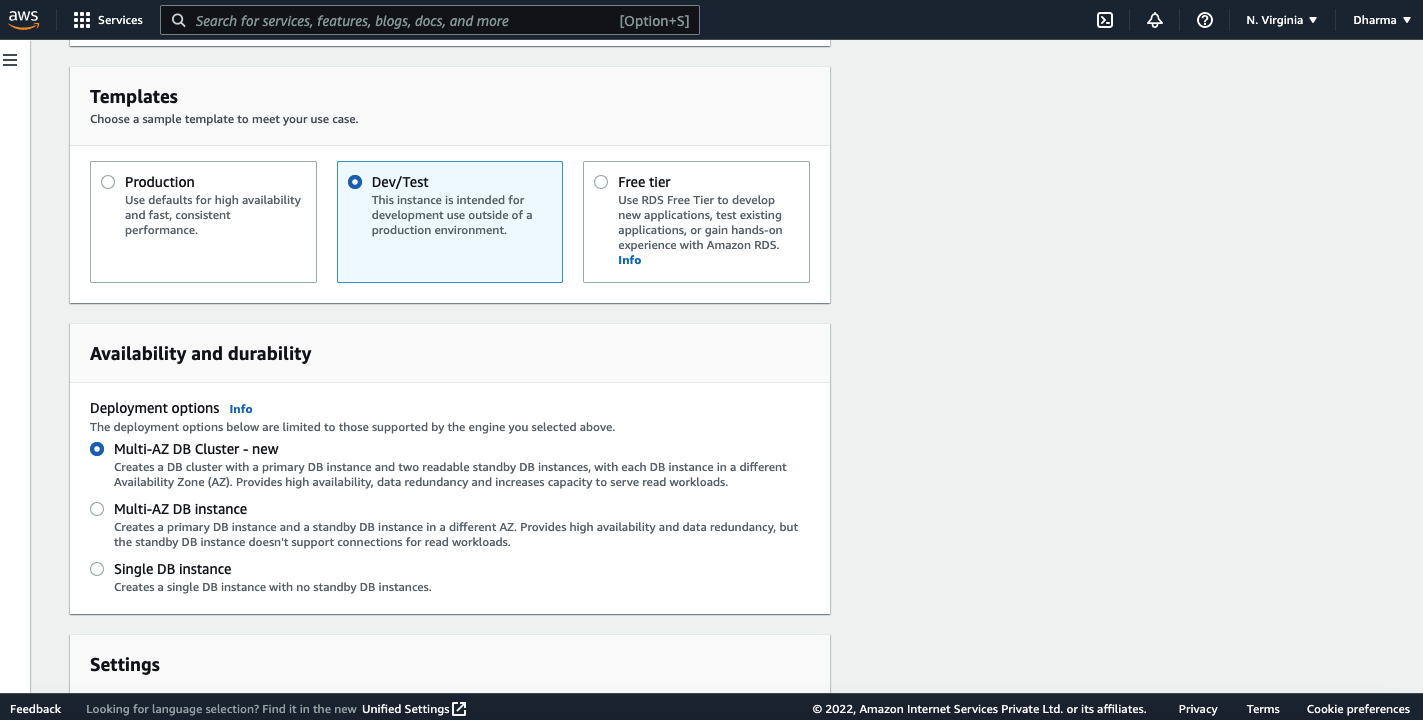
You will have an option to select Multi-AZ instance or single instance. I have selected a single instance for this demo.
The next step is to enter database name, master username and password.
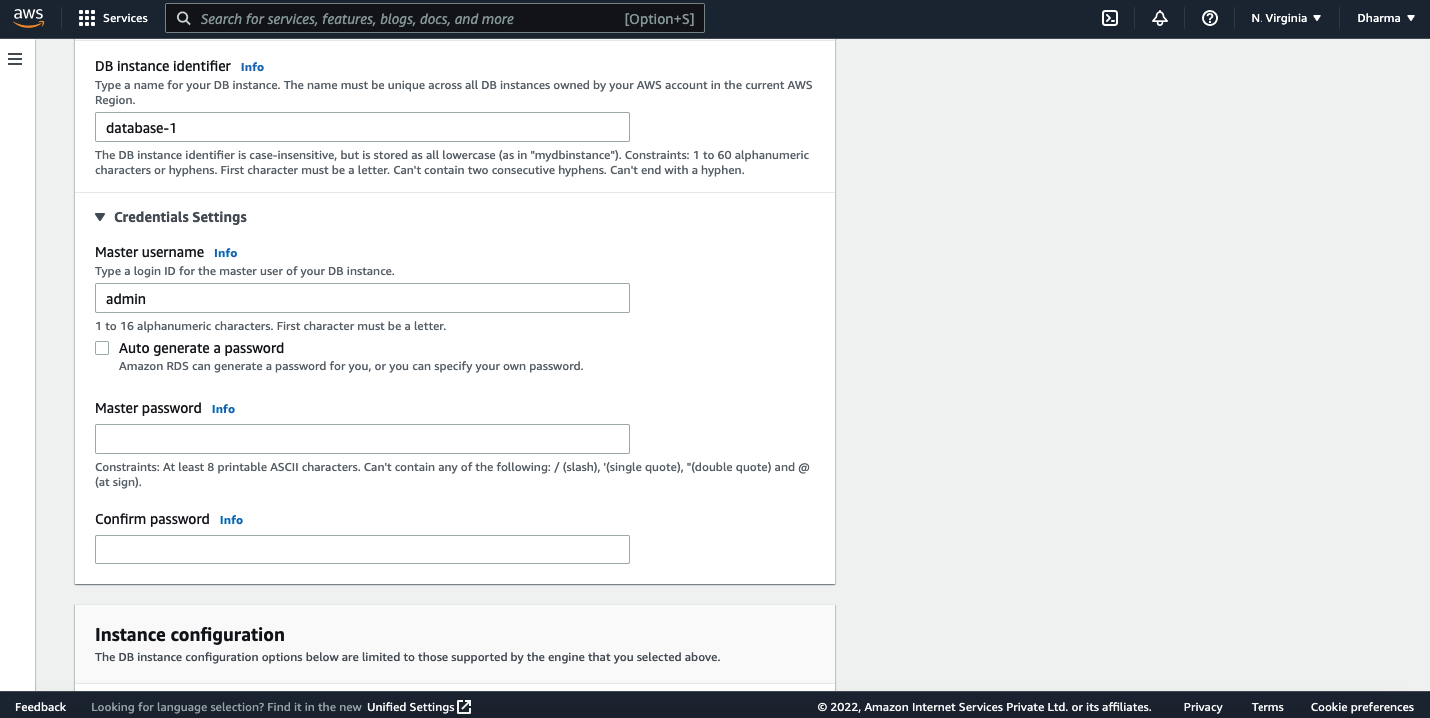
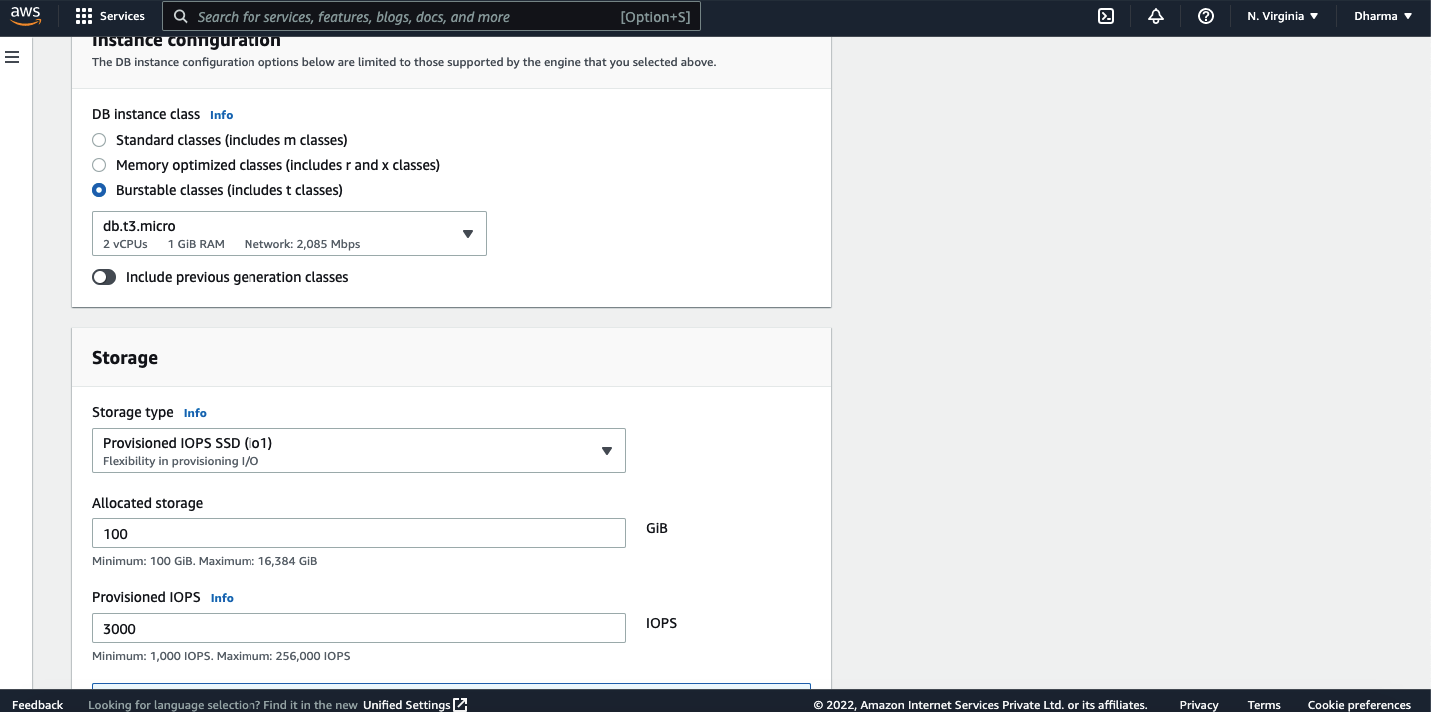
The next step is to select the instance type. There are 3 instance classes available. Standard, memory optimized and burstable. Select the instance type and storage type.
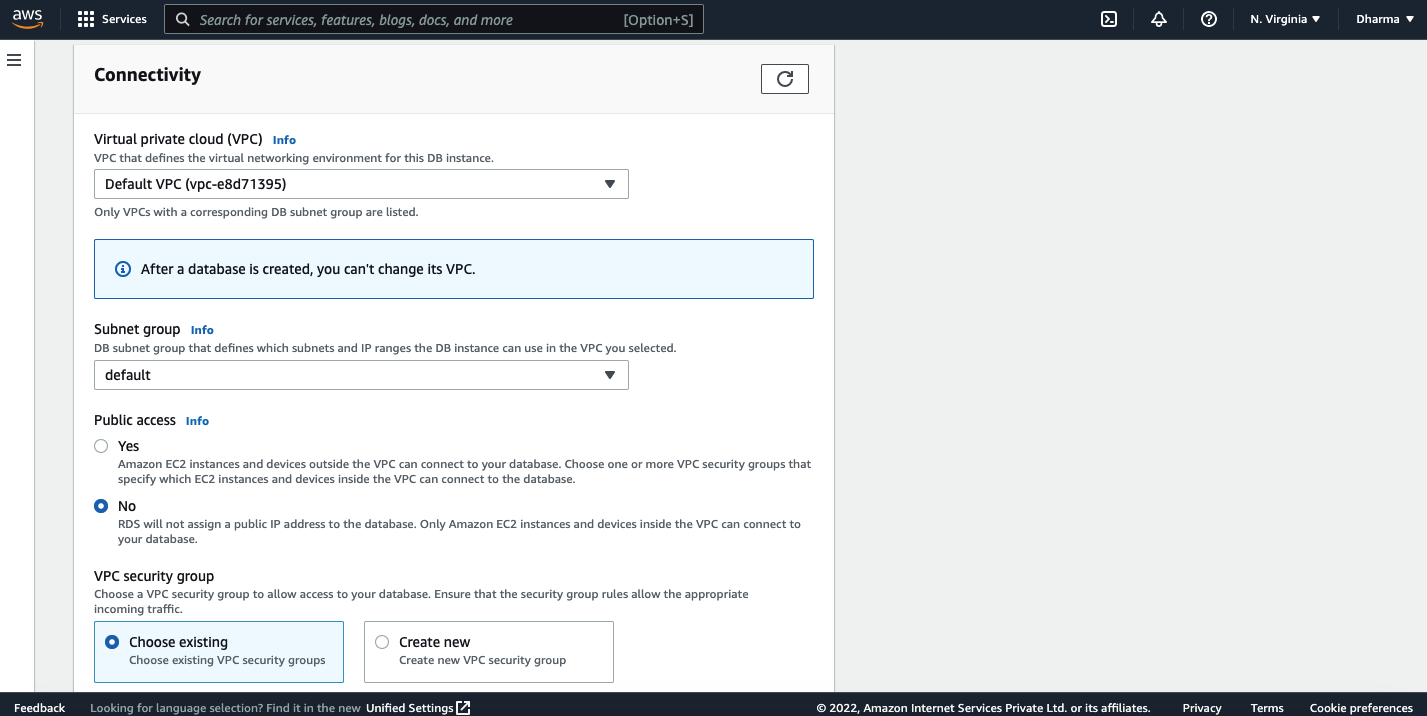
You have to select the VPC and security group as well. Review the settings and click on create.
That’s it. Within a few seconds, your RDS instance will be created.
Hands-On: Create RDS Instance from AWS CLI
We have created the DB instance from the AWS console. Let us also see how we can create an instance from AWS CLI.
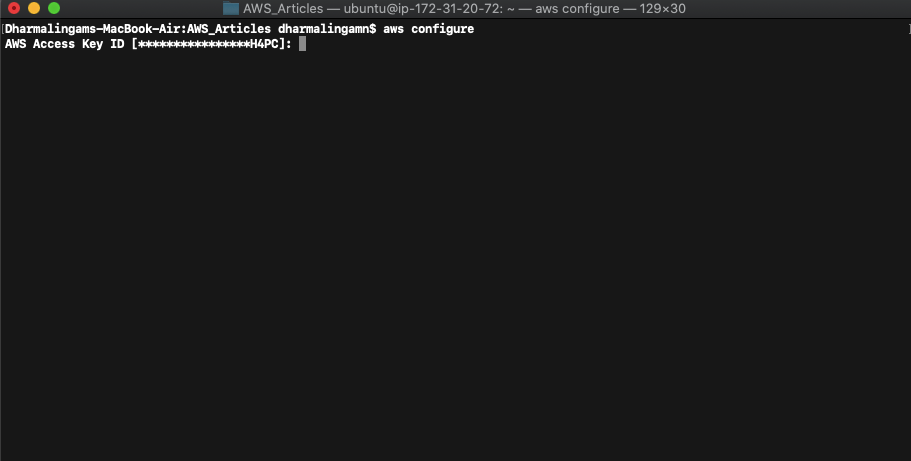
I assume that you have done the AWS CLI installation and entered AWS credentials already. If not, please create an IAM user and have the access key and secret key ready. Run the command aws configure to add your credentials.
While creating DB instances using AWS console, we have entered many parameters like database engine, instance type, VPC, security group, storage type, multi-az support, etc. We need to provide these inputs while creating the instance using CLI as well.
–db-instance-identifier
–db-instance-class
–engine
–engine-version
–master-username
–master-user-password
–allocated-storage
Refer to the AWS documentation for the complete list of parameters.
The command to create RDS instance is: create-db-instance <parameters>
In our case, we will create a MySQL engine.
Let us run the create command along with the configuration parameters.
aws rds create-db-instance –db-instance-identifier db-whizdemo –db-instance-class db.t3.micro –engine mysql –master-user-password 12345678 –master-username demo –allocated-storage 20
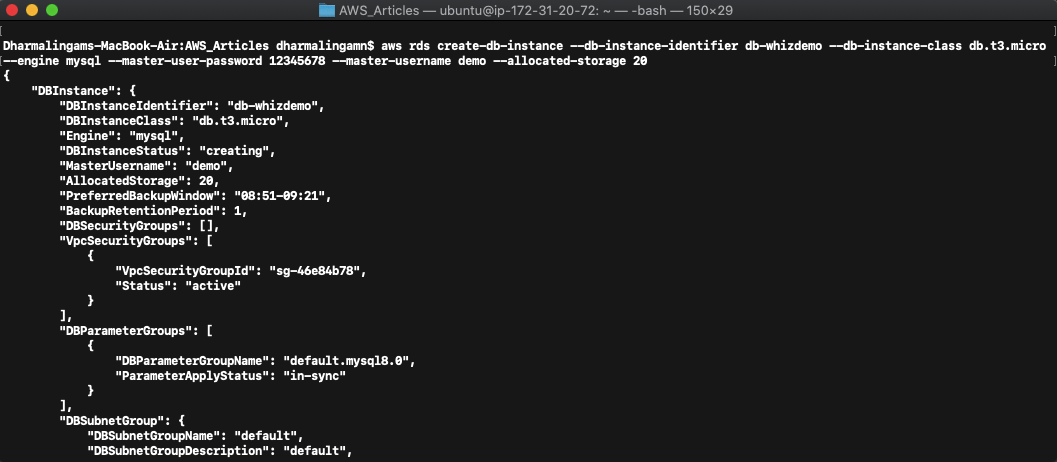
You will get an output in JSON format on a successful request.
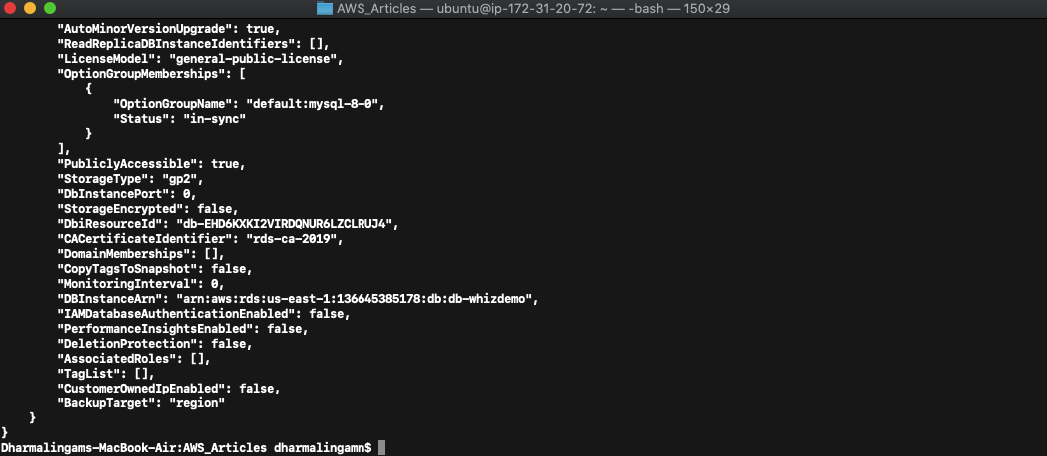
You can see on the console that a new instance has been created.
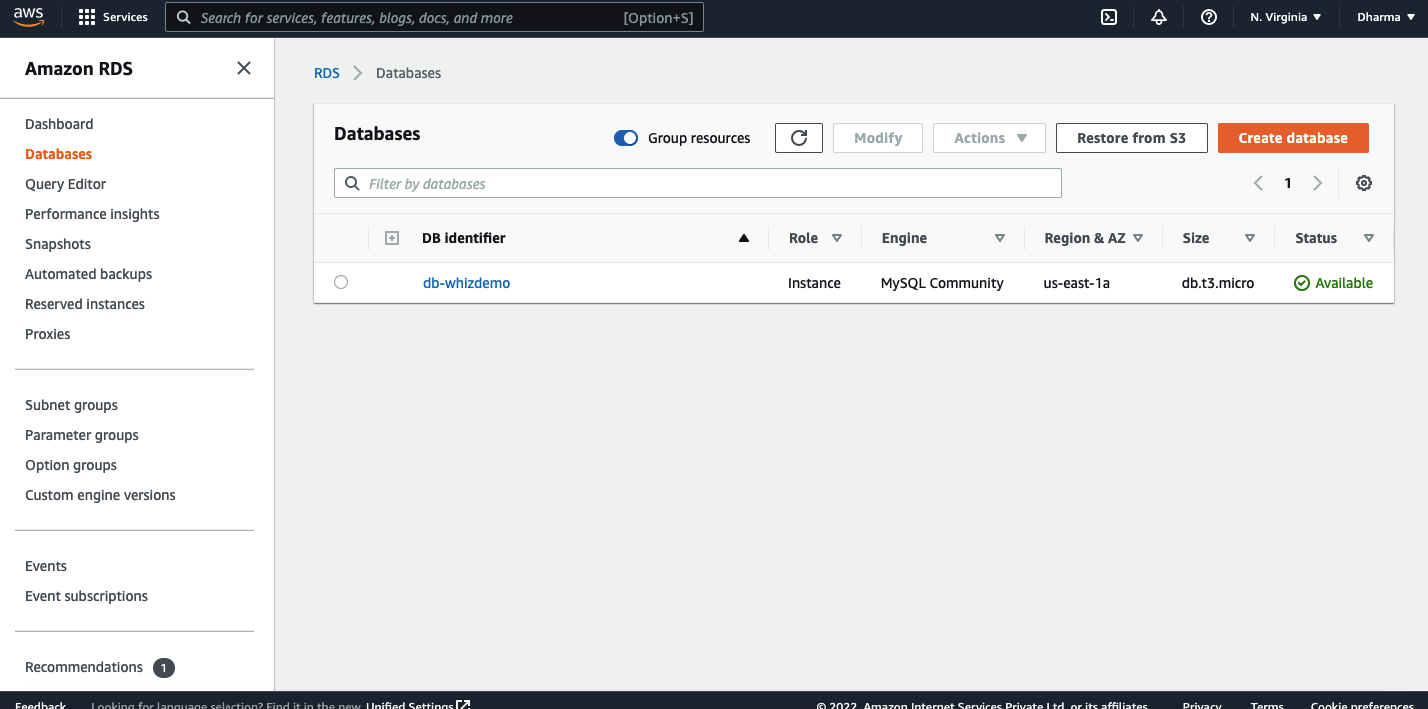
We have now successfully created the RDS DB instance using AWS CLI commands.
RDS Read Replica
We have seen that the read replica is one of the features of RDS. As the name says, it’s an asynchronous copy of the db instance. Read replicas can be created in the same or different region. All the database engines supported by RDS will support this feature.
Advantages of Read Replicas
Some of the advantages of using read replicas are:
- Read replica serves all the read requests received to the source database. Since all the read queries are handled by the replicas, it increases the overall performance of the RDS. Also, replicas can be created in different regions, it will decrease the lag and increase the performance.
- In case of hardware failure, RDS allows us to use the replica of the affected database to be used as a standalone database.
- When we create a replica, RDS encrypts the data with a public key by default.
- We can create upto 5 read replicas of a database. It is also possible to create a replica of read replica.
Create Read Replica for the RDS instance
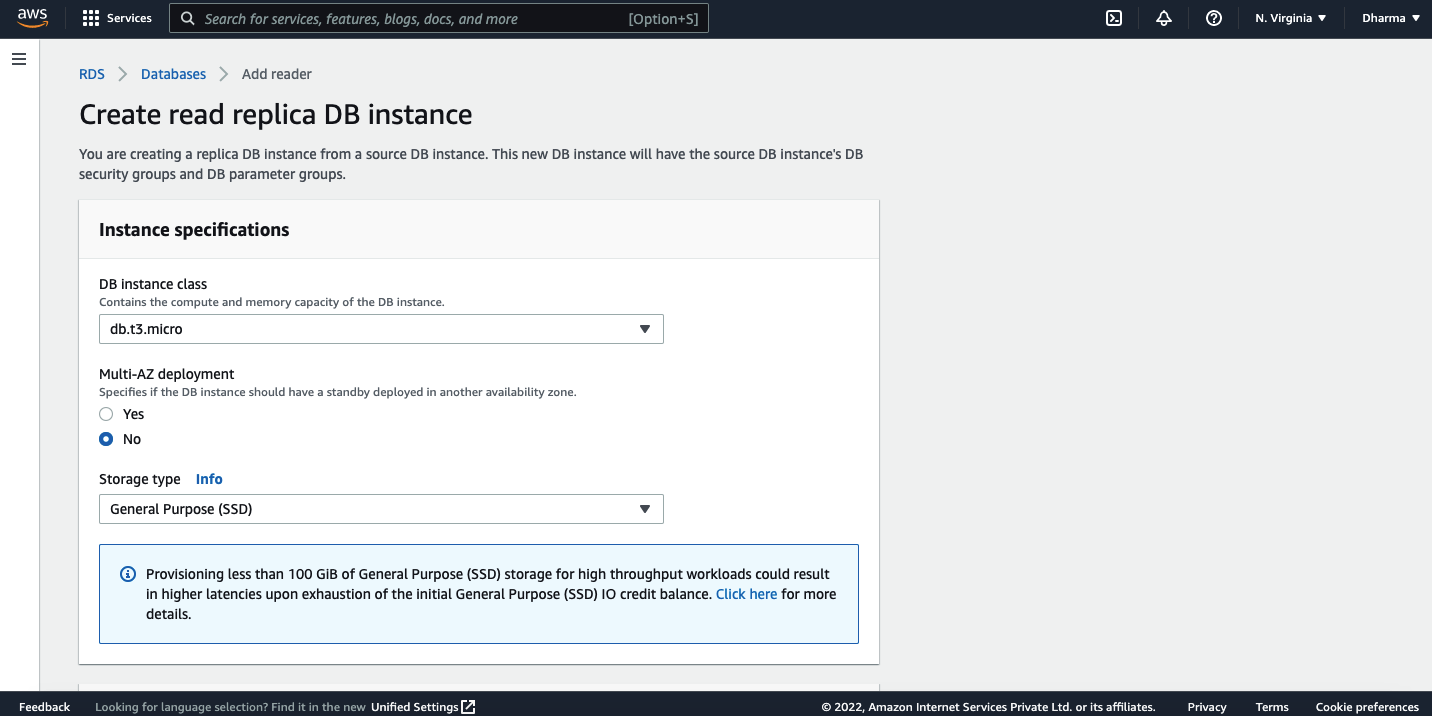
Let us go ahead and create a replica for the DB instance we have created in the previous step.
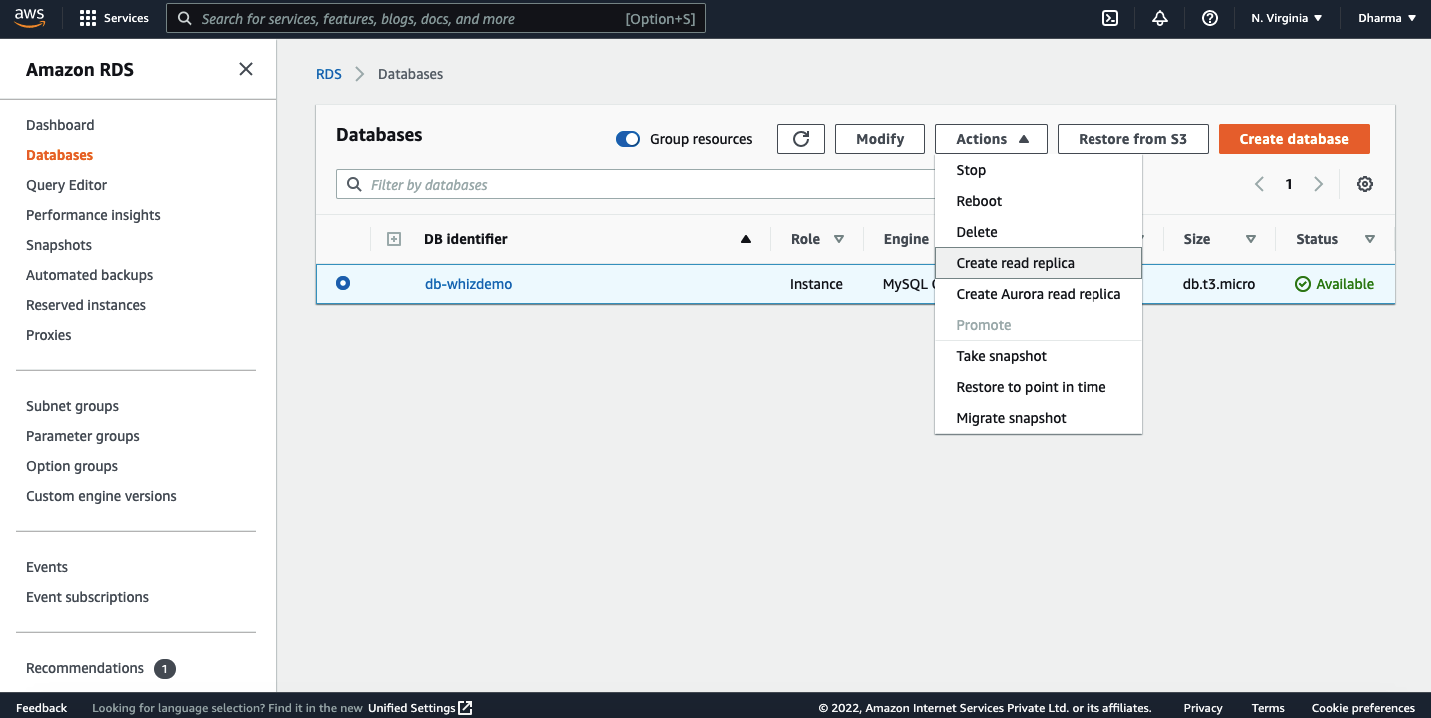
Navigate to the RDS on the AWS console and click on the databases.
Select the database for which you want to create a read replica. In our case, I will select the one which we have created in previous steps. Under actions, click on the create read replica.
On the next screen, you will get options to select the instance class, region, VPC, security group, etc.
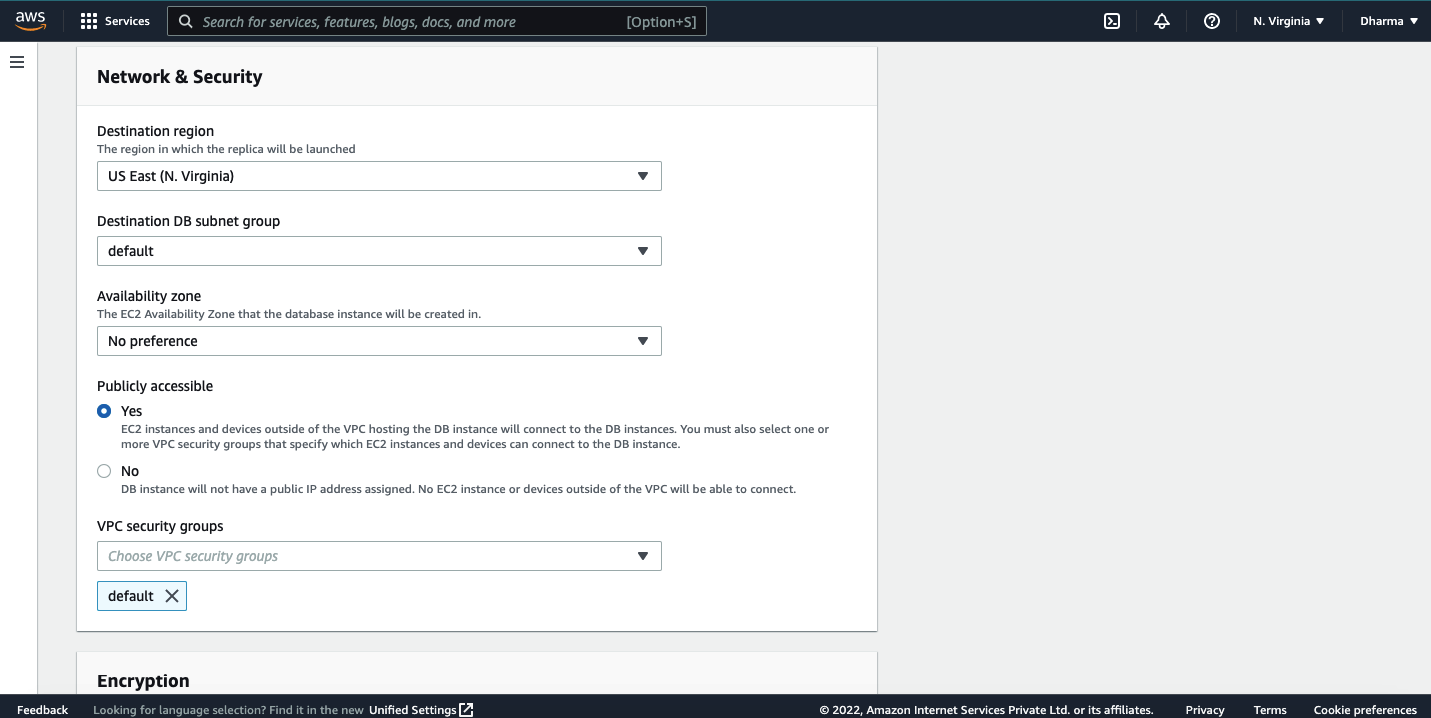
Under the settings, you need to select the db instance to add it as a read replica source.
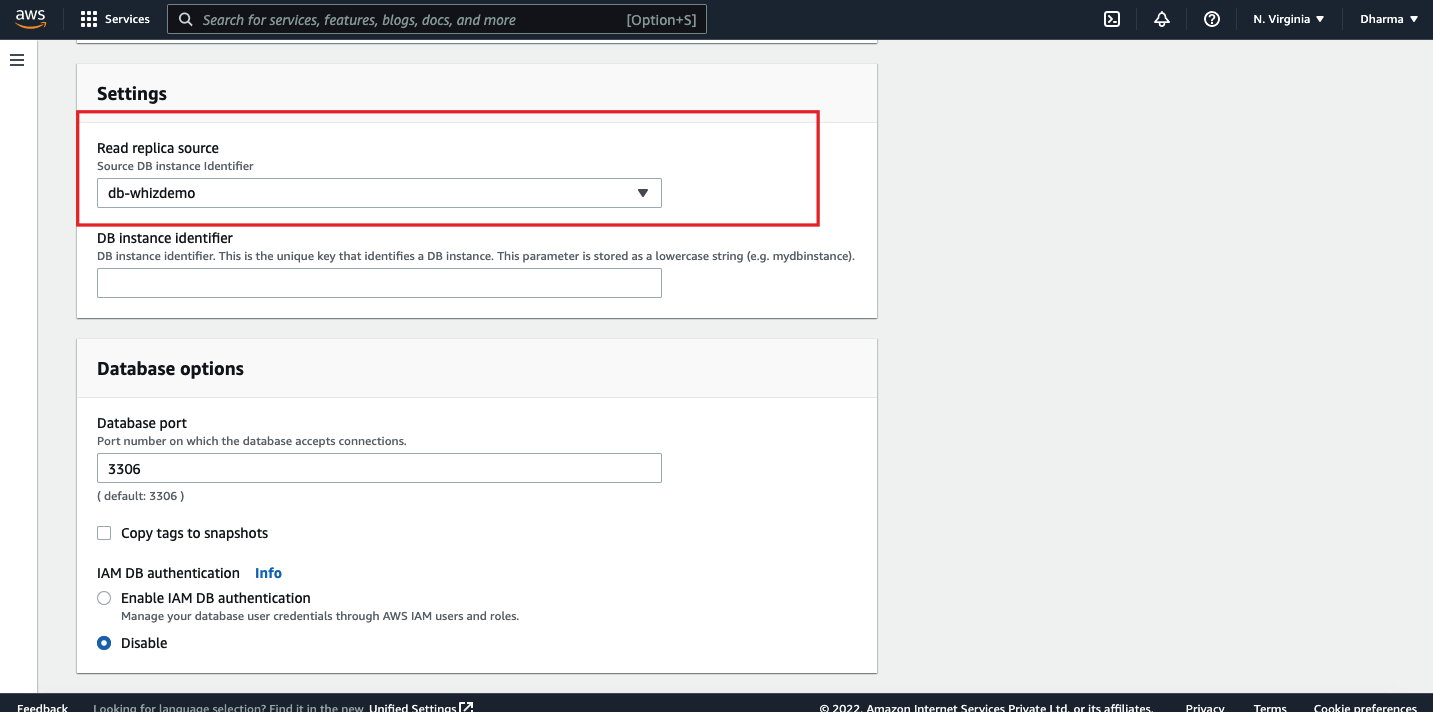
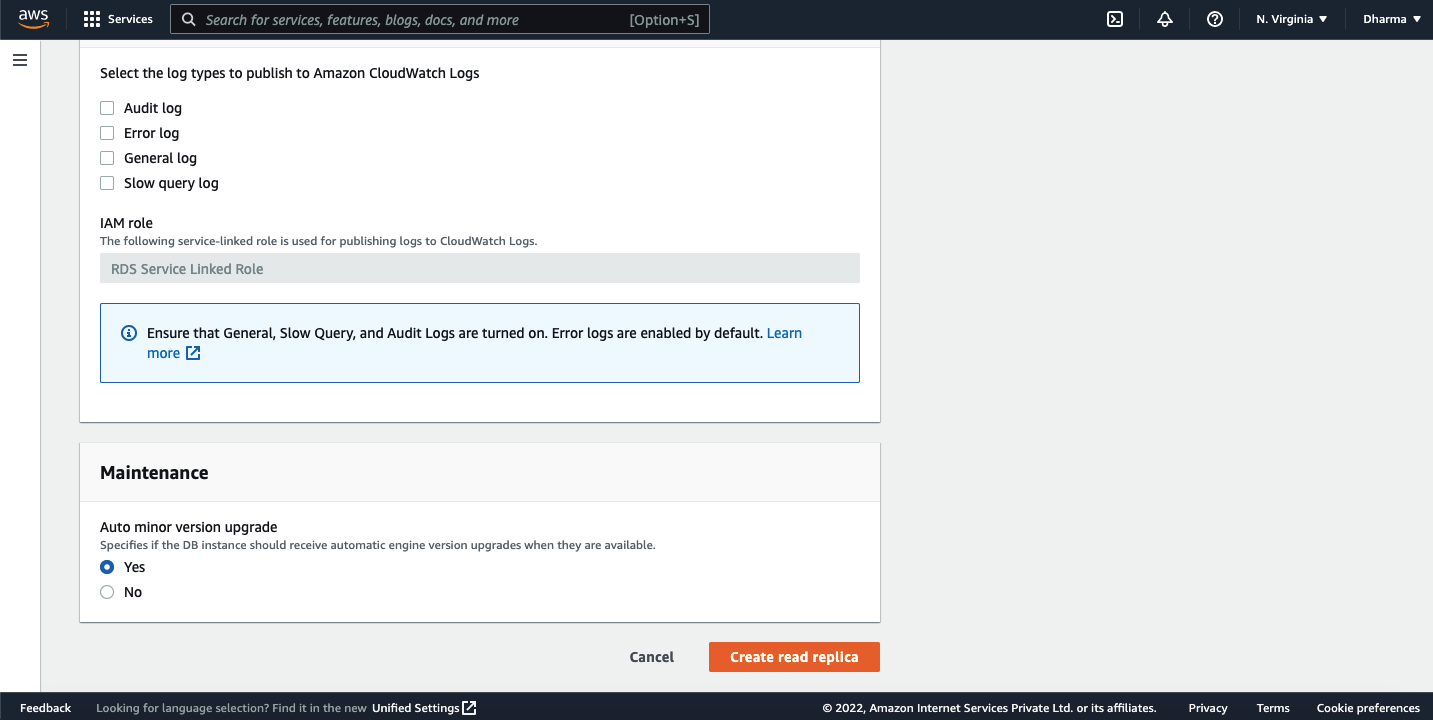
Review the settings and click on create read replica.
That’s it. We have created a read replica of the database.
Difference between Multi AZ and Read Replica in RDS
We have seen two different features of Amazon RDS. The Multi AZ and Read replica. Both features copy the source database but in a different nature or for a different purpose.
Multi AZ deployments enhance the availability of database instances within a region. In this case, the database will be synchronously replicated to the standby instance. In case of hardware failure, RDS performs an automatic fail over to the standby instance so that the application will not be disrupted.
Replication to a standby instance is synchronous and the endpoint to the standby instance in the case of failover will remain the same.
RDS Read Replica allows us to create a read-only copy of the instance in the same or different region. Write requests will be served from the main database and only read requests will be served from the read replica database. Updates made to the source database will be asynchronous copies to the replica instance.
Read replica decreased the load on primary instances by handling the read requests. Read replicas can be created within Availability Zone, cross-AZ or cross-region.
In the case of hardware failures, read replicas can be promoted as standalone databases manually.
Read replicas with Multi AZ can be used as a disaster recovery strategy.
What is Amazon S3?
Amazon Simple Storage Service (Amazon S3) refers to an object storage service that offers data availability, scalability, security, and performance.
Customers from various different industries and of various sizes could make use of Amazon S3 encryption for the storage and protection of any amount of data to be used in websites, mobile applications, IoT devices, enterprise applications, big data analytics, archive, backup and restore, and data lakes.
Amazon S3 offers management features that help you with the organization, optimization, and configuration of access to your data required to meet your business, compliance, and organizational requirements.
Know More: AMAZON WEB SERVICES (AWS) Beginner’s Guide
Amazon S3 (AWS) Buckets and Objects
A bucket is a container for objects. You can store numerous objects in a bucket.
An object is any file and the associated metadata that describes it. Each object is identified using a unique key, assigned by the user.
How do you store an object on Amazon S3?
To store an object in Amazon S3, you will have to create a bucket and then upload the object to the bucket. The bucket carrying the object allows you to open, download, and move the object. When the bucket or object is no longer needed, you can simply clean up your resources.
What is S3 Encryption?
 In simple words, it means protecting the data-in-transit and data-at-rest while it travels to and from S3, and also when it is resting on disks in S3 data centers.
S3 Encryption encrypts an object before saving it to the disk and decrypts it when the object is downloaded. This is done when you are using Server-Side Encryption and the process is performed by Amazon S3.

To interact with KMS, your Lambda function or S3 application uses encrypted data, a data key, and an encrypted data key.
You don’t encrypt S3 or the entire S3 bucket, but only encrypt the data at the object level. It uses Envelope Encryption to protect the data at rest. Here, each object is encrypted using a unique key, and then the key itself is encrypted with a Master Key.
You protect your data in transit with the help of
Secure Socket Layer(SSL)/Transport Layer Security(TLS) or Client-side encryption. Data at rest gets protected through
- Server-side encryption that uses SSE-KMS, SSE-C, and SSE-S3
- Client-side encryption
Server-side encryption refers to protecting data-at-rest. It is responsible only for the encryption of object data and not its metadata.
For SSE-S3 server-side encryption with S3 managed keys: Here, each object is encrypted with a unique key. For further protection of the data, this key is encrypted with a master key that is regularly rotated. It makes use of the AES-256 block cipher for data encryption. A bucket policy is used where there is a need for server-side encryption for all objects present in a bucket.
A bucket policy is a resource-based AWS Identity and Access Management(IAM) policy that allows you to grant permissions to your bucket and the objects that it holds. The permissions associated with a bucket are applicable to all the objects that it contains and are owned by the bucket owner.
SSE-KMS, Server-side encryption with AWS-KMS managed keys: Server-side encryption with Customer Master Keys is stored in a Server-side Key Management Service, offering added advantages to SSE-S3, that is,
Separate permissions while using a CMK, which means added protection against unauthorized object access in S3Audit Trail, that keeps track of who used the CMK and when. They can create and manage their own customer master keys, or AWS Managed CMKs, with distinct account, region, and service credentials.
SSE-C, Server-side Encryption with customer-provided keys: Here you, the customer, take charge of the management of encryption keys. So, while you are responsible for managing the keys, S3 takes care of the encryption and decryption, but it does not store the encryption key. It stores a salted HMAC value of the key instead, to validate future requests.
The HMAC key, however, could not be used for finding the encryption key value or decrypting the contents, which means that losing the encryption key would make you lose the data.
Here, you encrypt the data before sending it to S3. You may follow one of the following two procedures:
Client-side encryption-CMK stored in KMS: Here,
While uploading an object, the client sends a request for the new symmetric key(required for the data object encryption) to the KMS using the CMK ID. The KMS in turn will give a plain text key for data encryption along with a cipher blob key version as metadata.
While downloading the object, the client downloads the encrypted object from S3 along with the cipher blob version of the data key. The client then sends the cypher blob to KMS and retrieves the plain text version of the data key for decrypting the data object.
Client-side Encryption-Master Key stored with the Application: Here, the client uses the Master Key stored with the application.
While uploading an object, you provide a client-side master key to the S3 encryption client, which makes use of that master key to encrypt the data encryption key that is randomly generated. After that, the S3 encryption client generates a symmetric key that can be used only once, and it makes use of the data key to encrypt the data of a single S3 object.
The S3 data client generates a separate data key for every object. The S3 client then encrypts the data encryption key using the master key that you have provided as part of the object. While downloading an object, using the Master Key stored with the application and the object’s metadata, the S3 determines which Master key has to be used for data decryption.
It then uses the master key to decrypt the data key, decrypts the object using this data key, and sends the object back to you.
AWS Console
To understand the concept better with all the features explained using the AWS Console, go through our YouTube video at S3 encryption.
Reference for Amazon S3:
https://docs.aws.amazon.com/AmazonS3/latest/userguide/Welcome.html
Summary:
Hope you have enjoyed this detailed article about AWS Amazon Web Service guide. By using this AWS tutorial, you can advance your deployment skills in AWS which helps uplift your cloud career to higher levels. We suggest trying our AWS Hands-on Labs which has guided sessions and Lab challenges to fasten your AWS learning. The positive factor with our Hands-on Labs is you can reduce your configuration expenses and prevent errors while configuring services. Keep Learning!
- Which AWS Certification is Best For Developers - December 5, 2023
- Top Popular Hands on Labs for Google Cloud Platform (GCP) - October 29, 2023
- 7 Exam Tips for Google Cloud Database Engineer Certification - September 21, 2023
- What Is Azure Web Application Firewall (WAF)? - September 8, 2023
- The 5 Best Team Chat Apps for Business in 2024 - August 10, 2023
- What is Microsoft Cybersecurity Reference Architectures? - July 31, 2023
- How to Secure & Migrate your SAP Environment on AWS - July 26, 2023
- A Comparison of SUM-DMO and SWPM - July 21, 2023