There is no doubt that Amazon Web Services (AWS) is the leader in the cloud computing market. Besides, to provide its users with better and robust services, it regularly updates the platform with the latest innovations. AWS helps companies and corporates with different types of workloads. For example, massive data processing, development of apps, warehousing, and many more. But there is something more. AWS is much more than just the simple browser console. If you want to explore more about it, then it’s time to learn about AWS Command Line Interface.
If you don’t know much about it, well, there is nothing to worry about. Here we will discuss all the things about AWS CLI. You will learn how to install AWS CLI, how to use AWS CLI, AWS CLI configure, and more. But, first, let’s know what AWS CLI is?
Preparing to become a certified AWS professional? Check our AWS Certifications Training Courses now!
Understanding the AWS Command Line Interface
Before knowing how to Install AWS CLI, it is essential to understand this. AWS CLI is a tool, which can be used to monitor and manage all the AWS services and features from the client’s terminal session. Even though the AWS APIs or management console can control almost all the AWS services, there is another way that can be quite useful in some cases. That is the “Command Line Interface.”
Once you install AWS CLI, you can unlock the true potential of the AWS environment. All you need to download and install the AWS CLI, and you are ready to manage various AWS services using command lines.
With easy installation and configuration, you can utilize all the functionality using the terminal program. That can be:
1. WCL-Windows Command-Line:
On your Windows, you can quickly execute different commands in the PowerShell and the command prompt.
2. Linux Shells:
The users can use various command shell programs, such as zsh, bash, and tsch, to execute commands in Unix, Linux, and macOS.
3. Remote Terminal:
You can even execute the required command on Amazon EC2 using a remote terminal, for example, SSH and PuTTY.
Apart from all these, AWS CLI offers easy access to AWS public APIs. Furthermore, it provides effective customization for different services.
Must Read: Exploring the Basics of AWS: AWS Cheat Sheet
Benefits of Amazon Web Services CLI
One of the most major benefits of the AWS CLI is it saves a lot of time. Some other benefits include,
- It supports all the AWS services.
- The installation is quite smooth and simple.
- Most of the AWS CLI users find it much faster than other platforms.
- It comes with shell scripts that let it automate the cloud infrastructure effectively.
Installing the Amazon Web Services CLI
Before installing, you need to download the AWS CLI. Depending on the operating system you are using, you need to follow different processes to Install AWS CLI.
For macOS, Linux, and Unix
Ensure that you are using the latest version of Python. Make sure you have Python 2.6+ or Python 3 and above. You can check your Python version, by suing ‘Python – -version’ command.
Now let’s start with the installation process:
To installing the Amazon Web Services CLI, prefer to use the installers come with AWS. With the installer, you will find all the required dependencies to install AWS CLI.
- To start the installation, use the bellow given command
“curl “https://s3.amazonaws.com/aws-cli/awscli-bundle.zip” -o “awscli-bu.”
- Then, you need to unzip the downloaded package. For this use, this command
“unzip awscli-bundle.zip.”
- After that, you can begin the installation
“Sudo ./awscli-bundle/install -i /usr/local/aws -b /usr/local/bin/aws”
The -b option lets the users run the AWS CLI from a different directory. That means you don’t need to mention the installation directory. Follow these steps to install Amazon Web Services CLI in macOS, Linux, and Unix system.
Installing AWS CLI on Windows
To install the AWS CLI in a Windows system, make sure that you are using Windows XP and above version.
Now, let’s install this:
You will get three MSI installer. Choose as per your requirements
- 32-bit
- 64-bit and
- CLI setup file
First, choose the required option to begin downloading the MSI. Then, execute the MSI installer. Follow the onscreen instruction displayed on the screen. That’s it. After that, you can locate the executable files in the installed directory. For example,
In the 64-bit version, the location will be -C:\Program Files\Amazon\AWSCLI
In the 32-bit version, the program location will be- C:\Program Files (x86) \Amazon\AWSCLI
Now, to confirm the successful installation of the program, you can use ‘aws – -version’ command.
You can also install this using Pip. For this, follow the below-mentioned steps.
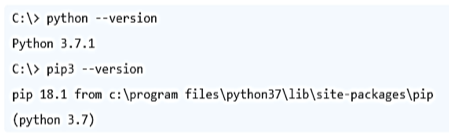
1. You need to first open the command prompt. For this open start menu and then search for CMD. Click on it.
2. Now, you need to make sure that Pip and Python are installed properly, and you are using the latest version. Here is the snippet for commands that you can use to check it.

3. Use Pip to install AWS CLI
![]()
![]()

4. Now, you need to check everything went fine. Check the snippet given below to know the commands.
An AWS Elastic Load Balancer distributes the load evenly to multiple instances. Let’s understand the working of AWS Elastic Load Balancer!
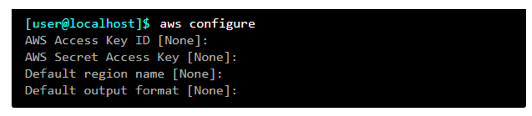
How to Configure AWS CLI?
You can run some command to put your secret and access keys for the bucket. You need to accept the ‘default output format’ and ‘default region.’ For this press ‘Enter.’ You don’t need to input anything for the output format and region. Here is a snippet of the commands.
Now, you are ready to use ‘aws-cli’ commands to interact with the bucket.
When you use the above commands, during the session, the virtual environment remains active. But when you lot out and then log in again after some time, you will find it de-active. So, how to activate the virtual environment automatically whenever you log in? You need to add some commands to the .bash_profile. Here is the snippet of this command.
![]()
The AWS secret and access keys are generally used to authenticate the AWS account. It gives you the authority to perform some specific tasks based on the permission level. It may be noted that it is not possible to restore the lost access keys.
How to Use AWS CLI?
Just think, you have carried out some tasks on Amazon Web Services and you have done it with the help of Amazon Web Services management console. Well, the same thing can be done, but putting fewer efforts through Amazon CLI. You can consider the below example.
You want to start the AWS Linux instance. If you’re going to do this using the AWS management console. To lunch the AWS instance, you will need to following steps:
- First, open the EC2.
- Now, click on Launch Instance.
- After that, you need to choose AMI and the type of instance that you want to create.
- Now visit the Configure Instance Details page, set network, IAM, user data settings, and life cycle behavior.
- Open the Add Storage page and choose the storage volumes.
- Now, visit Add Tags page and add tags.
- Go to the Configure Security section and set a security group.
- That’s it. Now all you need to do is review and launch the AWS Linux instance.
It may look easy, but when it comes to launching multiple AWS instances, it will take a lot of time.
Now, let’s do the same task using AWS CLI. However, first, you need to install AWS CLI.
New IAM user creation using AWS CLI
Here, we will create a new IAM group and users. After that, we will add the users to the IAM group with the help of AWS CLI.
- Use create-group for new IAM group creation
“$ aws iam create-group –group-name mygroup.”
- Now, create a new user using create-user
“$ aws iam create-user –user-name myuser.”
- To add the newly created users to the group, you need to use the add-user-to-group command
“$ aws iam add-user-to-group –user-name myuser –group-name myiamgroup”
- Now, you need to allow a policy to the newly added users. For this, use the put-user-policy command
“$ aws iam put-user-policy –user-name myuser –policy-name mypoweruserole –policy-document file://MyPolicyFile.jso”
- Want to assign some access keys to the IAM users, use create-access-key
“$ aws iam create-access-key –user-name myuser.”
Starting AWS Linux instance with the help of AWS CLI
Remember that before starting the Linux instance, you need to create a security group and key pair.
- Now use create-key-pair to create the key pair.
“$ aws ec2 create-key-pair –key-name mykeypair –query ‘KeyMaterial’ –output text > mykeypair.pem”
- Create a new security group and add the rules
“$ aws ec2 create-security-group –group-name mysecurityg –description “My security group.”
After that, you can launch the EC2 instance just by using run-instance command.
“$ aws ec2 run-instances –image-id ami-09ae83da98a52eedf –count 1 –instance-type t2. micro –key-name MyKeyPair –security-group-ids sg-903004f8”
You might think that it is quite complex than using the AWS management console. But the truth is this is very simple. You can obtain the same result just by combining all the commands and then save them in a script format. With this, you can alter the codes and execute them whenever you want. There is no need to start the process from the beginning. For more detail, you can check the official AWS CLI documentation.
OpsWork allows you to define and deploy a stack of components. Here’s how OpsWork stack looks and how to implement it!
How to Uninstall AWS CLI?
To uninstall AWS CLI, you need to understand how you had installed the program, using Pip or commands. However, there are simple steps and commands following which you can uninstall the program. Here is a snipped of the commands that can be used to uninstall the AWS CLI.

Now, you know a lot of things about AWS CLI, its installation, and how to use it. The AWS Command Line Interface is an effective as well powerful tool that helps you in managing the cloud services. You can now give it a try. Remember that AWS CLI can perform much more than you have ever imagined. There is a lot of things that you can explore about AWS CLI by using AWS CLI documentation.
Want to know more about AWS CLI and it’s installation? Just start a discussion at Whizlabs Forum to get answers by the experts.
Bottom Line
AWS CLI is a tool that is used to monitor and manage all the AWS services and features from the client’s terminal session. Besides AWS APIs or management console, it’s another way to control AWS services. So, here we have learned how to install and configure AWS CLI on different operating systems. We’ve also covered how to use and uninstall the AWS Command Line Interface.
If you are an AWS professional working on AWS CLI, you may find a number of job opportunities for you to get ahead. Still, an AWS certification is always an add-on as it validates your skills and adds a credential in your resume. So, if you are aspiring to get recognition for your skills, check out our AWS certification training courses and start your preparation to get ahead in your career.
- Top 20 Questions To Prepare For Certified Kubernetes Administrator Exam - August 16, 2024
- 10 AWS Services to Master for the AWS Developer Associate Exam - August 14, 2024
- Exam Tips for AWS Machine Learning Specialty Certification - August 7, 2024
- Best 15+ AWS Developer Associate hands-on labs in 2024 - July 24, 2024
- Containers vs Virtual Machines: Differences You Should Know - June 24, 2024
- Databricks Launched World’s Most Capable Large Language Model (LLM) - April 26, 2024
- What are the storage options available in Microsoft Azure? - March 14, 2024
- User’s Guide to Getting Started with Google Kubernetes Engine - March 1, 2024