
Amazon Elastic Compute Cloud or Amazon EC2 is defined as a virtual computing environment. It allows people to use their web service interfaces for launching several instances with diverse operating systems. Along with that, it also allows the users to implement network access control or permissions.
Apart from these perks, Amazon EC2 has a lot more to offer the business owners for streamlining their operational aspects. Therefore, this guide is the best material for you to educate yourself about the detailed aspects of Amazon Elastic Compute Cloud or Amazon EC2.
Go through the complete Virtual Private Cloud Guide today!
What is Amazon EC2 or Elastic Compute Cloud?
Amazon EC2 is one of the most prominent services of AWS that has helped businesses to run their applications over the public cloud seamlessly. With the use of the EC2 interface, the developers can integrate several virtual machine instances and configure their scaling capacity.
The purpose of integrating Amazon EC2 into the business environment is to build apps for automating the scaling aspects based upon the needs and requirements at certain instances. Along with that, it becomes really easy to manage the storage and deploy virtual servers over the cloud with the use of Amazon EC2.
The best part is that you are saving a lot on the upfront cost of setting up the hardware proposition. And, you are also inching your operational aspects to streamline the development processes within your enterprise with EC2.
Get Free Questions on AWS Solutions Architect Associate Certification
Amazon EC2 is billed based on the size and hours of instance, operating system, and region. Apart from that, the billing is also done based upon resource consumption. Setting up Amazon EC2 for your business operations is quite convenient and easy. You will get to know more about it further in this guide. So, follow on till the end!
How Can You Use Amazon EC2?
In order to better understand the efficacy of AWS Elastic Compute Cloud, it is important for you to understand and implement the right ways of using it. Therefore, here are the steps that you need to follow for using this popular AWS service:
- Firstly, you will have to select an AMI (Amazon Machine Image), which is usually a pre-configured template. You need to pick one right away to instantly move onto the next step of integrating it. If not that, you can still create a custom AMI that will have your data, applications, libraries, configuration setting, and other such aspects.
- In the second step, you will have to configure network and security accessibility upon the EC2 instance.
- Now, select the type of instance you wish to integrate, following to which you can start, monitor, and terminate the instances as per the necessity of your AMI. You will be doing it with the use of APIs embedded within your web service and the management tools offered to you with EC2.

- Now, you will have to determine whether you want to run your EC2 instance in multiple locations. Along with that, you will also have to utilize the IP endpoints. If not that, you will have to add block storage for your EC2 instances.
- Finally, you will be billed only for the resources that you actually use, such as data transfer or instance hours.
Know the Features of Amazon Elastic Compute Cloud
As you have understood the ways of implementing Amazon EC2 into your business operations, it is important for you to check on the features as well. With the proficient idea of the core features of Amazon EC2, you will gain knowledge about using it in the right manner for enhancing productivity. The features are:
-
Hibernating & Resuming the Instances
Amazon EC2 instances can be hibernated based upon the needs and requirements of users. It is possible with the implementation of Amazon EBS. Hence, you can resume the instance anytime later from the hibernation state without much hassle.
It is mostly preferred for applications that have high latency in terms of bootstrapping and persisting into RAM. With the use of this hibernation feature embedded within Amazon EC2, you can stop or start anytime you want. Along with that, the data from RAM also gets persisted within these sessions.
The best part is that Amazon doesn’t charge you for the hibernating hours of your Amazon EC2 instance. But, yes, the storage will be charged at standard pricing. You need to check the details of the compatible OS and instance types in the official operation guide of Amazon Elastic Compute Cloud.
-
High I/O Instances
The customers who demand random I/O access for their respective data can rely upon the High I/O instances within EC2. Not just that, but the people expecting to tweak the latency between high and low can also use this instance type for the purpose.
This type of instance within Amazon Elastic Compute Cloud is destined to offer customers some high random I/O rates that go over 3 million IOPS. These instances are executed with the support of SSD-based Non-Volatile Memory Express. It is appropriate for the users who wish high-performance NoSQL databases, Elastic Search Workloads, or transactional systems.
-
Highly-Optimized CPU Configurations
It is one of the most important features embedded within Amazon EC2 that allows the users to gain more control over their EC2 instances from two aspects. The first aspect is that you get the potential to specify a custom count of vCPUs while you launch new EC2 instances. It will eventually help you save the additional licensing cost upon vCPU.
The second aspect is that you can use it for disabling the option of multithreading for select workloads that are adequate to perform well upon single-threaded CPUs. This implementation is mostly required for the applications that demand high-performance computing.
-
Diverse Storage Options
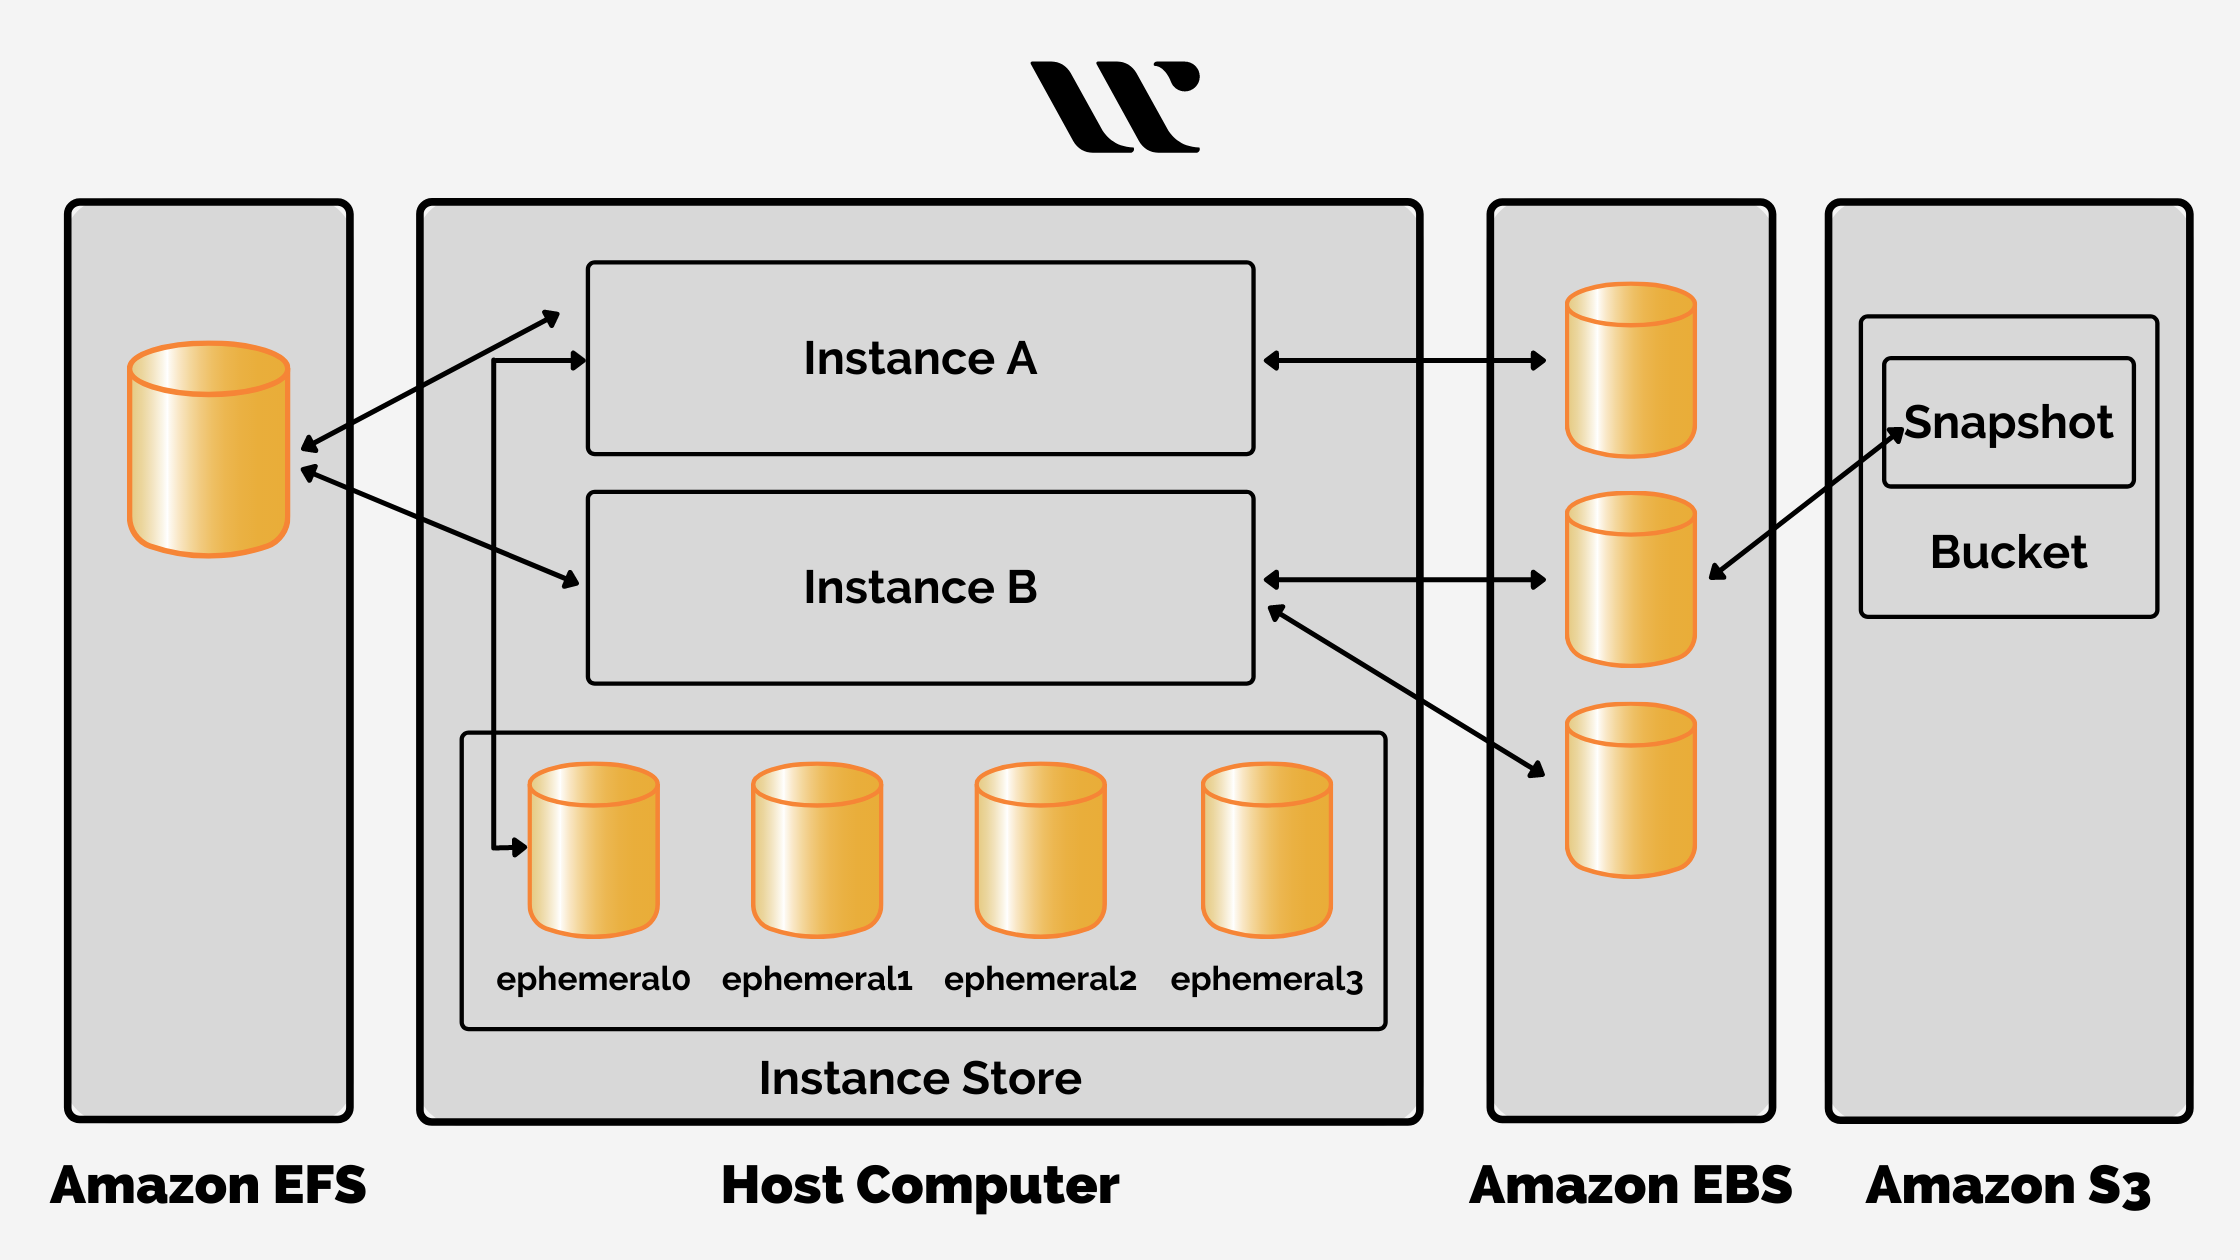
Amazon EC2 understands that different workloads might have different storage requirements. Therefore, Amazon has implemented flexible storage options within Elastic Cloud Compute functionality. Apart from the usual instance storage, Amazon EC2 also has Elastic Block Store (EBS) and Elastic File System (EFS) to meet the cloud storage need of different workloads.
Amazon EBS is destined to offer a consistent and low time delay storage volume for users to implement it with their EC2 instances. Amazon EFS is yet another simple and scalable yet a fully-managed file storage solution for implementing shared access.
These are just a few of the many important features that explain the true potential of Amazon Elastic Compute Cloud for business operations. It has elastic IP addresses, auto-scaling, multiple locations, enhanced networking, availability on AWS private link, and many more such features to streamline the business operations and data management.
Available Operating Systems that can be used with Amazon EC2 Instances
The Amazon Machine Images are configured to work seamlessly with diverse operating systems. Some of the operating systems that are available for integrating with the EC2 instances are Amazon Linux, Windows, CentOS, and Debian.
There are different charges stated on the use of different Operating Systems. So, make sure you consider all the associated factors before picking one amongst the list for calibrating with Amazon EC2 instances.
Have you checked out 40+ Best Performing Free Tests from Whizlabs!
Benefits of Leveraging the Use of Amazon EC2
Amazon Elastic Compute Cloud is meant to offer you elastic load balancing as a prime perk amongst all. With it, you can expect an automatic distribution of your application traffic to different instances. It will also help identify the unhealthy instances and direct the traffic only towards the healthy ones until the damaged instances are fixed.
Along with it, there are some other considerable perks to the use of Amazon Elastic Compute Cloud as well, such that:
- Amazon EC2 intends to reduce the booting time while working with new servers.
- As the computing requirements change, the scaling capacity can also be tweaked or enhanced accordingly.
- The users will have complete control over servers. Moreover, they can also infuse accessibility permissions upon the servers and instances.
- There is high-end flexibility in terms of storage options and operating systems. You can pick an ideal OS and storage option that you think is perfectly suitable for your workload.
- It also consists of built-in security for keeping your data protected at all times.
Why Amazon EC2?
Amazon EC2 is more flexible than traditional machines and offers a lot of other possibilities as well. We can start with small instances and we can increase the size when the traffic is increased and that can be done within minutes. It’s easier to increase the storage capacity as well. You don’t have to worry about security patch updates, etc since these are taken care of by AWS. The cost is another important factor to consider using EC2. We will be paying only for what we have used.
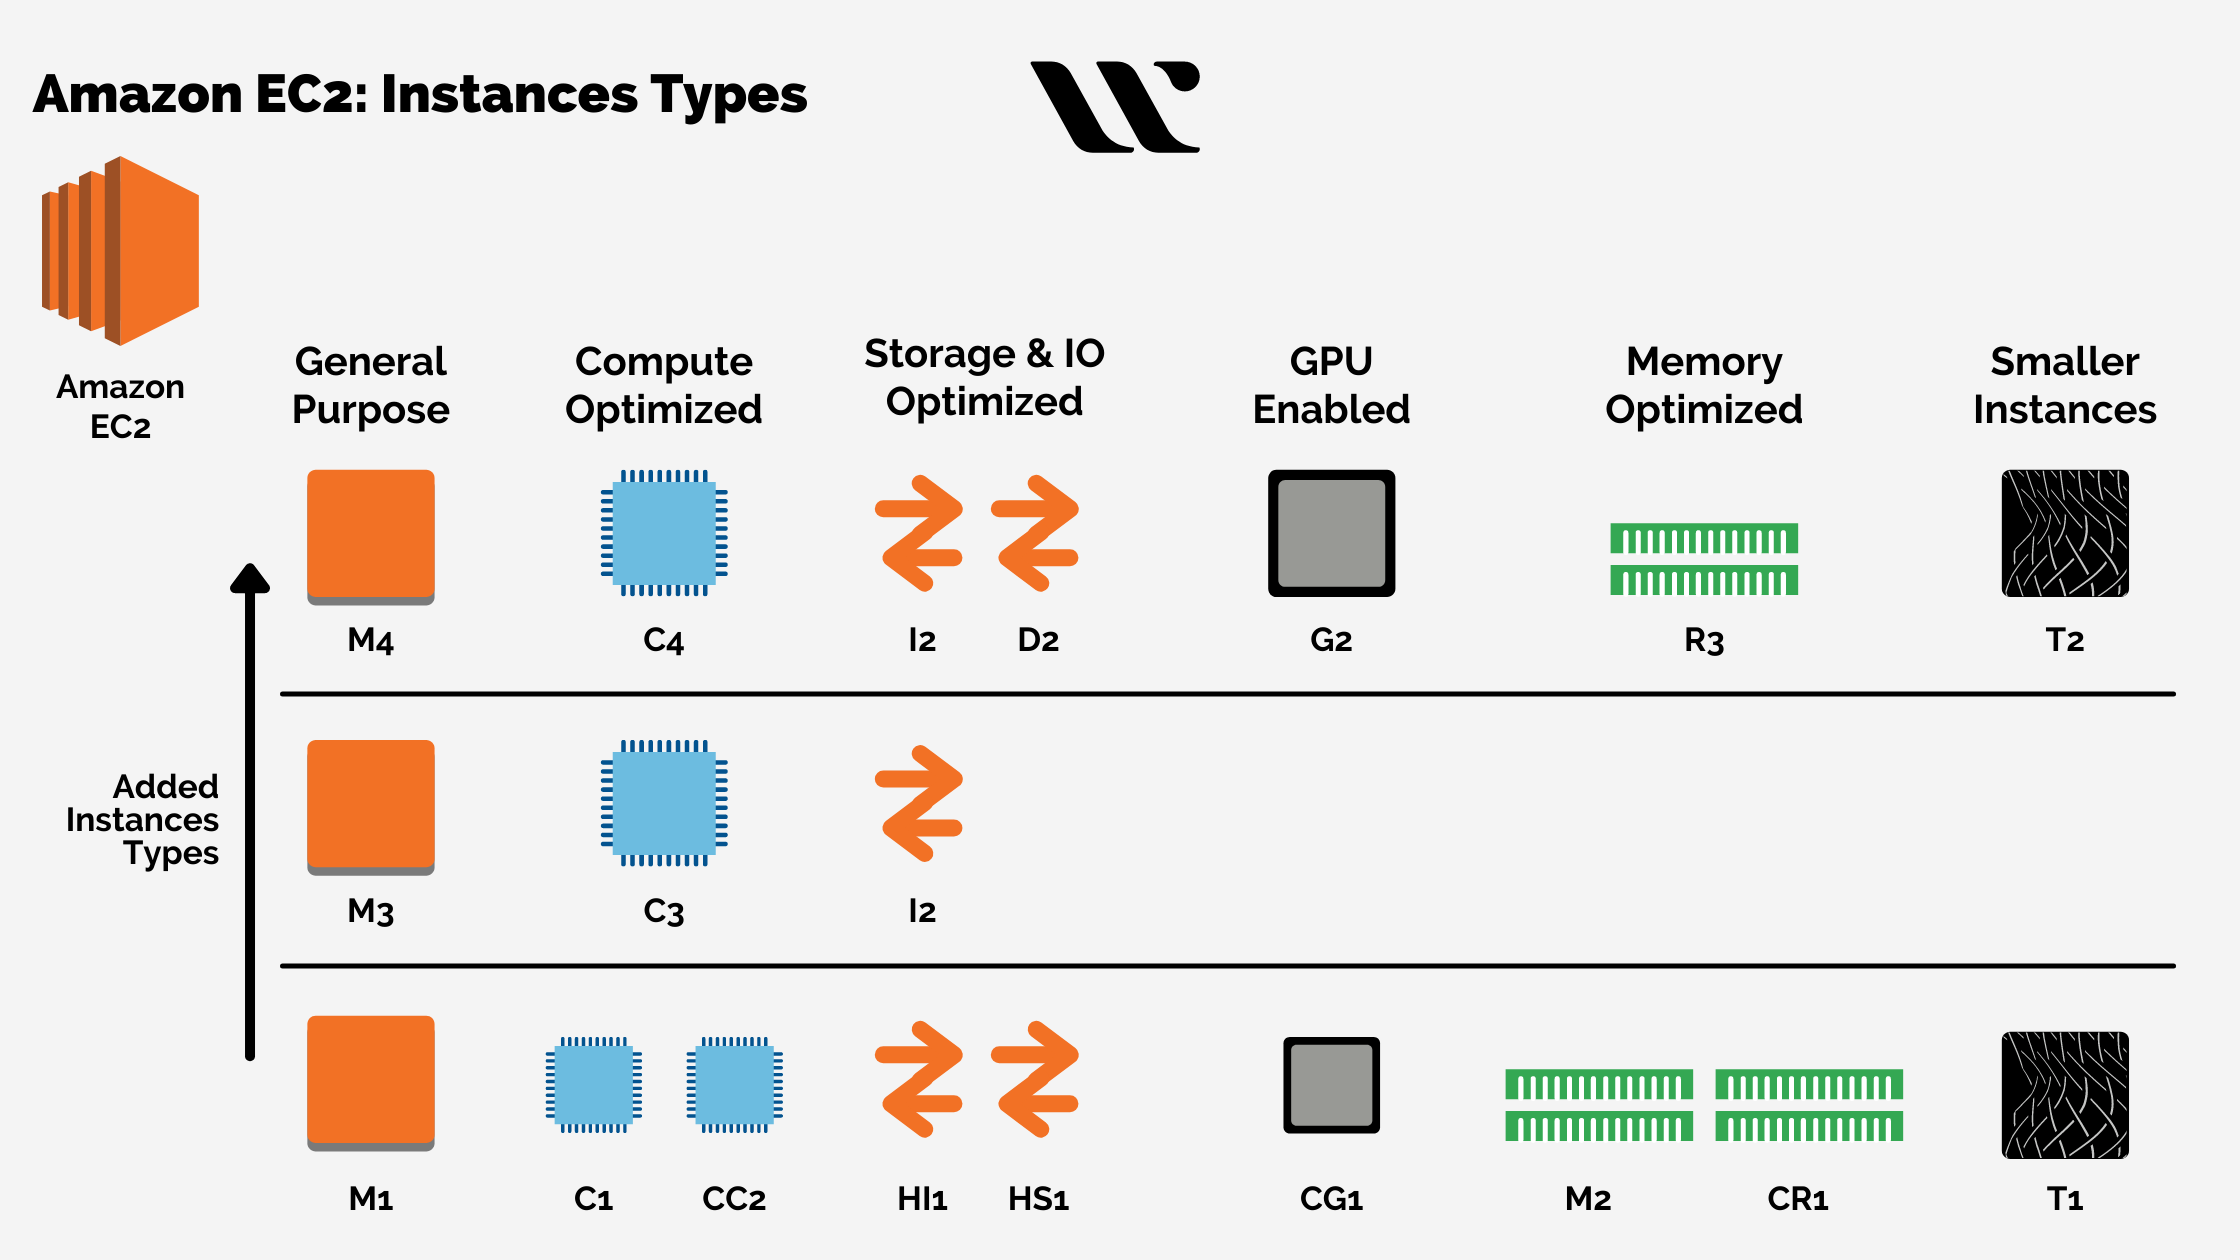
Types of EC2 Instances
The nature of our application or task will decide which type of instances we need. AWS offers different types of instances optimized for different use cases or workloads.
- General Purpose Instance
- Compute Optimized Instance
- Memory Optimized Instance
- Storage Optimized Instance
- Accelerated Computing
General Purpose Instances
The general purpose instances are divided into two varieties, T and M. This type of instance is suitable for applications that require to balance performance and cost. T and M instances are based on the virtualization types PV and HVM. T instances are more suitable for testing environments and M instances are suitable for production workloads.
Compute Optimized Instances
The compute optimized instances (C type) are recommended for the workloads which require a lot of processing power from the CPU. More suitable for data analysis and data processing applications.
Memory Optimized Instances
If the application is heavy and needs a lot of RAM but doesn’t require a lot of CPU power, then memory optimized instances are the best choice.
Storage Optimized Instance
Storage optimized instances are provisioned with more storage capacity. H, I and D instances belong to this group. When the application is huge and has a lot of data to be stored on the local disk, this type of instance would be a better choice.
Accelerated Computing
P and G instance types belong to this group. These types of instances are more suitable for the applications which require heavy graphics rendering. These instances have their own graphics card and GPU based on the instance size.
Elastic Compute Cloud (EC2) Pricing Options
AWS offers different purchase options for EC2:
- On Demand Instances
- Spot Instances
- Reserved Instances
- Dedicated Hosts
- Dedicated Instances
- Capacity Reservations
On-Demand instances are used when you don’t want any upfront payment and long term commitment. Follows pay-as-you-go pricing model and recommended for unpredictable and short term workloads.
Spot Instances can give discounts of up to 90% compared to on-demand instances. This pricing option enables you to bid on unused EC2 instances. Price fluctuates based on the availability of instances. Recommended for batch processing and not recommended for critical jobs.
Reserved instances save a significant amount of cost compared to on-demand instances. In this type you reserve the instance for a specific period of time.
There are three payment options available for reserved instances:
- All Upfront
- Partial Upfront
- No Upfront
There are two term lengths available to select from:
- One-Year
- Three-Year
There are two different classes available in the reserved instance type.
- Standard Reserved Instances
- Convertible Reserved instances
Dedicated Hosts is a physical server with EC2 instance capacity that is dedicated for your use. This is the more expensive instance type and suitable for companies which have a strong compliance need.
Dedicated Instances are running on the dedicated hardware. May share the hardware with other instances running on the same account which are not dedicated instances.
Learn the AWS pricing model before progressing your services for better cost optimization!
How to Create an EC2 Instance?
We have learnt about the EC2 basics in our previous tutorial. In this demo, we will dive deep into the EC2 instance in management console and see how to create an EC2 instance. I assume that you have an AWS account already or you can also use Whizlabs Hands On labs environment to get AWS login credentials.
Login to AWS management console and navigate to the EC2 dashboard by clicking on the Services tab and EC2.
 Now, click on the “Launch Instance” button. Give a name as you wish and select the AMI type. We will create an Ubuntu 20.04 with SSD volume for this type.

Now, we need to select the instance type. The t2.micro is a free tier eligible instance type so that we will be creating t2.micro for this tutorial. You can select any instance type as per your needs (please check the pricing before launching the instance).

We need a key pair to connect to the EC2 instance. We can either select the existing key pair or create a new one. For this demo, we will create a new key pair. Click on “Create new key pair” and give a name then click on create key pair. Save the file in your local.

Leave the network settings as it is or enter your settings. I have enabled HTTP traffic to this instance.

Next, we need to select storage for the instance. Add the storage you need and select the storage type. I have selected a general purpose SSD (gp2) for this demo.

Review the settings and click on launch instance.

Within a few seconds, our instance will be created. Navigate to the EC2 dashboard and you should be able to see the instance in the running state.

That’s it! We have successfully created an EC2 instance.
Connecting to EC2 instance
Let us now connect the instance which we have created using SSH. We have created a keypair with the name whizlabs-demo.pem. We need to change the file permission for this file. Run the following command to change the permission (replace the file name with your keypair file name).
chmod 400 whizlabs-demo.pem
Run the following command to connect to the instance. Replace the ip address with your public ip address.
ssh -i “whizlabs-demo.pem” [email protected]

Configuring Elastic IP
Now, we have a public IP assigned to our instance but that’s not a static IP address. If we restart the instance, this IP will be replaced with another one. Elastic IP resolves this problem. We will see how to assign elastic IP to the instance in the following steps.
Go to the EC2 dashboard and click on the Elastic IP.

Click on “Allocate Elastic IP Address” and leave the settings as it is and click on allocate.

An IP address has been allocated but not associated with any resource. We need to associate it with the instance which we have created. Select the Elastic IP and click on actions then click on associate elastic ip address.

Select the instance id and click on associate.

You can verify this by navigating to the EC2 dashboard.

Cleanup
As we don’t want to be billed, we will terminate the instance and release the Elastic IP as well. Note that, if the elastic ip address is kept unassociated with any resource, we will be charged for that as well.
Go to EC2 console, select the instance, click on instance state and select terminate instance.

Then navigate to the Elastic IP section, select the IP address and click on release IP address.

How to Create an EBS Volume and Attach to EC2?
Login to AWS console and navigate to EC2 dashboard. Under Elastic Block Store, click on Volumes.

Choose volume type. I am selecting gp2 for this demo. Enter the volume size and select the availability zone where you want to attach. If you want to encrypt the disk, you can select the option “Encrypt this volume” and select the default KMS key. For this tutorial, I am creating a volume without encryption. Review the settings and click on create volume.

Navigate to the EBS dashboard to see the volume. Let us see how to attach this volume to an EC2 instance.
Click on the volume ID and click on Actions dropdown and select the option “Attach Volume”.

Select the instance ID and click on attach.

Migrating EC2 instance from one region to another
As we know that AWS has regions and availability zones. Most of the AWS services are region specific. If you are running your servers on AWS, you may come across a situation where you want to migrate an EC2 instance running on one region to another region or one AZ to another AZ. In this article, we will see how to move EC2 instances from one region to another and one AZ to another AZ and one VPC to another VPC.
What is a Region?
Regions are the physical data centers of Amazon located around the world. Each region has different data centers which are physically isolated from each other and called availability zones.
Migrate EC2 instance from one region to another
I have an EC2 instance already created in the us-east-1 (N Virginia) region and I will migrate the instance to us-east-2(Ohio) region.

To migrate the instance, we need to create an Amazon Machine Image (AMI) from the existing instance and have to create a new instance in the new region.
Select the instance and click on the actions dropdown, and select “image and templates” and click on the “create image”.
Give a name and optional description then click on “create image” button.

Once the image is created, it needs to be copied to the destination region. In our case, it’s Ohio(us-east-2). Select the image and click on actions dropdown and select copy ami.

Give a name and description, select the destination region. Then click on the “Copy AMI”.

Once the AMI is copied, the same will be visible on the destination region as well.

Now, we need to launch an EC2 instance using the newly copied AMI.

That’s it, we have successfully migrated the instance from the N Virginia region to the Ohio region.

Setting up Performance Monitoring for EC2 Instance
Monitoring your cloud infrastructure is one of the major challenges you face when you migrate your servers to the cloud. Most of the AWS services integrate seamlessly with AWS CloudWatch, which is Amazon’s built- in service that helps you to configure monitoring and alerts in just a few clicks.
Amazon EC2 allows you to create instances on the cloud within minutes. Since it’s a managed service, it’s recommended to utilize the monitoring tools provided by AWS.
AWS CloudWatch Overview
CloudWatch is a monitoring tool or service offered by Amazon for the infrastructure and the applications running on it. CloudWatch can be used to monitor various AWS services and create metrics and alarms. It enables real time monitoring for AWS services like EC2 instances, RDS, etc.
Namespaces: A container for CloudWatch metrics. Metrics in one namespace are isolated from another namespace.
Metrics: Set of time-ordered points published to CloudWatch.
Dimensions: A unique identifier for the metric.
Statistics: Metric data aggregated over the time period.
Alarms: Used to initiate actions on your behalf. Alarm monitors the metrics based on time interval and performs the suggested actions.
Configuring CloudWatch Alarm
We will see what are the basic alarms that need to be configured while deploying an EC2 instance. For this demo, we will configure default and custom metrics for the deployed EC2 instances. We also configure healcheck and HTTP errors.
- CPU Utilization
CPU utilization is a CloudWatch metric that is available by default. To configure this metric, login to the AWS management console, navigate to the Management tools and select CloudWatch.

Click on the Alarms on the left then click on create alarm.

On the next screen, click on the select metric.

Select the metric “CPU Utilization” for the EC2 instance which you want to monitor. I have selected the instance named as cloudwatch-demo.

On the following screen, you will have an option to give a name and conditions for the alarm. Enter the details and click on next.

On the next page, we need to configure the alarm actions. Define when the alarm should perform the actions and select the SNS topic. We can create a new SNS topic from this page if we don’t have the existing one.

Apart from sending the notifications, CloudWatch alarm can also perform other actions like autoscaling and EC2 state change, etc. For example, if the metric goes beyond the desired value, we can set the alarm to reboot the instance.

Click on next, you will see a review page. Review the settings and click on create alarm.

Once done, you can see the alarm created on the CloudWatch dashboard.

If you click on the alarm name, you would be able to see a detailed view of an alarm.

System Status Check
StatusCheckFailed_System is another important metric for the EC2 instances. This metric is also available by default. To configure alarm for this metric, repeat the previous steps and select the metric as “StatusCheckFailed_System”.

Please remember that there are two status checks performed. System status check and Instance status check.
System Status Check monitors the AWS system required to use our instance. This check will fail in case of:
- Loss of network connectivity
- Software or Hardware issues on the physical host
- Power issues
Usually these failures will be fixed by AWS or by rebooting the instance.
Instance Status Check monitors the configuration and softwares of an instance. This status check will fail in case of:
- Incorrect network configuration
- Exhausted memory
- Corrupted disk/filesystem
Usually these failures need our involvement to be resolved.
For this demonstration, I have selected a metric as “StatusCheckFailed_System” to create an alarm. Apart from selecting SNS topics to send a notification, the preferred EC2 action for this alarm would be the “recover this instance”.

In this demonstration, we have created an EC2 instance, connected to the instance using SSH and allocated an Elastic IP address to the instance. We have also learnt how to create EBS volume and attach to EC2 instances. We have also seen how to migrate instances from one region to another. Hope you are able to follow along and the tutorial helped you.
Conclusion
These are just a few important enlightening details on the use of Amazon Elastic Compute Cloud. The practical use cases are meant to give you immense productivity at a very low but worthy investment. Therefore, if you intend to implement AWS services to your business operations, then Amazon EC2 should be one of the services that are to be picked on priority.
It will help streamline the business operations and help you with processing your operational workloads at ease. You can get in touch with AWS consultants to get more ideas about Amazon EC2 before you can integrate it for your particular requirements.
- Top 20 Questions To Prepare For Certified Kubernetes Administrator Exam - August 16, 2024
- 10 AWS Services to Master for the AWS Developer Associate Exam - August 14, 2024
- Exam Tips for AWS Machine Learning Specialty Certification - August 7, 2024
- Best 15+ AWS Developer Associate hands-on labs in 2024 - July 24, 2024
- Containers vs Virtual Machines: Differences You Should Know - June 24, 2024
- Databricks Launched World’s Most Capable Large Language Model (LLM) - April 26, 2024
- What are the storage options available in Microsoft Azure? - March 14, 2024
- User’s Guide to Getting Started with Google Kubernetes Engine - March 1, 2024