AWS or Amazon Web Services consists of several services that intend to improve the functionality of cloud operations for developers and organizations. All of those services are meant to serve different operations within the AWS infrastructure. For developers and organizations, it becomes difficult at times to pick the right services and the ways to provision them. Therefore, AWS Elastic Beanstalk came into existence!
AWS Elastic Beanstalk helps the users deploy or manage the apps within AWS Cloud. And in the pursuit of availing that, one doesn’t even need to keep track of the infrastructure that is responsible for running those applications. It is a magnificent innovation by Amazon Web Services and has impeccable features to help reduce the complexity for users in terms of management of apps.
There is more to AWS Elastic Beanstalk that you should know before integrating its implementation. Therefore, this article is here to explain to you the core insights about the Elastic Beanstalk and enlighten you with everything that you are supposed to know.
Definitive Explanation of AWS Elastic Beanstalk
AWS Elastic Beanstalk has the potential to suppress the app management complexity without putting up any choice or control restriction. It allows you to go ahead with uploading the application and let Elastic Beanstalk take care of the load balancing, application health monitoring, capacity provisioning, and scaling attributes automatically. It supports different applications that are developed on Java, Node.js, Python, Ruby, PHP, .NET, and Go.
The moment you deploy your application, Amazon Elastic Beanstalk integrates its process of building the dedicated platform version to provision the AWS resources for running the application. Amazon EC2 instances are one amongst the other resources that it provisions for running the operations. Moreover, it also allows you to perform most of the important deployment tasks directly from the web interface or console of AWS Elastic Beanstalk.
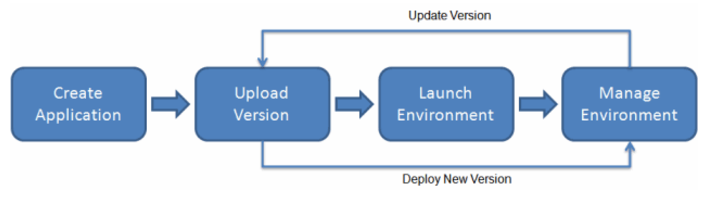
For using the Elastic Beanstalk, you are required to create an application, upload the specified version (as an application source bundle) that should be either in a .war, Java, or other such formats. Once it is uploaded to Elastic Beanstalk, now it is time for you to give in some additional information about the application. Some of the information that you should offer must include environment status, events, metrics, and others.
Amazon Elastic Beanstalk will then automatically create a specific environment to create & configure the required resources that are essential for running the application or the code embedded in it. After the environment is launched successfully, you can then manage the environment and implement newer versions without much hassle. The workflow of AWS Elastic Beanstalk is seamless and uninterrupted!
How to Get Started with AWS Elastic Beanstalk?
Getting started with Elastic Beanstalk is pretty much easy! You need to understand the adequate steps to create, explore, update and delete the application over Elastic Beanstalk. It is a seamless process, and you will need not more than an hour to complete these dedicated steps.
Here are the dedicated steps to help you create, explore, deploy, configure, and clean up an Elastic Beanstalk environment.
1. Create the AWS Account
It is true that you all are aware of this step to commence with almost anything over AWS. But, as the guide stated upon elaborating everything that you need to know within AWS Elastic Beanstalk, this step cannot be skipped. So, here are the steps to create an AWS account:
- Log onto this page by clicking on this link!
- Select the region you belong to, in the dedicated field.
- Now, enter the email address that you want to use for signing up.
- Follow the rest specified instructions, by filling in genuine details to complete your signup.
2. Creating the Application within AWS Elastic Beanstalk
Here are the steps to help you gain ideas upon the right steps to integrate or implement while creating an AWS Elastic Beanstalk. The steps are:
- Log onto the AWS Elastic Beanstalk console, by clicking on this link! If you are already logged in, then you will be redirected to the console right away.
- Now, you need to add the application tags to it. It is an optional step that you can preferably adapt to.
- Now, head to the platform section, and choose one of the platforms.
- Now, click on ‘Create Application.’
- Wait for around 5 minutes for the Elastic Beanstalk platform to process your request.
- An elastic beanstalk application will now be created, with the specified name given by you. For these steps, let’s take the name as “XYZ app.”
- The app is launched with some of the AWS resources that include Amazon EC2, EC2 security group, domain name, AWS CloudFormation stack, CloudWatch alarms, and others.
- Now, it creates a new app version with the default name as ‘Sample Application.’
- It then deploys the code for the Sample Application to the XYZ environment.
3. Exploring the Elastic Beanstalk Application Environment
Here are the steps that you need to adapt in order to get insight into the Elastic Beanstalk app’s environment:
- Access your Elastic Beanstalk console.
- Select the region you belong to, from the available options within the dedicated field.
- Within the navigation pane, you need to choose the tab ‘Environments.’
- Choose the name of the specific environment, from the available list, that you want to explore.
- You will get to see the top-level insight about the specific environment that you picked. For instance, you will get to see the health status, currently deployed app version, platform version, events, tags, and configuration.
4. Deploying A New Version of the Existing Application within the Elastic Beanstalk
In a specific time gap, you might need to look for deploying a newer version of the application. And the approach for the same is quite convenient with the dedicated steps, as highlighted below:
- You need to first download the sample application that must match the platform within the Elastic Beanstalk environment. Use one of the applications amongst Docker, Multicontainer Docker, Go, PHP, Python, Ruby, .NET, and others.
- Gain access to the Elastic Beanstalk Console, and pick your AWS region.
- Look for the ‘Environments’ tab, and select the environment upon which you wish to deploy a new version of the app.
- Go to the overview page of the selected environment. Now, you can go ahead and click on the ‘Upload and Deploy’ tab.
- Select on ‘Choose File’, go ahead, and upload the ‘sample application’ that you have picked in the first step.
- The console then automatically fills in the ‘Version Label’ with unique names. If you intend to type it out all by yourself, then you must make sure that the name is unique.
- Now, choose the ‘Deploy’ option, to complete the process.
5. Configuring the Environment
Environment configuration is yet another popular step that you need to implement in order to make your application more proficient within the environment. For instance, you can seek to change the type of EC2 instance, to ensure that your application experiences a change in terms of intensity. Here are the steps that you need to adapt in order to change the capacity of the environment:
- Gain access to your Elastic Beanstalk Console, and choose the dedicated ‘Region’ from the list.
- Go to the navigation panel, and choose the ‘Environments’ tab.
- Choose the name of the environment that you want to give a periodic configuration.
- Now, choose the ‘Configuration’ tab from the environment overview page or dedicated navigation panel.
- Head to the section of ‘Auto Scaling Group,’ and then you will have to change the ‘Environment Type’ to ‘Load Balanced.’
- Now, head to the row of ‘Instances.’ Make changes to ‘Max’ as 4 and change ‘Min’ with 2.
- Click on the ‘Apply’ tab.
- You will get a pop-up warning that will tell you that this update will replace all of the present instances within the environment. Click on ‘Confirm.’
- Choose ‘Events’ from the navigation menu. Wait for a few minutes, as the system takes a few minutes to update or configure the environment.
- Go ahead and verify the changes that you have made to the environment, by choosing ‘Health’ from the navigation menu of the environment.
- Go to the ‘Enhanced Health Overview’ page.
- Check the capacity of the environment, as it should be increased!
6. Cleaning up the Application, Its Versions, and the Environment
Now, you have successfully deployed the applications within the Elastic Beanstalk environment. So, it is finally time for you to know the steps to adapt the right process of deleting or cleaning up all of the application versions and terminate the specific environment.
Here are the steps that you need to implement for deleting the application versions:
- Gain access to the Elastic Beanstalk Console, and choose your AWS region.
- Now go to the ‘Applications’ tab and choose the dedicated app within which you want to delete the versions.
- Choose the ‘Application Versions’, and redirect to the dedicated page.
- Select all of the application versions that you wish to delete.
- Now, go to ‘Actions,’ and choose the ‘Delete’ option.
- Enable the option, ‘Delete versions from Amazon S3’.
- Select the ‘Delete’ option and click on ‘Done.’
Here are the steps that you need to implement in order to terminate the complete environment:
- Go to the navigation pane, choose the ‘Environments’ tab and choose the environment that you want to terminate.
- Go to the ‘Environment Actions’ tab, choose ‘Terminate Environment.’
- Confirm the termination pop-up, and click on ‘Terminate’.
Here are the steps that you need to follow for deleting the main application:
- Within the navigation panel, choose the application that you want to delete.
- Choose the ‘Actions’ tab, and go to ‘Delete Application.’
- Confirm the termination pop-up, and click on the ‘Delete tab.
Pricing of the AWS Elastic Beanstalk
There is no additional charge for you to use AWS Elastic Beanstalk. But, you have to pay for the AWS resources, such as EC2 instances and S3 buckets. It is because you use them for storing and running the application.
Therefore, check on the detailed pricing of the separate AWS resources on their dedicated pages, of Amazon EC2 pricing, Amazon S3 pricing, Amazon RDS Pricing, Amazon DynamoDB pricing, and Amazon SimpleDB Pricing.
You can also refer to the AWS Pricing calculator, to prepare your custom package and calculate the monthly billing price accordingly!
Benefits of AWS Elastic Beanstalk
As of now, you have understood the right ways of using the AWS Elastic Beanstalk. But to help you understand its core efficacy, here are the benefits of the same:
-
Fast & Simple
Elastic Beanstalk is referred to as the simplest initiative for deploying the application over AWS. Uploading the application is easy over the platform, with the help of AWS Management Console, integrated development environment, Git Repository, and IDE.
-
Productivity of the Developers
Elastic Beanstalk operates and provisions infrastructure for managing the application stack. It will also help you in keeping the application up to date with the latest updates and patches. You do not need to take hassle about it anymore to write codes for enhanced development. Configuring services and managing apps, will be handled by Elastic Beanstalk.
-
Optimized Resource Control
Elastic Beanstalk offers the flexibility to choose the desired AWS resources. For example, you might have to explain the Amazon EC2 instance type and others that are optimal for the application.
Final Words
These are a few of the things that explain the true potential of AWS Elastic Beanstalk. You need to keep in mind that a brief understanding of using the AWS resources is important, before you can utilize the use of Elastic Beanstalk.
For more information, you need to go ahead and adapt the integration of this new service. To know more about the concepts of AWS Elastic Beanstalk, refer to this link. You can also enroll in the skill-based AWS courses to enhance your knowledge about the AWS Elastic Beanstalk.
- Top 20 Questions To Prepare For Certified Kubernetes Administrator Exam - August 16, 2024
- 10 AWS Services to Master for the AWS Developer Associate Exam - August 14, 2024
- Exam Tips for AWS Machine Learning Specialty Certification - August 7, 2024
- Best 15+ AWS Developer Associate hands-on labs in 2024 - July 24, 2024
- Containers vs Virtual Machines: Differences You Should Know - June 24, 2024
- Databricks Launched World’s Most Capable Large Language Model (LLM) - April 26, 2024
- What are the storage options available in Microsoft Azure? - March 14, 2024
- User’s Guide to Getting Started with Google Kubernetes Engine - March 1, 2024