
In the dynamic world of cloud computing, understanding how to effectively deploy and manage Azure compute resources is essential for IT professionals and aspiring cloud practitioners. Azure Compute Resources empower organizations with the ability to provision and scale virtual machines, containers, and serverless solutions to meet diverse workload demands.
Microsoft Azure has emerged as a leading platform for deploying and managing compute resources. With the increasing demand for scalable and efficient infrastructure, mastering the deployment and management of Azure compute resources is essential for IT professionals seeking to excel in their Azure journey.
To navigate this landscape with confidence, the AZ-104 certification offers comprehensive knowledge and skills to ensure successful deployment and efficient management of Azure compute resources.
In this article, we explore the key concepts, strategies, and best practices to excel in AZ-104, equipping you with the expertise to deploy and manage Azure compute resources for optimal performance and business agility.
Let’s dive in!
Deploy and Manage the Azure Compute Resources
Before deploying any Azure compute resources, it’s essential to plan and design your infrastructure. Assess your requirements, including the number of virtual machines (VMs) needed, compute sizes, networking, and storage requirements. Consider factors like scalability, high availability, and cost optimization.
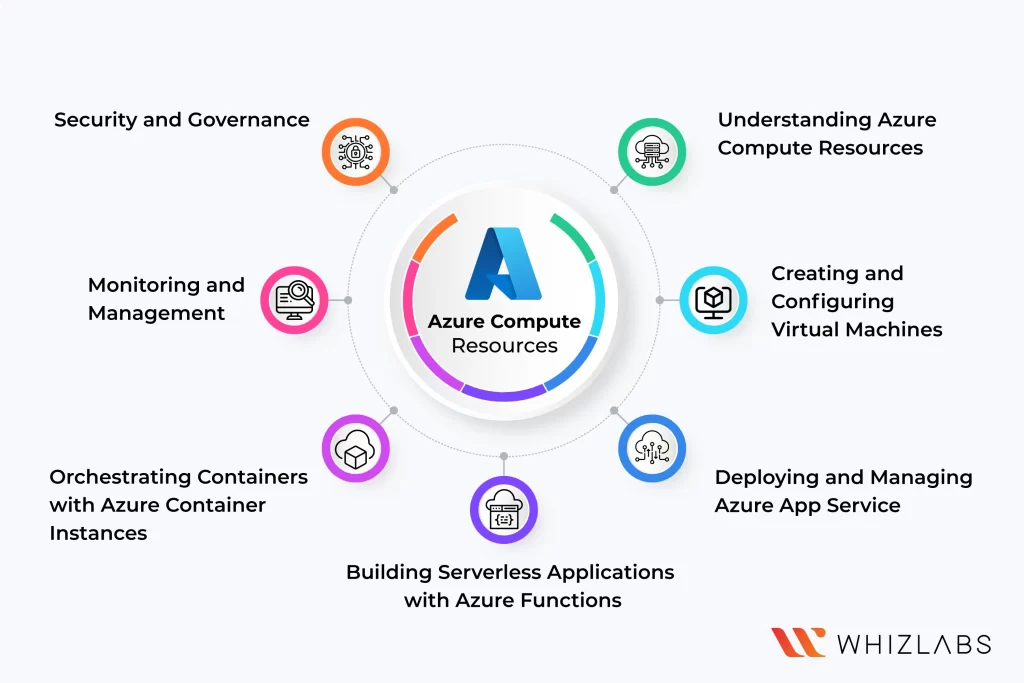
Here are some of the steps that need to be followed to deploy and manage Microsoft Azure compute resources, which may include:
Step 1: Understanding Azure Compute Resources
Azure compute resources encompass a range of services that enable the provisioning and management of virtual machines, containers, and serverless applications.
The primary compute options offered by Azure are as follows:
- Virtual machine: It is an IaaS service that enables us to deploy and operate virtual machines (VMs) inside of a virtual network (VNet).
- Azure App Service: This managed PaaS service can host RESTful APIs, web applications, mobile app backends, and automated business processes.
- Service Fabric: It refers to a platform that can be used in any setting, whether on-premises or in Azure. It is a machine cluster orchestrator for micro-services.
- Azure Kubernetes Service: Azure Kubernetes service oversees a hosted Kubernetes service.
- Azure Container Instances: This service provides the quickest and easiest way to run containerized applications in Azure without the need to install a high-level service or create any virtual machines.
Step 2: Creating and Configuring Virtual Machines
To deploy a virtual machine in Azure, start by selecting the appropriate VM size and image that best fits your workload requirements. Configure the VM settings, including network connectivity, storage, and security options. Utilize Azure Availability Sets or Availability Zones for ensuring high availability and fault tolerance.
We will be able to build and utilize virtual machines in the cloud via the Azure Virtual Machine. To build the virtual machine, we can use either our own image or one given by Azure or a partner.
You can be able to create and manage virtual machines by using:
- Azure Portal templates for ARM and PowerShell
- REST APIs for Azure CLI Client SDK
The configuration options that Azure provides for building a Virtual Machine are as follows.
- Operating system (Windows and Linux)
- VM size significantly impacts processing power, how many disks are attached etc.
- The region where the virtual machine will be hosted
- VM extension can provide capabilities such as running anti-virus etc.
- Compute, Networking, and Storage components will be built during the virtual machine provisioning
Step 3: Deploying and Managing Azure App Service
Azure App Service provides a platform for hosting web applications, mobile app backends, and RESTful APIs. Deploying your application to Azure App Service is straightforward, allowing you to focus on application development rather than managing infrastructure. Utilize deployment slots for seamless staging and testing before production deployment.
A fully managed platform for developing, deploying, and scaling web applications can be termed as Microsoft Azure App Service. We can easily launch our app by means of PaaS (Platform as a Service) without worrying about infrastructure or performance. Any language, including .NET,.NET Core, Java, Ruby, Node.js, PHP, or Python, can be used for development.
Both Windows and Linux-based systems make it simple to run and scale applications. Azure App Service makes use of Microsoft Azure’s DevOps features, such as continuous deployment from the Azure DevOps, in addition to providing security, load balancing, autoscaling, and automated administration to the application.
After creating the App Service plan, you have to configure the basic settings for the chosen App Service instance. It might include steps such as selecting the appropriate subscription, resource group, and region. You also set a unique name for your App Service instance and select the desired operating system, such as Windows or Linux.
Azure App Service supports multiple deployment methods, giving you flexibility in how you deploy your application code. You can choose from options like Git, Azure DevOps, FTP, or Azure CLI. Select the deployment method that aligns with your development workflow and preferences.
Once you have chosen a deployment method, follow the specific steps for that method to deploy your application code to Azure App Service. For example, if you are using Git, you would configure the repository and branch to deploy from. If using Azure DevOps, you would set up a build pipeline and release pipeline to automate the deployment process.
You can expand the application’s resources using Azure App Service according to workload or demand. If you want to increase the resources allotted to your app, you can directly scale up or scale out the App Service plan. As an alternative, you can employ automatic scaling based on indicators such as CPU or memory utilization.
Step 4: Building Serverless Applications with Azure Functions
A scalable and effective method for developing and deploying event-driven code without dealing with server infrastructure involves using Azure Functions to create serverless applications. We will examine the procedure for creating serverless apps with Azure Functions in this part.
You must first construct an Azure Function App before you start developing serverless applications. This acts as a logical container for the functions and offers the necessary runtime conditions for their execution. Through the Azure Portal, Azure CLI, or Azure PowerShell, you can build the Function App.
Events like HTTP requests, timers, queues, or notifications from event hubs can all start functions. Select the trigger that is best for the application you’re developing. Functions can also be bound to other Azure services, including storage accounts, databases, or event hubs, via input and output bindings. Bindings make it easier to integrate with outside resources.
It’s time to upload your functions to Azure after you’ve tested them locally. You have the option of manually deploying your functions from the development environment or via the Azure Portal. For the best performance and lowest cost, Azure Functions automatically adjusts your functions based on demand.
It is essential to monitor your Azure Functions to make sure they are functioning properly and upholding the specified service level agreements. Through Azure Monitor and Application Insights, Azure offers monitoring and logging capabilities. To ensure optimum performance, set up alerts, monitor function execution, and fix problems.
Step 5: Orchestrating Containers with Azure Container Instances
Azure Container Instances (ACI) from Microsoft Azure provides a lightweight and agile platform for running containerized workloads without the need for complex orchestration systems. By leveraging ACI, organizations can effortlessly deploy and manage containers, accelerating application development and streamlining operations.
For running containerized applications, Azure Container Instances (ACI) offers a serverless option. ACI allows you to deploy containers quickly without managing any underlying infrastructure. It’s ideal for dev/test scenarios or running short-lived jobs in a cost-efficient manner.
Step 6: Monitoring and Management
For the best performance and troubleshooting, proper monitoring and management of Azure compute resources are essential. Utilise Azure Monitor to monitor resource usage, create alarms, and learn more about your infrastructure. Automate management operations that are performed often, such as VM shutdown and startup schedules, by implementing Azure Automation.
Step 7: Security and governance
Ensure that your Azure compute resources are properly secured and governed. Implement Azure Security Centre to manage compliance, threat prevention, and security policy management. To enforce governance regulations and uphold adherence to organizational norms, use Azure Policy.
Summary
Hope this article explored how to deploy and manage Microsoft Azure compute resources in an efficient way. Mastering AZ-104 allows individuals to understand key concepts, and strategies, and get the best AZ-104 practice test for deploying and managing Azure compute resources.
With AZ-104 certification, professionals can optimize resource utilization, enhance application performance, and streamline operations in the Azure environment.
By completing the AZ-104 certification, individuals will possess the expertise to confidently orchestrate Azure compute resources, unlocking the full potential of Microsoft Azure for their organizations.
To delve more into the Azure compute resources, grab our hands-on labs and sandboxes.
If you have any questions about this article, please feel free to contact us!
- Which AWS Certification is Best For Developers - December 5, 2023
- Top Popular Hands on Labs for Google Cloud Platform (GCP) - October 29, 2023
- 7 Exam Tips for Google Cloud Database Engineer Certification - September 21, 2023
- What Is Azure Web Application Firewall (WAF)? - September 8, 2023
- The 5 Best Team Chat Apps for Business in 2024 - August 10, 2023
- What is Microsoft Cybersecurity Reference Architectures? - July 31, 2023
- How to Secure & Migrate your SAP Environment on AWS - July 26, 2023
- A Comparison of SUM-DMO and SWPM - July 21, 2023