
In this article, we have provided PL-400 exam questions, that help you get an assessment of the PL-400 certification exam and the concepts that could be asked.
The PL-400: Microsoft Power Platform Developer exam requires you to have a good practical knowledge of the Power Platform services, inclusive of its boundaries, capabilities and constraints. Also, a core knowledge of the DevOps practices for the Power Platform is a must.
Let’s start Learning !
Domain : Configure Microsoft Dataverse
Q1 : The users can view the contact’s City, Zip code, and State in your model-driven app. But only the Sales team can view the full address. They have access to three additional columns: street1, street2, and phone.
A. Add all address fields to the security profile with “Yes” to Allow Read permission
B. Enable field security for all address columns
C. Add the three fields to the security profile with “Yes” to Allow Save permission
D. Create a security profile for the Sales team
E. Enable field security for street1, street2, phone columns
F. Create a security profile for the Users
G. Add the three fields to the security profile with “Yes” to Allow Read permission
H. Add all address fields to the security profile with “Yes” to Allow Save permission
Correct Answers: D, E and G
Explanation
Microsoft Dataverse provides column (field) security on a column-by-column basis for most out-of-the-box tables. For management simplification, the Dataverse groups the secured column (field) permissions into a profile. A system administrator can grant access to the profiles to specific users or teams.
You need to enable the Field security for the three contact columns (fields): street1, street2, and phone. You can do this using a classic interface.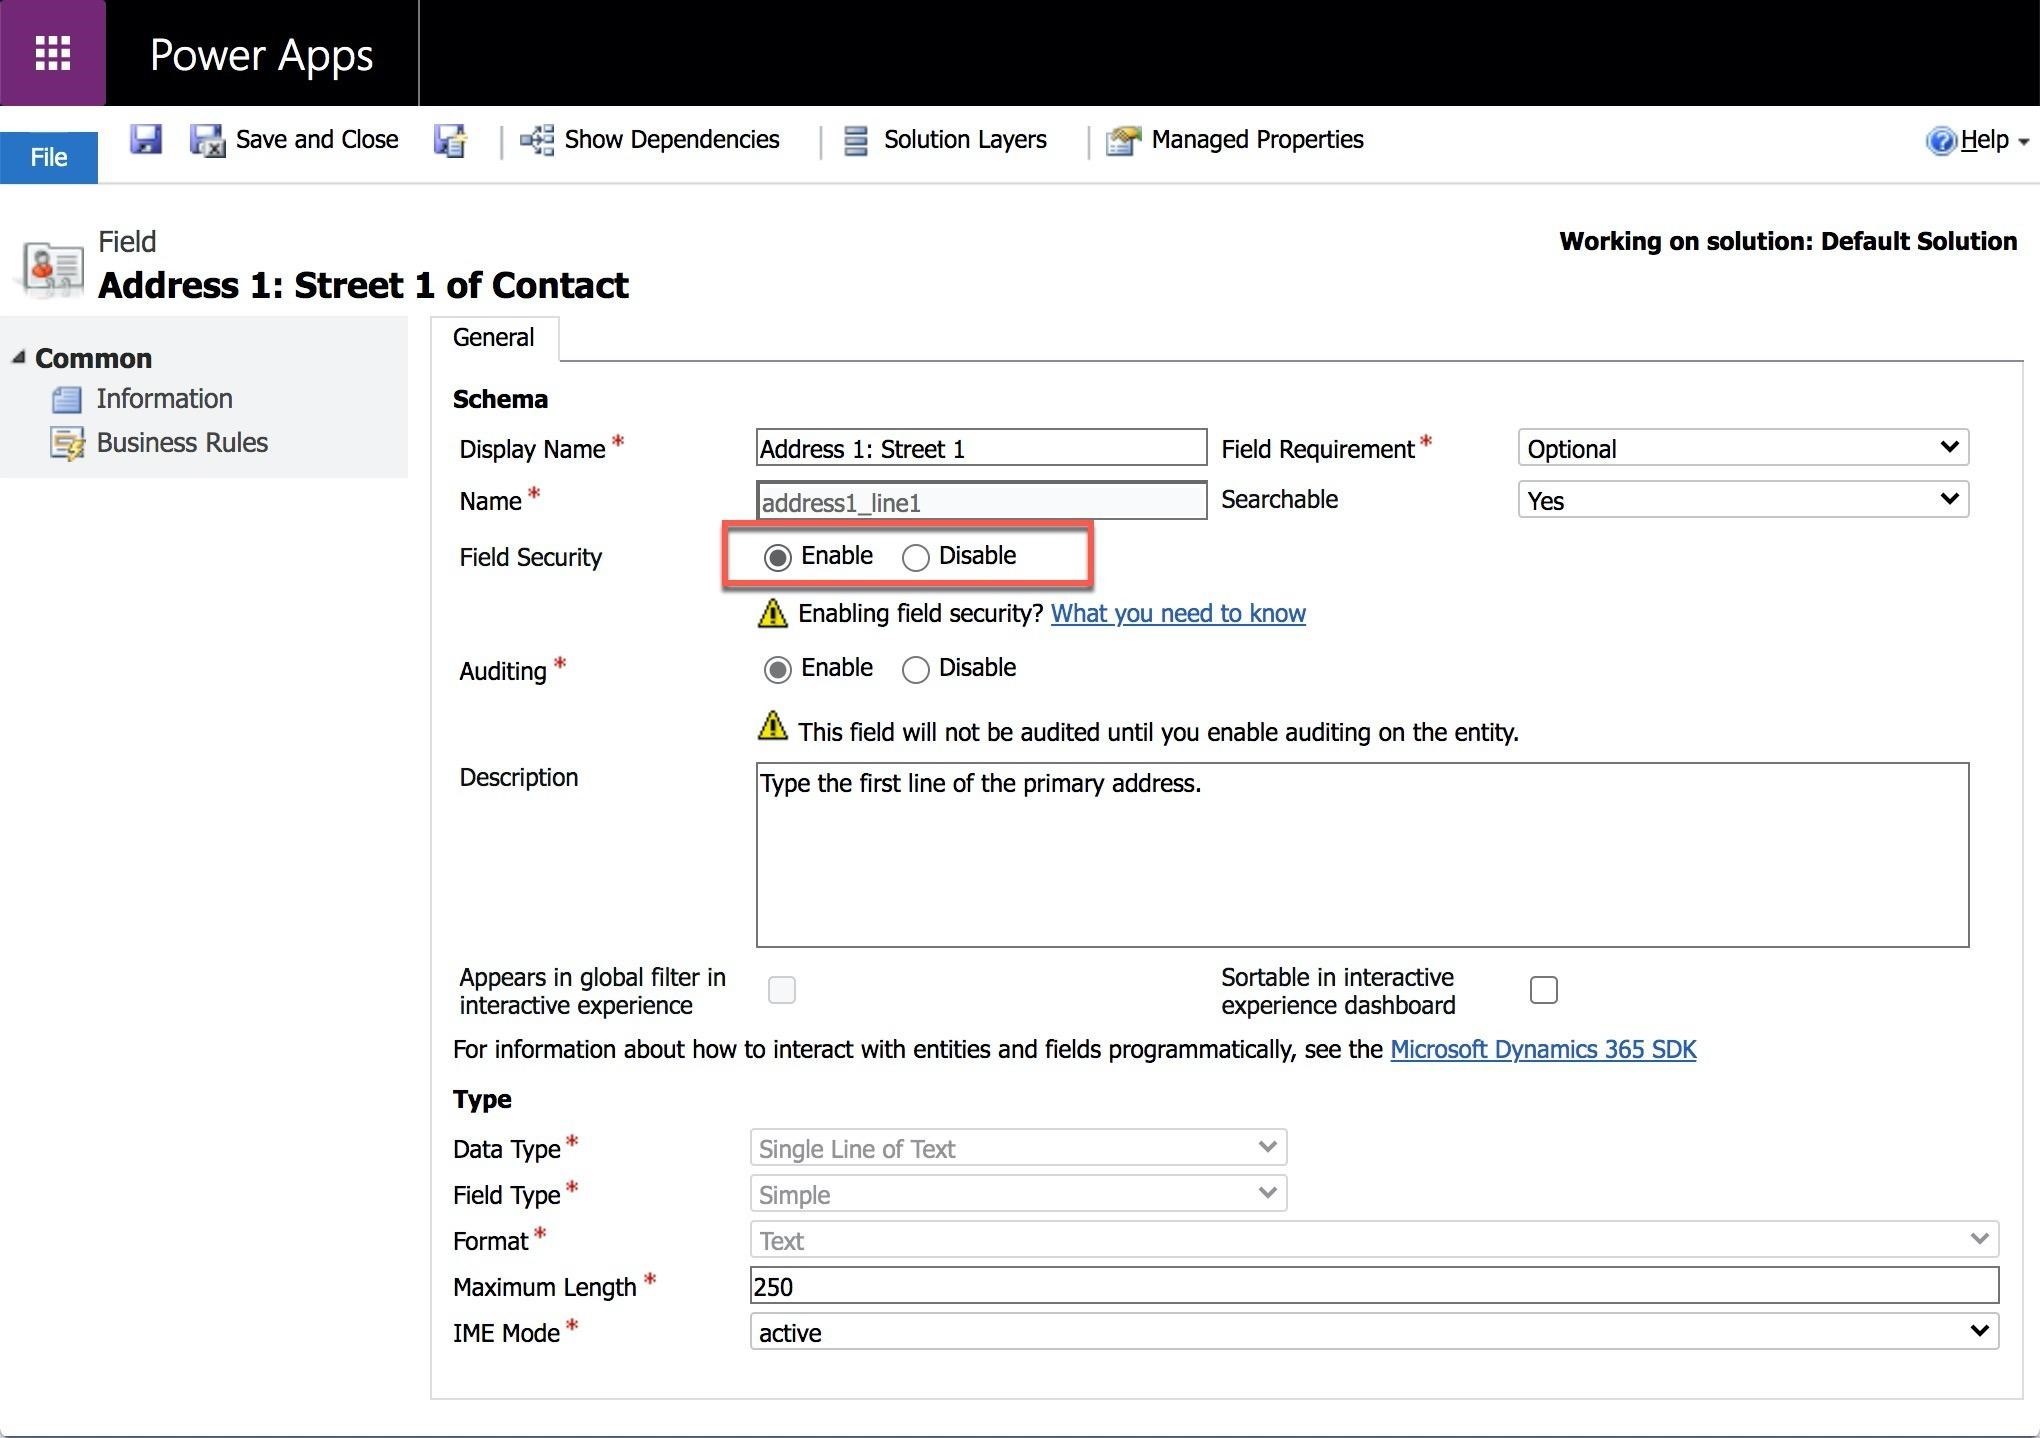
Then you create a Field security profile and add the Sales team as a Member. After that, for each of the three columns (fields), you set the “Allow Read” to “Yes.”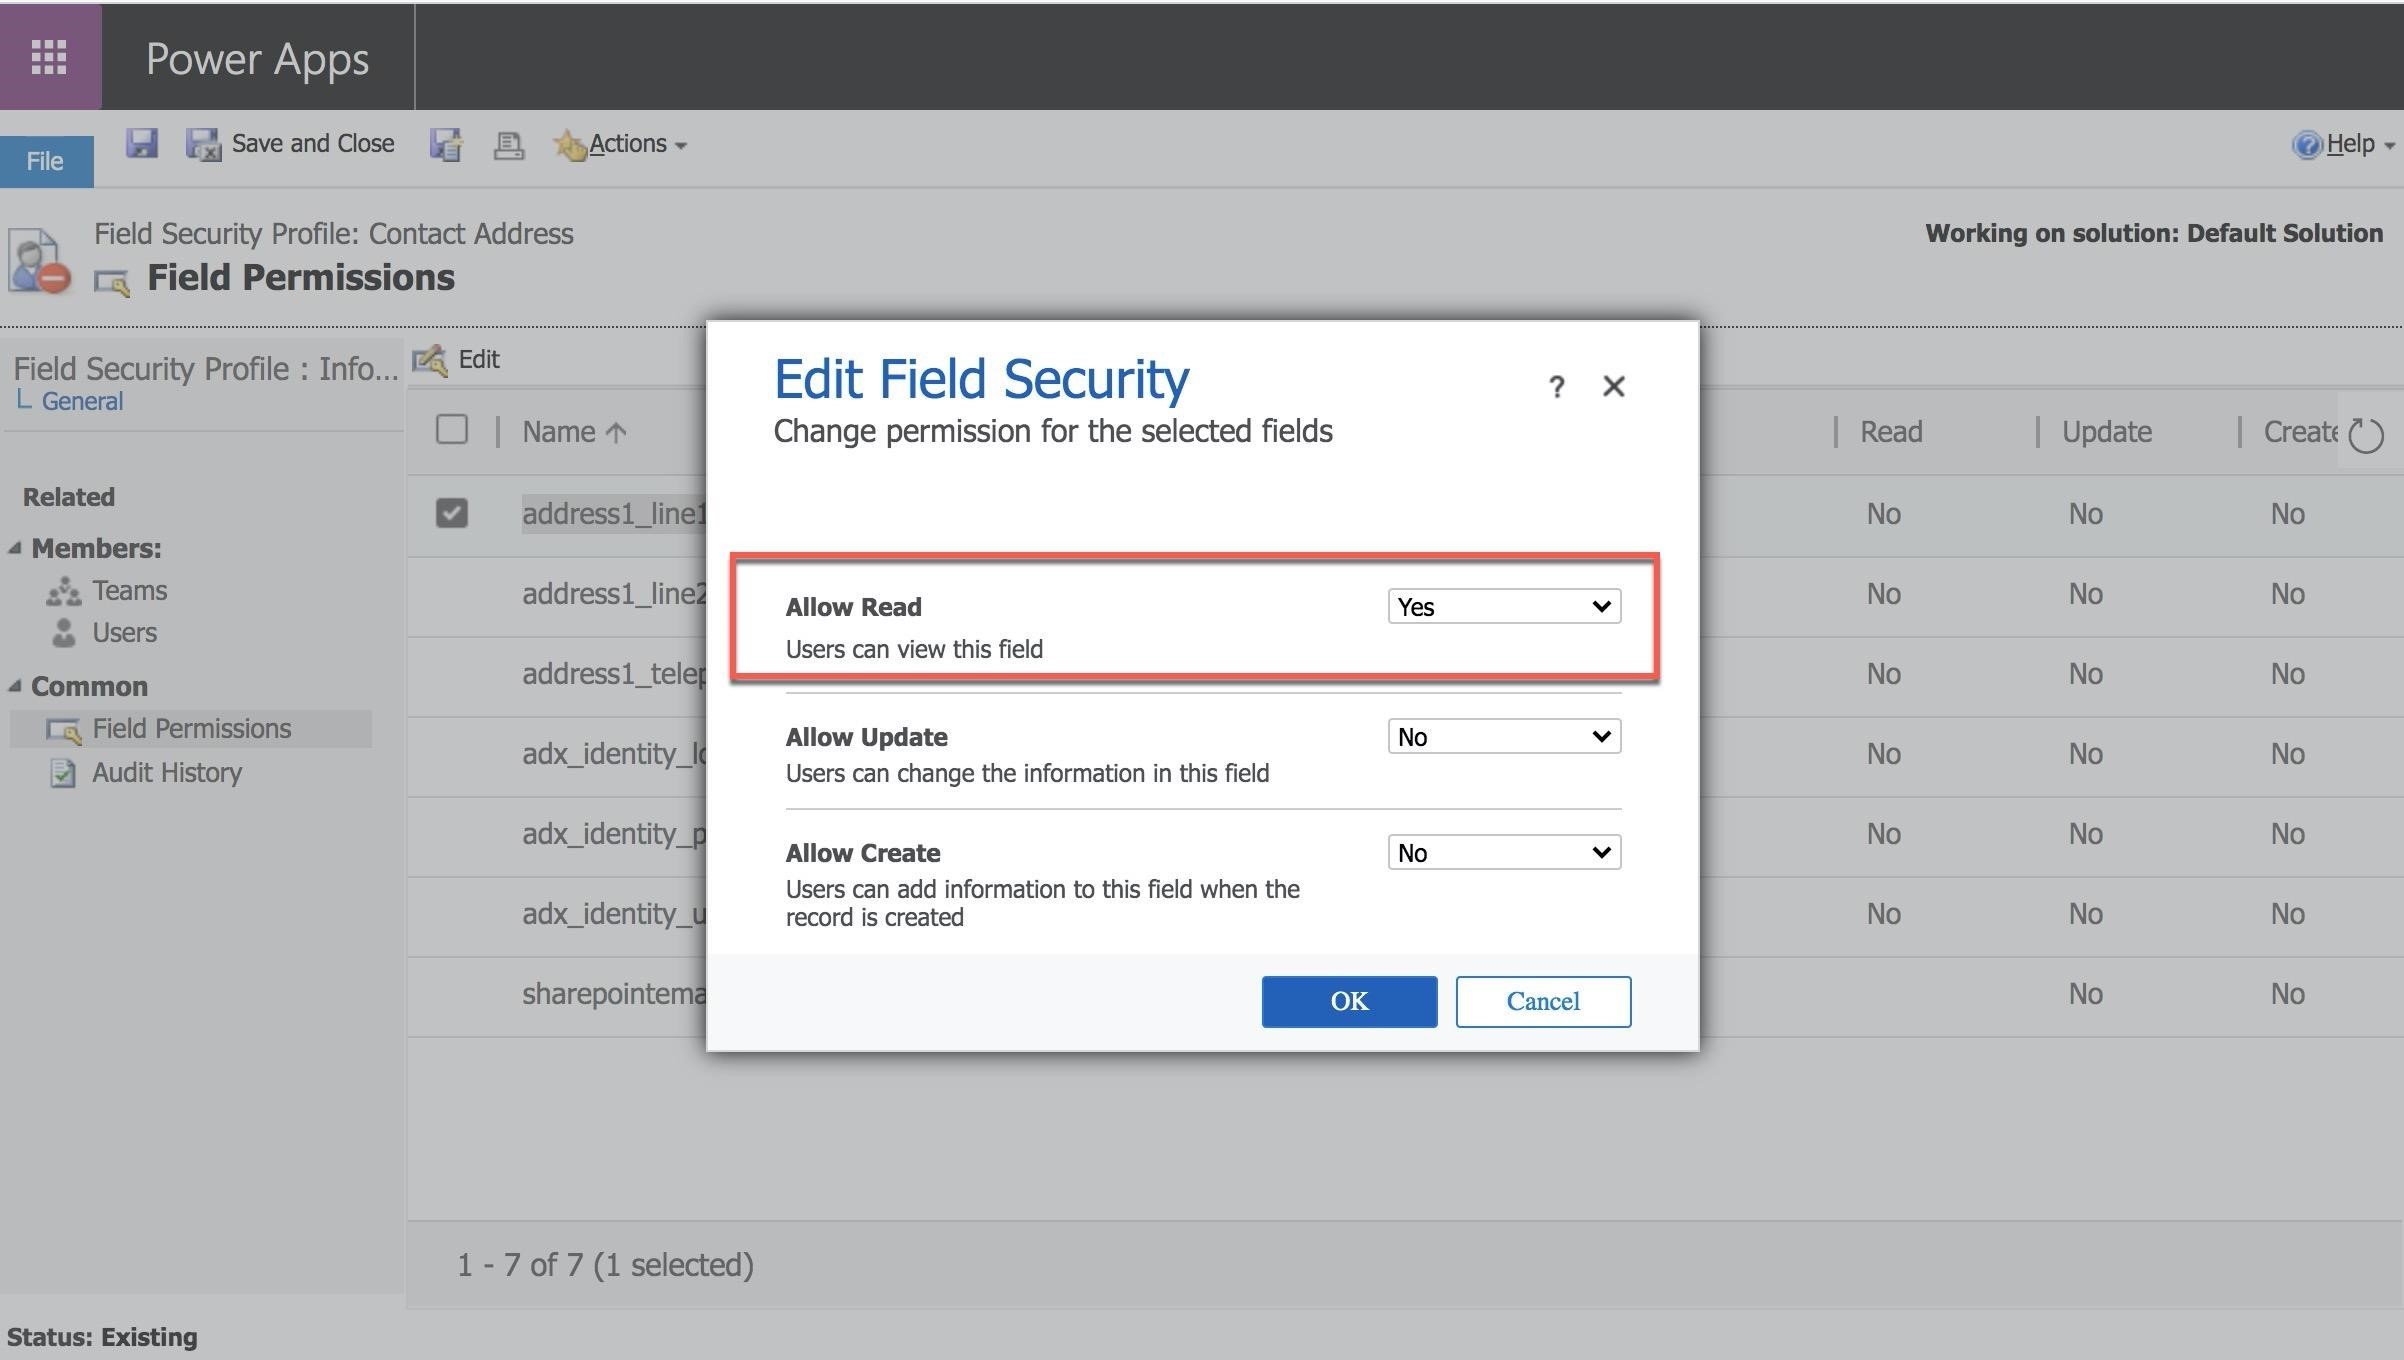
All other options are incorrect.
For more information about Dataverse Field Security Profiles, please visit the below URLs: https://docs.microsoft.com/en-us/power-platform/admin/wp-security-cds#field-level-security-in-dataverse, https://docs.microsoft.com/en-us/power-platform/admin/field-level-security, https://docs.microsoft.com/en-us/power-platform/admin/add-teams-users-field-security-profile
Domain : Create and configure Power Apps
Q2 : You create a canvas mobile app using SharePoint lists (Equipment and Sales) as data sources.
You want to improve the app’s performance.
A. Collect(LocalEquipment, TextInput1.Text)
B. Filter(Equipment,ID=2346)
C. Concat(Sales,Title & “,”)
D. LookUp(Sales,Title=”Mango”,UnitsSold)
Correct Answers: B and D
Explanation
For the best performance of a canvas app, you need to consider the following tips:
- Limit data connections — no more than 30 data sources for the same app.
- Limit the number of controls — no more than 500 controls per app.
- Effective OnStart load — for data load use in a parallel process by implementing the Concurrent function.
- Optimize local caching — use the Set function for local caching.
- Load screens in memory only when needed — avoid screen dependencies and formula sharing between screens.
- Use delegation — process data close to the source, on the data server, as much as you can. Use predominantly delegable functions.
- Republish your app regularly — Power Platform adds new features all the time that can help your app’s performance.
When working with a large dataset, you need to limit the number of records you can bring to the client.
By default, the Power Apps limits the number of records that you can bring to 500. You can change this limit in the app’s settings. But if your result set from the data operation would be over this limit, Power Platform will download only the limited number of records.
Therefore, push the data-heavy operations’ execution on the back end of your data source. Power Apps provides functions that are optimized to perform such actions. These functions are called delegable functions.
Execution of these functions depends on the delegation support by the data source. The delegable data sources include Common Data Service, SharePoint, SQL Server, and some others. The list of the delegable functions consists of a filter (like Filter, Search, and Lookup), sorting (Sort and SortByColumns), aggregate (Sum, Average, Min, and Max), and table shaping (like AddColumns, DropColumns, etc.) functions. The list of non-delegable functions includes Collect, Concat, Choices, Groupby, etc.
When a connector does not support the function delegation, App Checker will let you know. Even the Sum function (Number 1) is on the list of potential delegable functions, but the SharePoint connector does not support this functionality. And App Checker issues the Delegation warning (Number 2).
Options B and D are correct because Filter and Lookup are the delegable functions and supported by the SharePoint connector.
Options A and C are incorrect because Collect and Concat are non-delegable functions.
For more information about the canvas app’s delegation and performance optimization, please visit the below URLs: https://docs.microsoft.com/en-us/powerapps/maker/canvas-apps/delegation-overview, https://docs.microsoft.com/en-us/powerapps/maker/canvas-apps/common-performance-issue-resolutions, https://docs.microsoft.com/en-us/connectors/sharepointonline/#power-apps-delegable-functions-and-operations-for-sharepoint
Domain : Extend the platform
Q3 : You create a custom connector for the National Weather Service (NWS). The NWS provides two types of forecasts: by grid points and by coordinates. Here is an example of the grid points URL:
https://api.weather.gov/gridpoints/{office}/{grid X},{grid Y}/forecast,
where the office is an NWS office responsible for a section of the grid. You need to define the Policy details for the NWS connector.
Please select the Policy template for the NWS connector.
A. Set HTTP header
B. Set property
C. Set Host URL
D. Set query string parameter
E. Set header/query parameter value from URL
Correct Answer: C
Explanation
A custom connector is an API wrapper around the REST API. When you develop your application using REST API services, you need to describe the API’s operations before exporting your APIs. There are three approaches to how to create the API definitions:
- Using a blank custom connector
- Using an Open API definition
- Using a Postman Collection
Then you need to secure your Web APIs and set the authentication type for your custom connector. In the end, when you test a new custom connector, you can use it in Power Apps, Power Automate, and Azure Logic Apps.
If you need to change the connector’s behavior during the run time, like to route a call to a different endpoint, the custom connector’s Policies (Number 1) help you define the URL templates of your dynamic URL. One of the Policy templates is the “Set Host URL” (Number 2). This template replaces the host URL with the URL generated from the “URL Template” expression (Number 3). 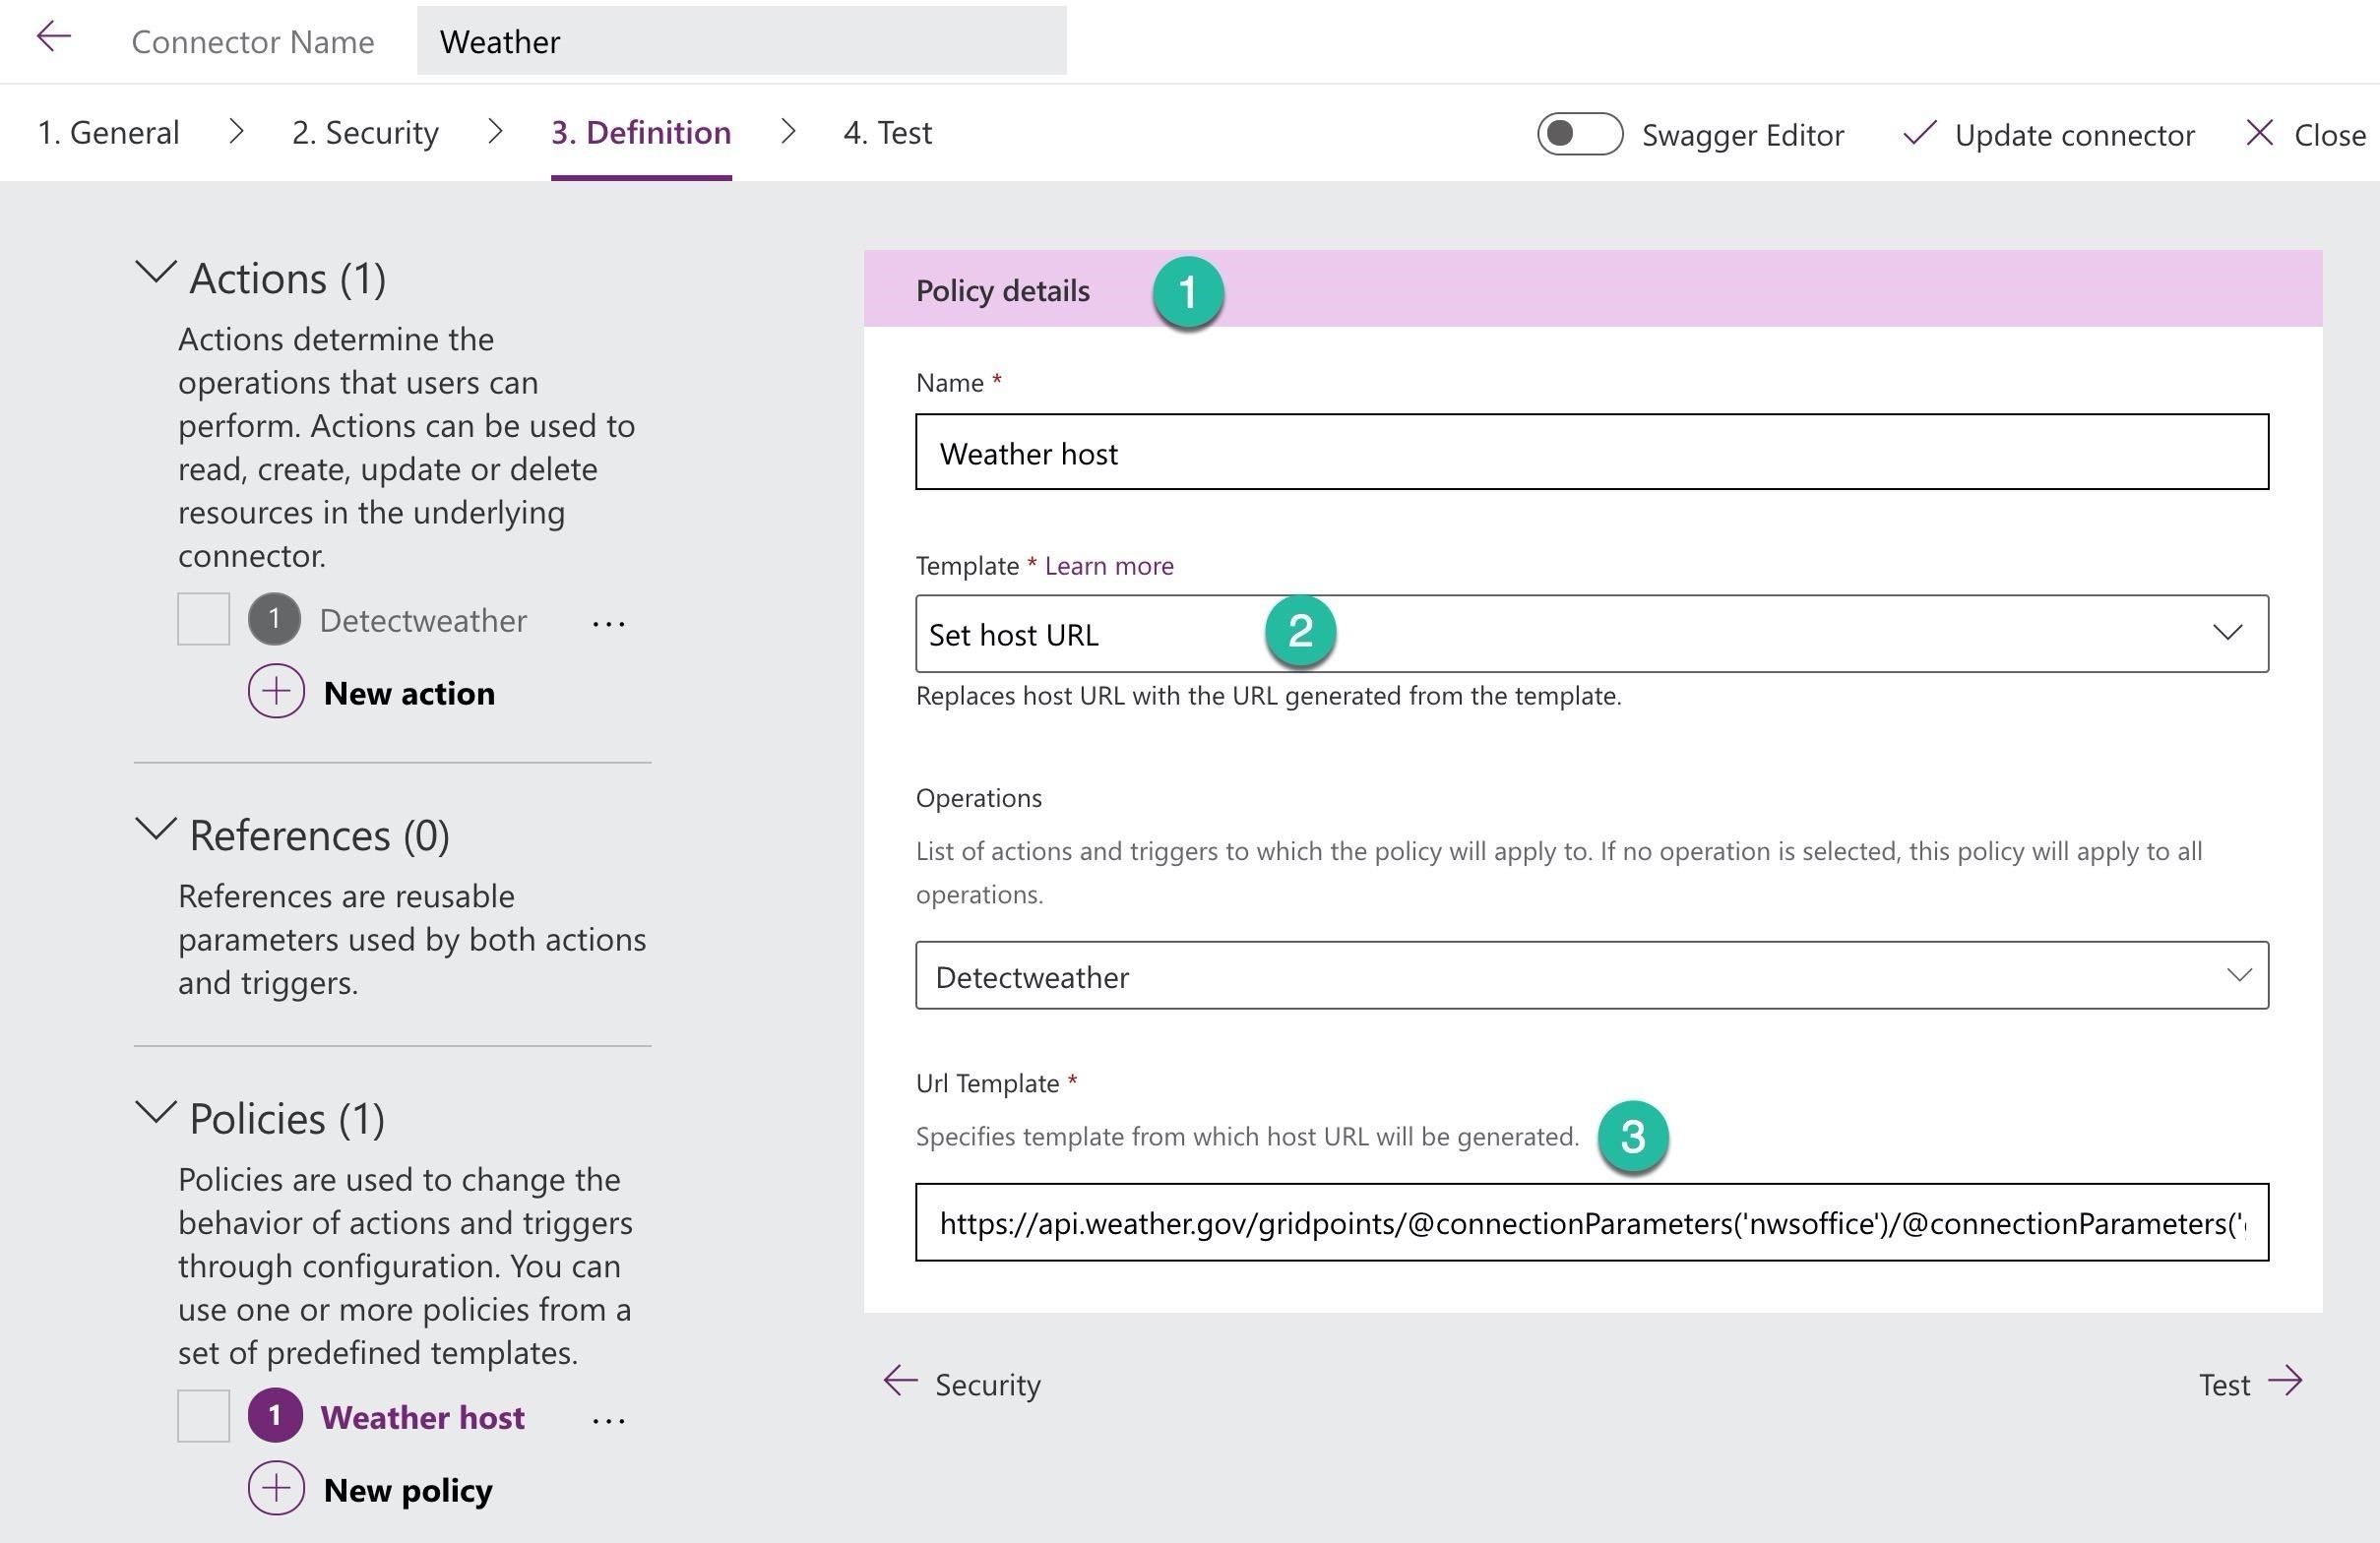
The URL template expression for the NWS looks like:
https://api.weather.gov/gridpoints/@connectionParameters(‘nwsoffice’)/@connectionParameters(‘gridX’),@connectionParameters(‘gridY’)/forecast
where the nwsoffice, gridX, and gridY are the path parameters. You can define these parameters in the Request section of the Definition stage (Number 1).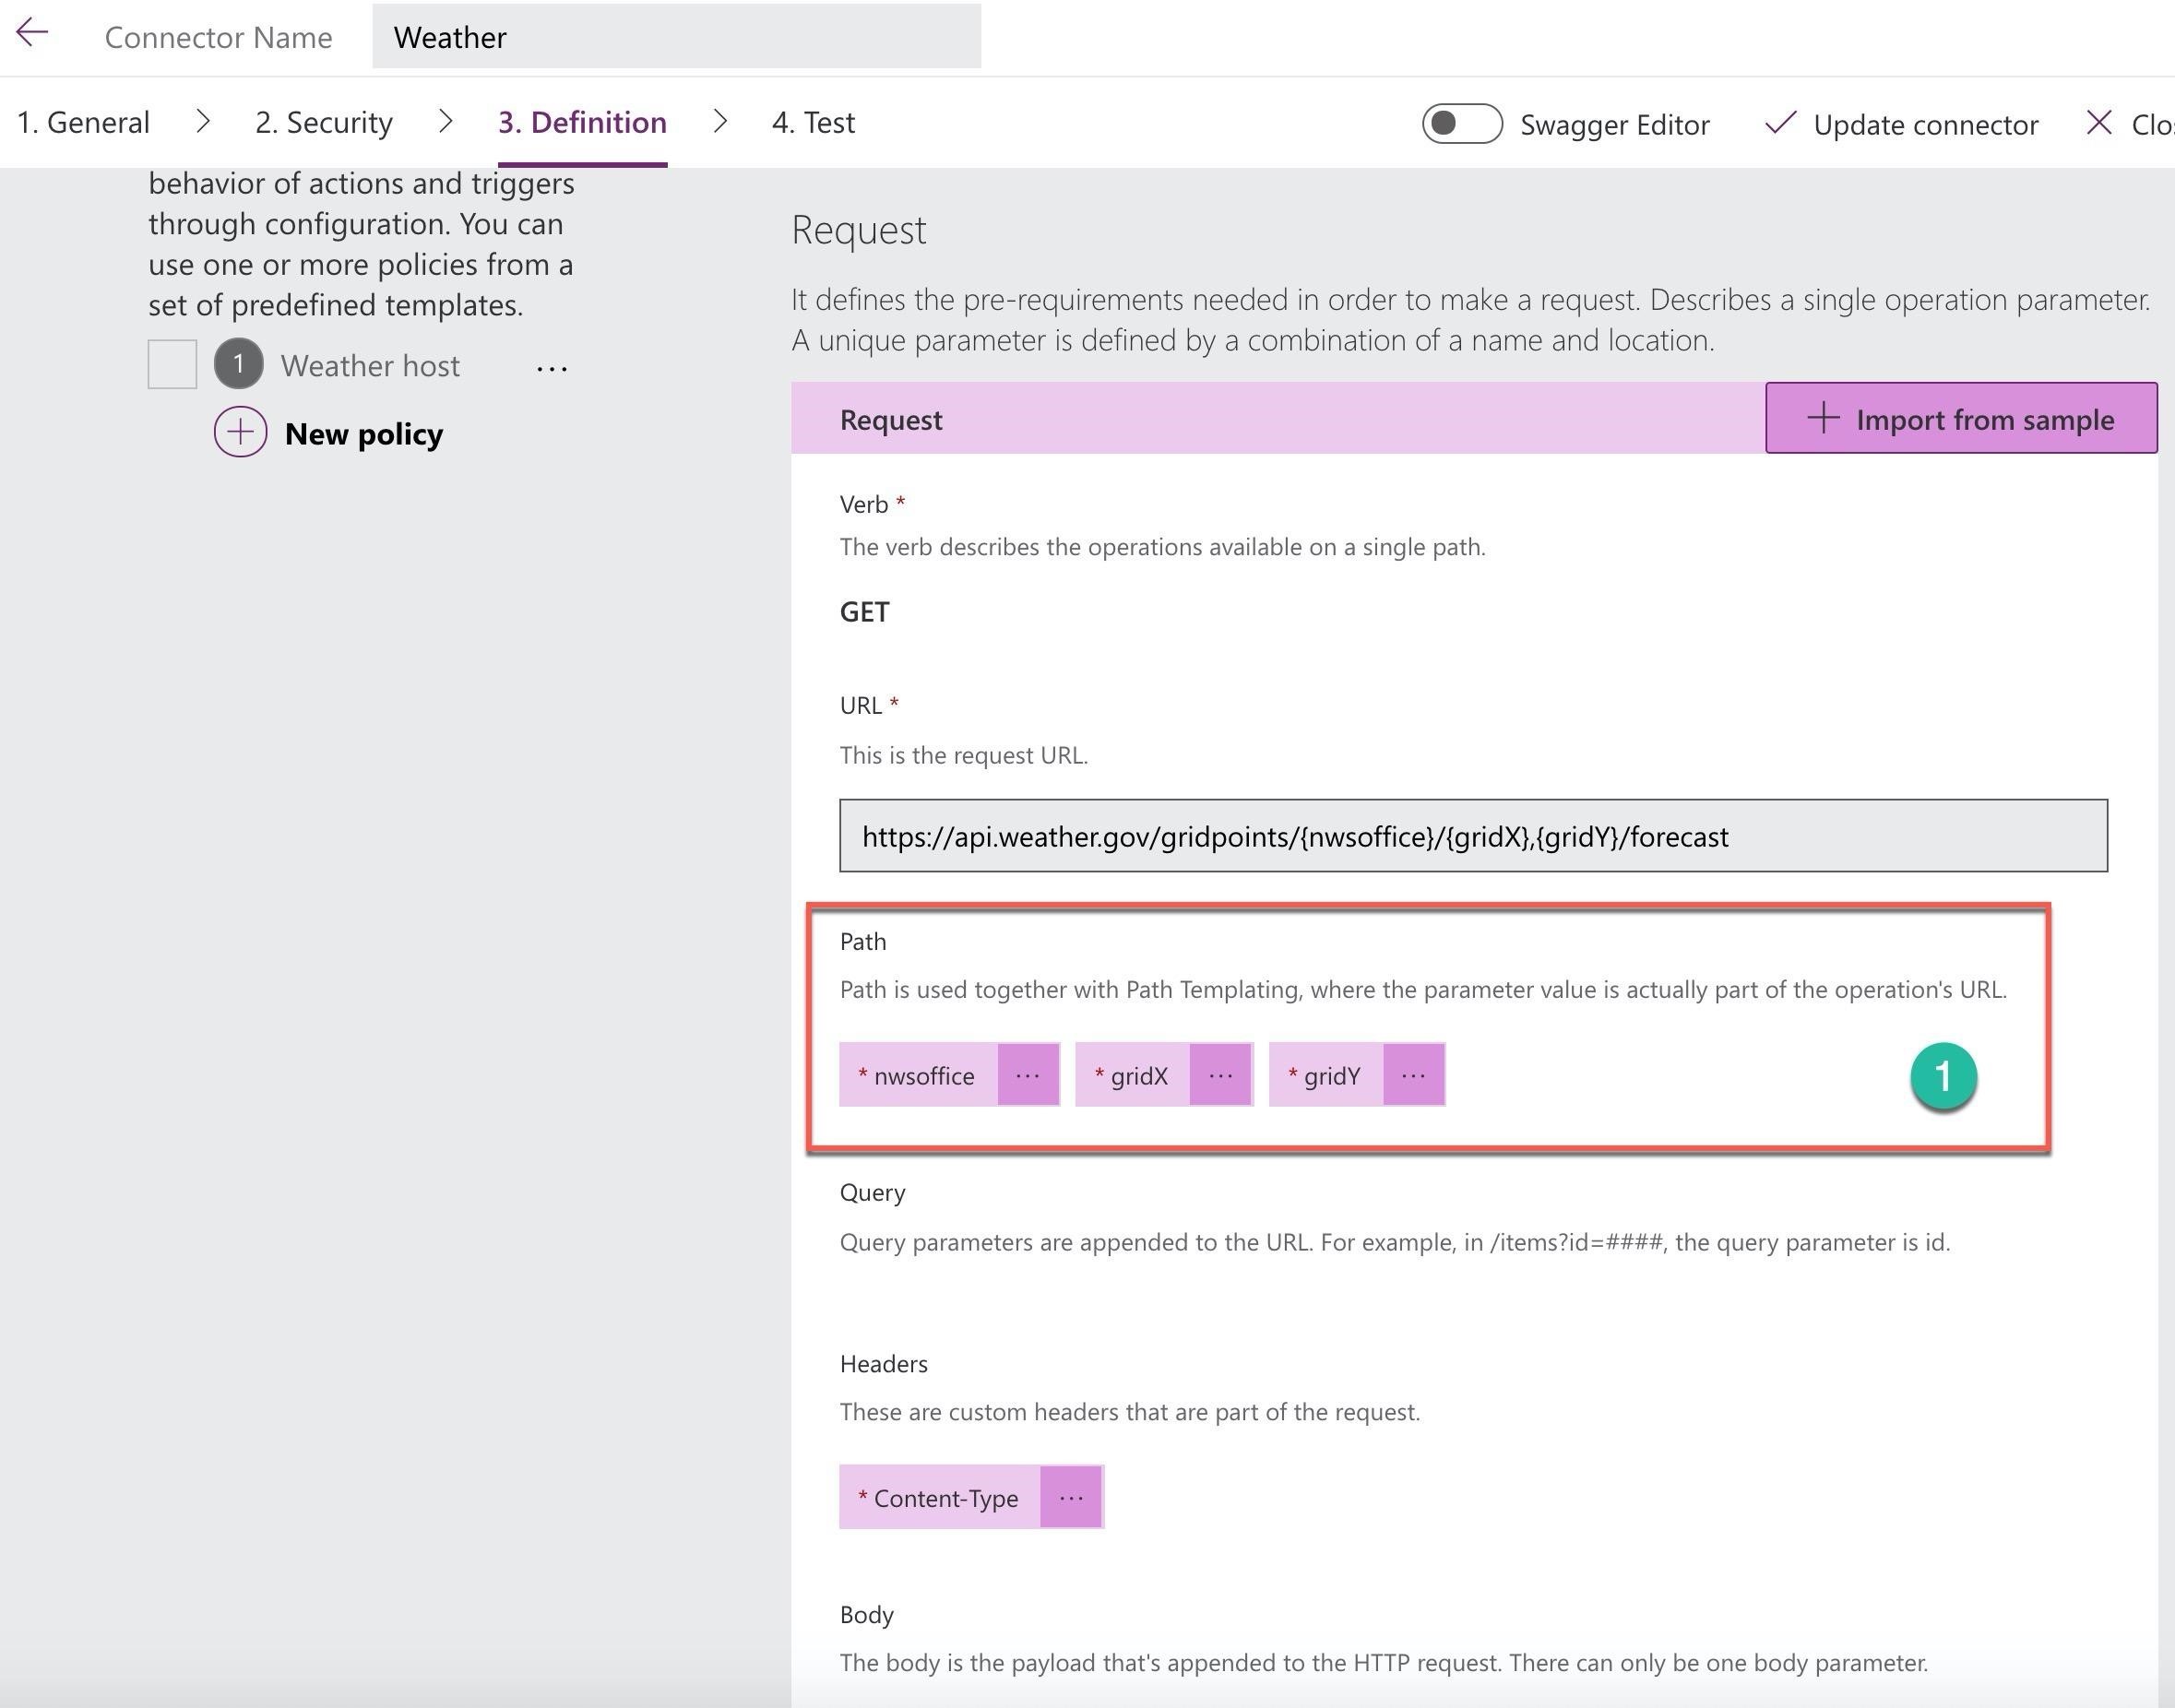
All other options are examples of the Policy templates. They are irrelevant to the current task.
For more information about custom connector’s Policy templates, please visit the below URLs: https://docs.microsoft.com/en-us/connectors/custom-connectors/policy-templates, https://docs.microsoft.com/en-us/connectors/custom-connectors/policy-templates/dynamichosturl/dynamichosturl, https://www.youtube.com/watch?v=PmfrG57-9Hc&t=581s
Domain : Create a technical design
Q4 : You create an Azure Function that estimates monthly car loan payments. It takes three parameters: total loan amount, loan term (in months), and interest rate. You want to use this estimator in the Power Apps and Power Automate.
What should you do?
A. Create a Dataverse plug-in
B. Create a Custom connector
C. Create a Dataverse Web API
D. Create a PCF component
Correct Answer: B
Explanation
Power Platform provides 300+ connectors. If you need to communicate with services that Microsoft doesn’t have on its list of connectors, you can create your custom connector. A custom connector is an API wrapper around your REST API. You can create such a wrapper for Azure Functions, Azure Web Apps, Azure API apps.
When you create your application using one of these services, before you can export your application’s APIs, you need to describe the API’s operations by creating API definitions.
Power Apps or Power Automate portals provide a wizard-type interface for creating a custom connector (Number 1). You need to input the connector name, select the security, and set the authentication type for your custom connector. There are four types of API authentication you can choose from (Number 2). Then you provide the API definition. After the custom connector’s successful test, you push the “Create connector” button (Number 3). And you can use your new custom connector in Power Apps, Power Automate, and Azure Logic Apps.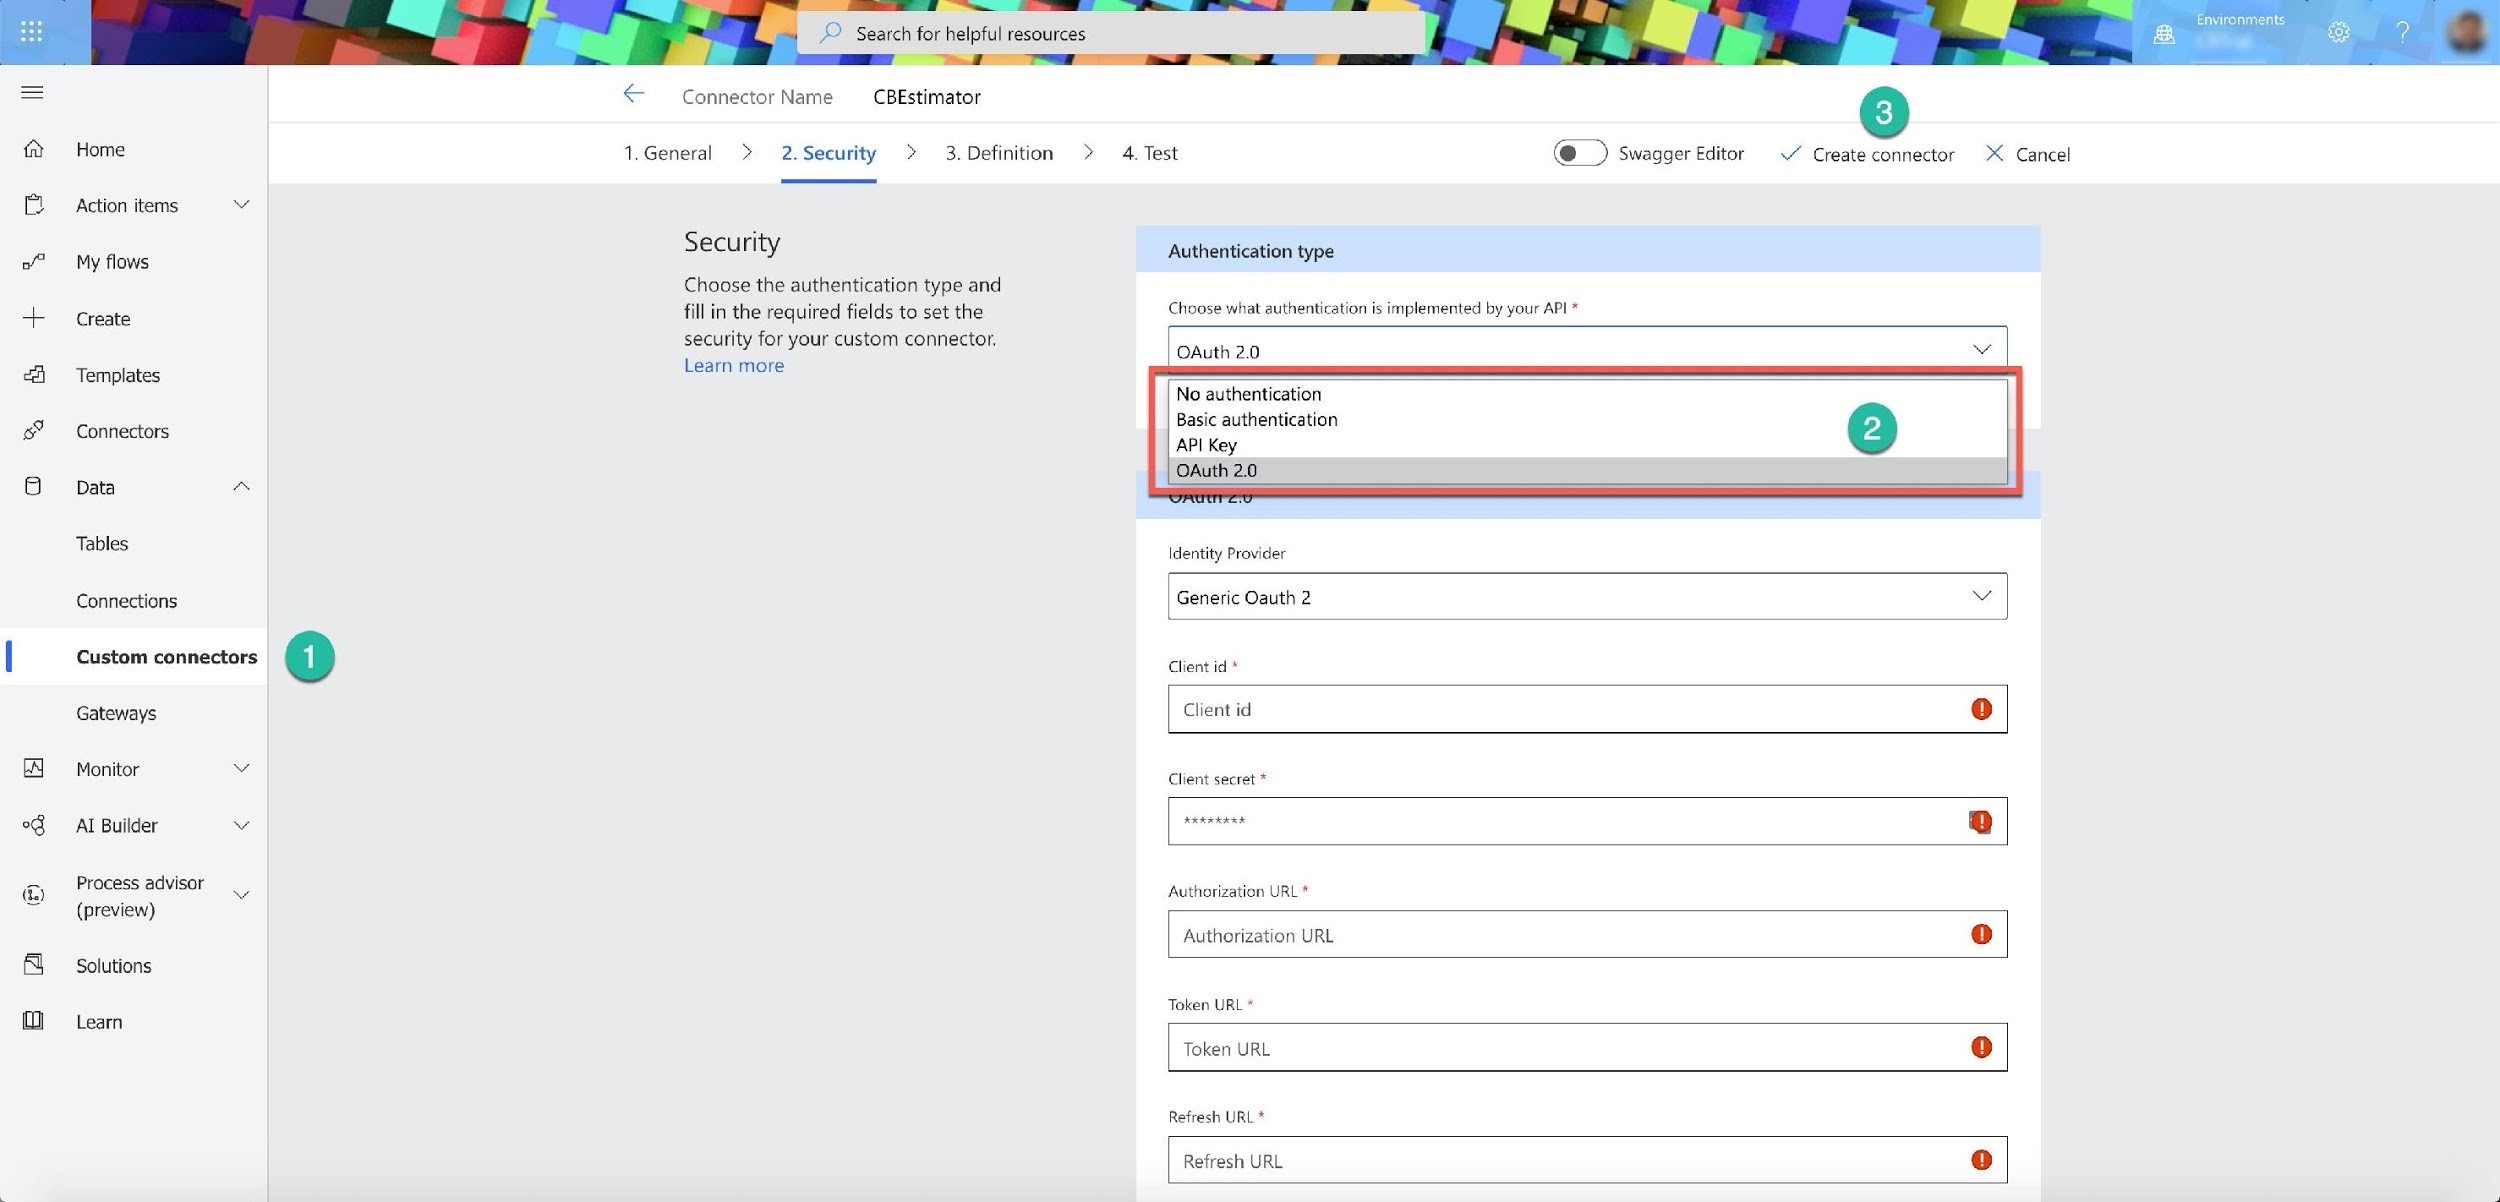
Options A, C, and D are incorrect because you don’t need to create a Dataverse plug-in, Web API, or PCF component to connect to the external application. You need to create a custom connector.
For more information about Custom connectors, please visit the below URLs: https://docs.microsoft.com/en-us/learn/modules/introduction-power-platform/3-data-connectors, https://docs.microsoft.com/en-us/connectors/custom-connectors/, https://docs.microsoft.com/en-us/connectors/custom-connectors/create-web-api-connector
Domain : Configure Microsoft Dataverse
Q5 : You modified a solution in a development environment. You want to clone the solution and import it to the test environment. Your current solution version is 5.2.3.1.
What will be the version of the cloned solution?
A. 5.2.3.2
B. 5.2.4.1
C. 5.3.0.0
D. 5.3.3.2
Correct Answer: C
Explanation
There are two options for the managed Dataverse solutions updates:
- To create a patch — a bug fix or some minor solution change
- To clone — a major solution update
You can select a solution from the Power Apps portal and click on the three dots for more options. When you choose the Clone menu item, you will see two options: Clone a patch and Clone a solution.
Every solution has a version number with the following structure: <major>.<minor>.<build>.<revision>.
The “Clone solution” controls the first two numbers: <major> and <minor>. The Power Platform automatically increments the minor number, e.g., if the basic solution has a 5.2.3.1 version (Number 1), the clone will have by default 5.3.0.0 (Number 2). Users can change the first two numbers only.
The “Clone a patch” controls the last two numbers: <build> and <revision>. The Power Platform automatically increments the build number, e.g., if the basic solution has a 5.2.3.1 version (Number 1), the patch will have by default 5.2.4.1 (Number 3). Users can change the last two numbers only.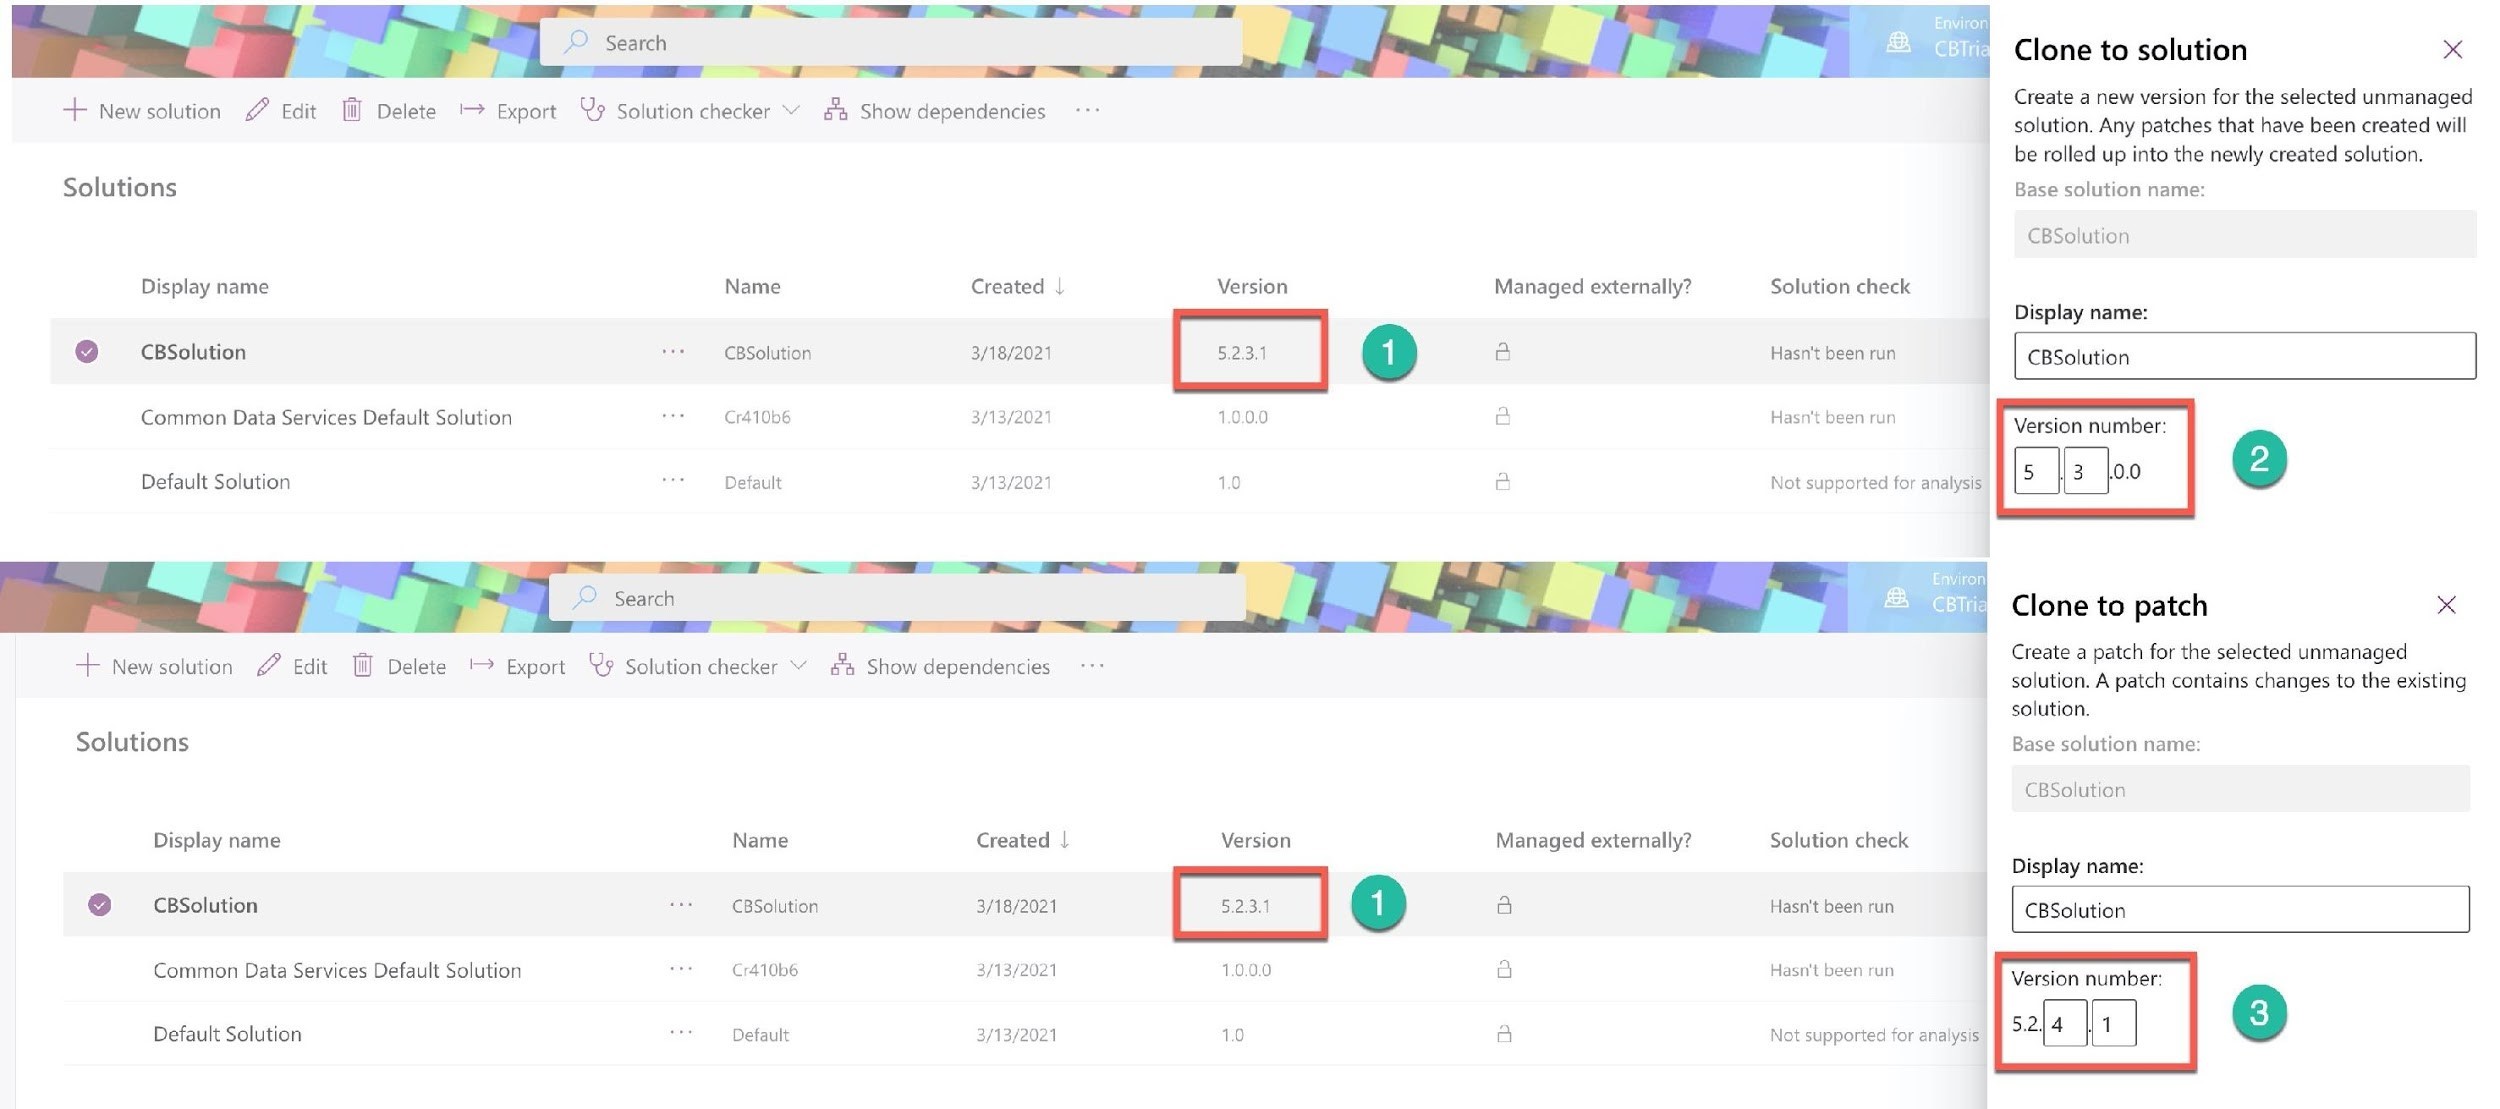
All other options are incorrect.
For more information about cloning the Dataverse solutions, please visit the below URLs: https://docs.microsoft.com/en-us/power-platform/alm/update-solutions-alm, https://carldesouza.com/how-patching-of-solutions-works-in-the-power-platform/
Domain : Configure business process automation
Q6 : You need to create a Power Platform app for processing college applications. As soon as the application is submitted online, the app should extract and store an applicant’s personal information and main achievements in the Dataverse.
What should you use to achieve your goal?
A. Dataverse plug-in
B. Organization service
C. Power Automate
D. Web API
E. Power BI
Correct Answer: C
Explanation
Power Automate provides five types of flows:
- Automated — this cloud flow type is triggered by an event, like when an email comes from your manager
- Instant — this cloud flow type is triggered manually, like when you push a button
- Scheduled — this cloud flow type is triggered on a schedule, like sending a report on every working day at 8 am.
- Desktop — this flow type automates processes for your desktop and web applications
- Business process flow — this flow type guides users step-by-step through the business process.
For processing college applications, you need to use an automated flow triggered by an incoming application. Your flow should incorporate AI Builder models to parse and extract the information from the application. And then store it in the Dataverse database.
Option A is incorrect because the Dataverse plug-in is not the simple solution for this task. Power Platform help to achieve your goal in a no-code or low-code approach. It would be best to use the Dataverse plug-ins only when the Power Platform products’ declarative process does not meet your business requirements.
Option B is incorrect because the Organization service works with the Dataverse data and metadata. It does not automate business logic.
Option D is incorrect because the Web API works with the Dataverse data and metadata. It does not automate business logic.
Option E is incorrect because the Power BI reveals data insights and helps businesses to make data-driven decisions. It does not automate business logic.
For more information about declarative automation of the Dataverse business logic, please visit the below URLs: https://docs.microsoft.com/en-us/power-automate/flow-types, https://docs.microsoft.com/en-us/powerapps/developer/data-platform/plug-ins
Domain : Extend the platform
Q7 : You create a Dataverse plug-in.
Please select all execution stages of the plug-in event pipeline.
A. PostValidation
B. PreOperation
C. PreValidation
D. PostExecution
E. PostOperation
Correct Answers: B, C and E
Explanation
Power Platform provides a variety of tools to extend the platform and user experience. If you need to work with the Dataverse, you can use the Dataverse Web API and Organization service. Or develop your business logic by using the Dataverse plug-ins. You can use Data import, Synchronization, Virtual entities, Azure integration, and Webhooks for integration purposes.
Before creating the business logic using a code (the Dataverse plug-in), you should evaluate the application of the Dataverse declarative options for the business logic: use of business rules, Real-time workflows, actions, and Power Automate flows for your business requirements.
The extension of the business logic by a code depends on detecting the Dataverse’s events. The Event Framework provides this information to the declarative tools and registered extensions.
The Dataverse plug-in is a .Net assembly that can modify the platform behavior. You can create your .Net project using a development environment, like Visual Studio or Visual Studio Code. After compiling the project and creating an assembly, you need to register (map) the assembly classes to the Event Framework events (steps). Then you register your business logic steps.
There are three stages in plug-in event pipeline execution:
- PreValidation — an initial stage before the main operation. You can include the logic for canceling the event before the data transaction.
- PreOperation — the next stage before the main operation but within the data transaction. You can make changes to the data in operation.
- PostOperation — the stage after the main operation and still within the data transaction. You can call other actions using the Organization service before the message returns to the caller.
Your Dataverse plug-ins can act synchronously or asynchronously.
All other options are incorrect.
For more information about creating the Dataverse plug-ins, please visit the below URLs: https://docs.microsoft.com/en-us/powerapps/developer/data-platform/plug-ins, https://docs.microsoft.com/en-us/powerapps/developer/data-platform/tutorial-write-plug-in, https://docs.microsoft.com/en-us/powerapps/developer/data-platform/register-plug-in, https://docs.microsoft.com/en-us/powerapps/developer/data-platform/apply-business-logic-with-code
Domain : Extend the platform
Q8 : You need to create an approval process for the SharePoint documents. You contemplate using the Azure Durable Functions.
What application pattern should you consider for your task?
A. Function chaining
B. Monitor
C. Async HTTP APIs
D. Human interaction
E. Fan out/fan in
Correct Answer: D
Explanation
When you need to run the long-term workflows, you should use the Azure Durable Functions. The Durable Function is an extension of the Azure Functions. The function provides a cost-effective serverless approach for running stateful long-running, complex workflows.
The Durable Function can chain, orchestrate, and coordinate the functions. This Azure service manages the state. Therefore, the developers do not need to write the code to manage the state for long-running functions. There are three Durable Function types: Client, Orchestration, and Activity.
The Durable Functions implement several common workflow patterns:
- Function chaining — execution of the multiple functions in a specific order
- Fan out/fan in — a run of the multiple functions in parallel till every function finishes its execution
- Async HTTP APIs — coordination of the long-running operations with the external clients
- Monitor — a recurrent process until specific conditions are met
- Human interaction — a combination of human interaction with automated processes
- Aggregator — an aggregation of the several data streams from different data sources and possibly during long time periods into one function.
Option D is correct because the Human interaction pattern is a combination of human interaction with automated processes, like waiting for the document approval from a person. This pattern involves four functions:
- A request for approval task
- An assignment of the task to the person
- A process of approval
- An escalation process
For more information about Durable functions, please visit the below URLs: https://docs.microsoft.com/en-us/learn/modules/create-long-running-serverless-workflow-with-durable-functions/3-design-a-workflow-based-on-durable-functions, https://docs.microsoft.com/en-us/azure/azure-functions/durable/durable-functions-overview?tabs=csharp
Domain : Create a technical design
Q9 : You need to determine when to use serverless computing, plug-ins, or Power Automate.
A. The best use of the Dataverse plug-in is for the execution of the long-running tasks
B. You can offload the Dataverse’s business logic to Azure Function
C. The Azure function can modify the data during the Dataverse database transaction
D. The Power Automate provides the declarative application of the business logic in Dataverse
Correct Answers: B and D
Explanation
Microsoft Dataverse provides two ways of defining and applying the business logic: a declarative process or by the code. The Dataverse declarative options for the business logic include the use of business rules, Real-time workflows, actions, and Power Automate flows for your business requirements. Power Automate helps to achieve business requirements in a no-code or low-code approach.
The application of the business logic by code includes the creation of a plug-in or a workflow extension. Before creating the business logic using a code (the Dataverse plug-in), you should evaluate the declarative options. It would be best to use the Dataverse plug-ins only when the Power Platform products’ declarative process does not meet your business requirements. The plug-in sits between the Web API call and the Dataverse database. It enforces the business logic independently from the source of the API call during the Dataverse database transaction. The plug-ins must be self-contained.
The extension of the business logic by a code depends on detecting the Dataverse’s events. The Event Framework provides this information to the declarative tools and registered extensions.
The Dataverse can offload the execution of the business logic to Azure Functions. Using the webhooks, you can execute the data operations synchronously using Azure Functions. You need to register the webhook using the Dataverse Plug-in Registration Tool and then register the step that triggers the execution of the business logic in the Azure Function on the occurrence of the Dataverse’s event. If the business logic requires stateful long-running, complex workflows, you can use the Durable Function. The Durable Function is an extension of the Azure Functions.
Option B is correct because you can use the Azure Function to offload the Dataverse business logic.
Option D is correct because the Power Automate provides the declarative application of the business logic in Dataverse.
Option A is incorrect because the best is to use the Durable Function to execute the long-running tasks, but not the Dataverse plug-in.
Option C is incorrect because the Dataverse plug-in can modify the data during the Dataverse database transaction, but not the Azure Function.
For more information about serverless computing, plug-ins, or Power Automate, please visit the below URLs: https://docs.microsoft.com/en-us/powerapps/maker/data-platform/processes, https://docs.microsoft.com/en-us/azure/azure-functions/functions-overview, https://docs.microsoft.com/en-us/azure/azure-functions/durable/durable-functions-overview?tabs=csharp, https://docs.microsoft.com/en-us/powerapps/developer/data-platform/plug-ins
Domain : Create and configure Power Apps
Q10 : You create a canvas app. On the first screen of the app, you put a Text input field (TextInput1) and a “Submit” button (Button1). You want to enable the “Submit” button when a user types a valid email address. Here is your formula:
If(IsMatch(TextInput1.Text, Email), Edit,Disabled).
Where should you put this code?
A. TextInput1.Fill
B. Button1.OnSelect
C. TextInput1.DisplayMode
D. App.OnStart
E. Button1.DisplayMode
Correct Answer: E
Explanation
Formulas in Power Apps are similar to Excel. But in Power Apps, formulas perform operations on the app and app’s controls instead of cells and spreadsheets.
For formulas operations, you can use various elements like:
- Functions — operate on the parameters and return values. There are specific Power Apps group of functions — behavior functions. This group describes the behavior of the controls like the Button when you push it.
- Signals — provide information about an environment like GPS coordinates.
- Enumerations — return predefined constant values like Color with the set of its properties: Color.Red, Color.Blue, etc.
- Named operations — return a reference to the app or app’s controls like Self, Parent, ThisItem, or ThisRecord.
- Controls and their properties — operate on the properties for setting control’s configuration. There is a list of controls that you can use in your apps like Button, Check Box, Column chart, etc.
When you need to change the controls state (Enabled/Disabled) on a canvas screen, you put code in the DisplayMode.
There are three states for the DisplayMode: Edit, Disabled, and View. By default, the control’s DisplayMode is set to Edit.
When the DisplayMode is set to View, the control looks like in the Edit state, but a user cannot select it.
All other options are incorrect.
For more information about managing canvas app controls by formulas, please visit the below URL: https://docs.microsoft.com/en-us/learn/modules/author-basic-formula-change-properties-powerapps/6-functions-validating-data
Domain : Configure business process automation
Q11 : You need to create a client-side code for interaction with business process flow on a model-driven app’s form.
Please select Client API objects you can use in your code.
A. formContext.ui.navigation
B. formContext.data.process
C. formContext.data.entity
D. formContext.ui.process
E. formContext.ui.formSelector
Correct Answers: B and D
Explanation
The business process flow is one of the Power Automate flow types. It guides users through the process of data operations with one or several Dataverse tables. Business process flow consists of stages. Each stage can be associated with only one Dataverse table, but optionally, you can select related tables in the One-to-Many relationship with the primary stage table. A stage contains one or more steps that represent the table’s fields.
If you need to interact with the business process flow on a form with client-side code, there are two types of objects that you can use: the Data — formContext.data and UI — formContext.ui.
The formContext.data object includes formContext.data.process. It provides objects, events, and methods for interaction with the form’s business process flow data. The business process flow triggers the client-side process events whenever the process manipulates the record, changes the stage, or the status of the process changes to Active, Finished, or Aborted.
The formContext.ui object includes formContext.ui.process that provides methods to interact with the form’s business process control.
All other options are incorrect.
For more information about using the Client API for client-side interaction with business process flow, please visit the below URLs: https://docs.microsoft.com/en-us/power-automate/developer/business-process-flows-code#client-side-programmability-support-for-business-process-flows, https://docs.microsoft.com/en-us/powerapps/developer/model-driven-apps/clientapi/reference/formcontext-data-process, https://docs.microsoft.com/en-us/powerapps/developer/model-driven-apps/clientapi/reference/formcontext-ui-process
Domain : Extend the platform
Q12 : You create a Custom API message. You need to develop a plug-in for your Custom API.
A. You need to know the message name
B. You need to register the plug-in for a step
C. After registration, you need to add the assembly to the solution
D. You need to know the names and types of the API parameters
Correct Answers: A, C and D
Explanation
You can extend the Dataverse by creating the custom API that would be exposed as the messages. There are two types of custom messages: Custom Process Action and Custom API.
The Custom Process Actions messages are the no-code option that you can create using the Workflow Designer.
The Custom API provides the capabilities of code extending beyond the Workflow. You can use the maker portal, Web APIs, or the Organization service to create the Custom API. The Custom API data is saved in the Dataverse tables. You can invoke the custom message by using the Web API, Organization services, and plug-in.
Option A is correct because you need to know the message name, the names and properties of the message parameters, and the response properties for creating a plug-in for the custom message.
Option C is correct because after the assembly registration, by using the Dataverse Plug-in registration tools, you need to add the assembly to the solution.
Option D is correct because you need to know the message name, the names and properties of the message parameters, and the response properties for creating a plug-in for the custom message.
Option B is incorrect because you don’t need to register the step for the plug-in. You just need to register the plug-in’s assembly and add it to the solution.
For more information about the Dataverse custom messaging, please visit the below URLs: https://docs.microsoft.com/en-us/powerapps/developer/data-platform/custom-actions, https://docs.microsoft.com/en-us/powerapps/developer/data-platform/custom-api#write-a-plug-in-for-your-custom-api, https://docs.microsoft.com/en-us/powerapps/developer/data-platform/workflow-custom-actions
Domain : Configure Microsoft Dataverse
Q13 : You need to create a new column in the custom Order table. The Dataverse table contains information about every order. The new column should store the number of days since the order record was created for the open (new) orders. The column should update the value whenever you save the record.
What should be the type of the new column?
A. Whole number
B. Rollup
C. Decimal number
D. Calculation
E. Duration
Correct Answer: D
Explanation
Microsoft Dataverse provides special column types for calculations and data aggregation. These types are Calculated and Rollup.
The Calculation column allows users to define a formula based on the column value. This type includes columns from the same table and related parent table in a many-to-one relationship. Calculated columns are read-only. Users benefit from a list of built-in functions for the calculated values. This column type operates on the different data types like text, numeric, and date-time. The calculations run synchronously when a record is saved.
The Rollup column is like the Calculated type. The Rollup type operates only on the numeric (Whole Number, Decimal Number, and Currency) and date-time datatypes. This type includes columns from the same table and related child tables in a one-to-many relationship. The list of built-in functions for the Rollup column is smaller compared to the Calculated columns. It includes sum, min, max, and count. Rollup columns are read-only. By default, the calculations for the Rollup column run once per hour. Users can change the frequency in Customization settings for the table. It is an asynchronous operation.
Suppose you create the calculated column “DaysOpen.” Here is the condition and action for the column:
The condition includes the check for the “New” order status. And the action has the Difference in days between the order date and a current date/time. If you use the NOW() function, you need to be sure that the date-time column’s behavior is set to the “User local” (in this case, the nwind_orderdate or “Order date” column (Number 1)). The “User local” behavior (Number 2) stores the time zone-aware data. This type of date-time behavior is the requirement for the NOW() operations.
Options A, B, and D are incorrect because the Duration, Whole number, and Decimal number are the data types but not the column types.
For more information about The Dataverse Calculated and Rollup columns, please visit the below URLs: https://docs.microsoft.com/en-us/learn/modules/create-define-calculation-rollup-fields/3-calculation, http://powerappsguide.com/blog/post/dataverse-how-to-calculate-durations-with-calcaulated-columns, https://docs.microsoft.com/en-us/powerapps/developer/data-platform/calculated-rollup-attributes
Domain : Create and configure Power Apps
Q14 : You create a canvas app in the Power Apps Studio. The App Checker alerts you with the red dot about the problems in your app.
What are the four categories of possible errors that the App Checker monitors?
A. Accessibility
B. Connections
C. Formulas
D. Performance
E. Connectors
F. Runtime
G. Code
Correct Answers: A, C, D and F
Explanation
PowerApps Studio App checker identifies possible app problems and errors during a development process. It monitors the issues and alerts users with a red dot on the stethoscope icon when an error or a problem occurs in your app (Number 1). A user can click on the App checker icon, and a new panel on the right side of the studio screen opens (Number 2).
The App checker panel displays the five categories of problems and errors that App Checker tracks (Number 3):
- Formulas — checks operator’s name, invalid references, missing brackets, etc.
- Runtime — will the app be a reliability risk during runtime or uses a deprecated functionality.
- Rules — the list of rules that App Checker follows.
- Accessibility — checks for accessibility problems and guides how to correct these problems. There are several potential accessibility compliance issues connected to apps like layout, color, multimedia, keyboard, and screen reader support.
- Performance — checks for potential performance issues during app run.


If you open the Formulas section (Number 1), the App checker presents the results by screen and splits the Formulas alerts into two categories: Errors (Number 2) and Warnings (Number 3).
When you open the Error’s App section and click on one of the errors, the App checker opens the Details panel (Number 2) for the issue (Number 3). It highlights the problematic place in the formula (Number 1). Besides the issue description (Number 3), the App checker provides information about the possible cause for the issue (Number 4) and the error location in the app (Number 5). Also, on this panel, users can find the App checker’s recommendations on fixing the problem (Number 6) and link to the additional information relevant to the issue (Number 7).
All other options are incorrect.
For more information about the Power Apps App checker, please visit the below URLs: https://powerapps.microsoft.com/en-us/blog/powerapps-checker-now-includes-app-checker-results-for-canvas-apps-in-solutions/, https://docs.microsoft.com/en-us/powerapps/maker/canvas-apps/accessibility-checker
Domain : Extend the user experience
Q15 : You create a PCF component and are ready to test.
What should be your command to start testing and debugging the component in the local test harness?
A. npm run build
B. pac pcf test start
C. npm start
D. pac pcf new test
E. npm t
Correct Answer: C
Explanation
The Components are reusable blocks that you can use for Power Apps applications. Power Apps provides out-of-the-box standard controls (components) for creating applications, like HTML Text, Vertical Gallery, or Edit Form. If your Power Platform solution requires more than standard controls, Power Apps also provides tools to create and reuse custom components. Power Apps Component Framework (PCF) helps you to create these components.
After creating a PCF component, you need to test the new component. You can start the local test harness from your component root directory by running the npm start command (Number 1) in a command window. The command builds the code and starts the harness (Number 2).
Then a new PCF Test environment browser window opens (Number 1) with the component’s name on the right panel (Number 2) and the running component in a container (Number 3). The right panel provides three sections: Context inputs (Number 4), Data Inputs (Number 5), and Outputs.
You can interact with the component inside of the container (Number 3) or use the inputs to change the Form Factor, container sizes, property values. If the PCF component needs data for testing, you can load a CSV file with the data. The test environment reads the ControlManifest.Input.xml file for the required types of inputs. You can add any additional inputs in this file if you need them for testing and debugging the component.
The test harness can help you see the real-time changes in the component’s index.ts or ControlManifest.Input.xml. If you start your test in watch mode: npm start watch, you will see an automatic reflection of the changes in the files on your component. You also can use the debug functionality of your browser.
All other options are incorrect.
For more information about the test harness of the PCF components, please visit the below URLs: https://docs.microsoft.com/en-us/powerapps/developer/component-framework/debugging-custom-controls, https://docs.microsoft.com/en-us/powerapps/developer/component-framework/debugging-custom-controls#watch-mode-in-test-harness, https://docs.microsoft.com/en-us/powerapps/developer/component-framework/debugging-custom-controls#debug-code-components-using-native-browsers
Domain : Create a technical design
Q16 : You create a model-driven app. You need to add custom business logic to the main form. You consider what to use better for your business requirements: the business rules or client script.
Please select all the main form operations that need or benefit more from the client script’s implementation.
A. Set field values
B. Referencing related data
C. Running business logic on a form load
D. Instant update of the form fields
D. Show and hide fields
E. Running business logic when you save the record
Correct Answers: B, D and F
Explanation
Power Platform provides a variety of tools to extend the platform and user experience. If you need to work with the Dataverse, you can use the Dataverse Web API and Organization service. Or develop your business logic by using the Dataverse plug-ins. You can use Data import, Synchronization, Virtual entities, Azure integration, and Webhooks for integration purposes.
Before you start coding any additions or extensions to the apps, you need to consider the alternatives that Power Platform already provides to save your time and automatically integrate the outputs within the platform. The Dataverse declarative options for the business logic include the use of business rules, Real-time workflows, actions, and Power Automate flows for your business requirements.
You need to evaluate your business requirements and decide what type of solution you should use: declarative or code.
Option B is correct because if you need to use the data from related tables, you need to use a client script or a Web API.
Option D is correct because if you need to update fields based on data changes in a form, it is better to use a client script. After all, the business rule updates data only on the data retrieval during the form load or refresh.
Option F is correct because if you need to run a business logic OnSave you have to use the client script because the business rules run logic on a form load or refresh.
For all other options, the business rules are better out-the-box solutions than client scripts.
For more information about the use of the declarative or code Power Platform solutions, please visit the below URLs: https://docs.microsoft.com/en-us/powerapps/developer/model-driven-apps/client-scripting, https://docs.microsoft.com/en-us/learn/modules/automate-business-process-flow-client-script-power-platform/2-best-practices, https://docs.microsoft.com/en-us/learn/modules/introduction-power-platform-extensibility-model/4-exercise
Domain : Create and configure Power Apps
Q17 : You open a new model-driven app in App Designer.
Please select all canvas sections that App Designer provides for creating a model-driven app.
A. Dashboards
B. Forms
C. Entity View
D. Business Process Flows
E. Entities
F. Site Map
Correct Answers: A, C, D and F
Explanation
The App Designer for model-driven apps (Number 1) provides four main sections on a designer canvas:
- Site Map — you can define the app’s navigation using a site map designer (Number 2).
- Dashboard — you can create dashboards for the app (Number 3).
- Business Process Flow — you can create a business process flow for the app (Number 4).
- Entity View – you can add entity assets (Number 5).
You can modify these components by clicking on the section, artifacts, and entity assets.
Power Apps Designer provides two types of design components: Artifacts (Number 6) and Entity assets (Number 7).
Artifacts include Entities, Dashboards, and Business Process Flow. Entity assets include Forms, Views, Charts, and Dashboards.
All other options are incorrect.
For more information about Power Apps Designer for model-driven apps, please visit the below URLs: https://docs.microsoft.com/en-us/powerapps/maker/model-driven-apps/design-custom-business-apps-using-app-designer, https://docs.microsoft.com/en-us/powerapps/maker/model-driven-apps/add-edit-app-components, https://docs.microsoft.com/en-us/powerapps/maker/model-driven-apps/build-first-model-driven-app
Domain : Configure business process automation
Q18 : You create an automated flow that compares the project item’s due dates in the SharePoint project plan list with today’s date for the new or updated SharePoint list records. You use the ticks function to compare dates. You need to be sure that the ticks function has a valid input if a due date value is missing.
Please select SLOT3 and SLOT4 for the condition expression.

A. SLOT4: ticks
B. SLOT3: triggerBody
C. SLOT3: coalesce
D. SLOT4: triggerBody
E. SLOT3: formatdatetime
F. SLOT4: coalesce
G. SLOT4: formatdatetime
H. SLOT3: ticks
Correct Answers: B and G
Explanation
Power Automate expression builder helps users create expressions that contain functions, operators, variables, explicit values, or constants. All expressions are organized in groups, like String functions, Collection, Logic functions, Manipulation, and others. Power Automate and Azure Logic Apps use the Workflow Definition Language for their expressions and definitions of their flows.
When you need to compare the date-time expressions, you can use the ticks function. This function provides the number of 100-nanosecond intervals since midnight of January 1, 0001, like for “2021-05-06T07:00:00Z” timestamp has 637558812000000000 ticks.
If somebody does not provide a “Due date” value, this field’s value will be null. Therefore, you need to use the coalesce function to supply a non-null value as a ticks parameter.
The coalesce function checks the input value (or values) for a null and returns the value instead of null: the input or a predefined value if the input is null or not null.
To add the ‘Due date’ field value to the expression, you need to reference it using the triggerBody() function:
triggerBody()?[‘Duedate’]. This expression is the first parameter for the coalesce function. The second parameter is the predefined value for a date-time. In our case, it is ’01/01/1901’ formatted as ‘MM/dd/yyyy’:
formatdatetime(’01/01/1901′,’MM/dd/yyyy’).
Option B is correct because the SLOT3 is triggerBody().
Option G is correct because the SLOT4 is formatdatetime.
Here is the expression:
ticks(coalesce(triggerBody()?[‘Duedate’],formatdatetime(’01/01/1901′,’MM/dd/yyyy’)))
All other options are incorrect.
For more information about Power Automate expressions, please visit the below URLs: https://docs.microsoft.com/en-us/azure/logic-apps/workflow-definition-language-functions-reference#triggerBody, https://docs.microsoft.com/en-us/azure/logic-apps/workflow-definition-language-functions-reference#formatdatetime, https://docs.microsoft.com/en-us/azure/logic-apps/workflow-definition-language-functions-reference
Domain : Extend the user experience
Q19 : You create a new ribbon button for a model-driven app. But it does not work as you expected. You need to troubleshoot the button functionality.
What two steps should you take to achieve your goal?
- Open Ribbon Workbench
- Open App Checker
- Add &ribbondebug=true to the app’s URL
- Check button rule
- Add &ribbonbench=true to the app’s URL
- Open Command Checker
Correct Answers: C and F
Explanation
Power Apps provides the Command Checker tool that helps you to troubleshoot the ribbon buttons. The tool produces information about button visibility, actions, problems with rules.
You need to enable the Command Checker by adding the &ribbondebug=true to the app’s URL (Number 1). After that, you click on three vertical dots (Number 2) to open a menu and select the “Command checker” item (Number 3).
When you create a new command button, you need to address two elements: rule and actions.
The rule defines when button’s state within the application, like enable/disable state of the button when some field is changed or who can see the button. There are two types of rules: enable (should the command button be enabled) and display (should the rule be visible for the users).
The action describes the button behavior, like what should happen when the button is clicked. There are two types of command button actions that users can define in the OnClick event: execute the custom logic using JavaScript code or open a specific URL. It can be the dynamic URL if the business logic of your app requires it.
Using the Command checker, you can “drill down” the command bar tree (Number 1) and select the button that you have a problem with (Number 2). On the right side of the Command checker screen, you can select the Command properties of the button (Number 3). This tab presents the button’s Actions, Enable Rules, and Display Rules. You can verify why the button is hidden, like the Display Rule evaluated to false on a page load (Number 4).
All other options are incorrect.
For more information about the Command button rules and actions, please visit the below URLs: https://powerapps.microsoft.com/en-us/blog/introducing-command-checker-for-model-app-ribbons/, https://docs.microsoft.com/en-us/powerapps/developer/model-driven-apps/define-ribbon-commands, https://docs.microsoft.com/en-us/powerapps/developer/model-driven-apps/define-ribbon-enable-rules, https://docs.microsoft.com/en-us/powerapps/developer/model-driven-apps/define-ribbon-display-rules, https://docs.microsoft.com/en-us/powerapps/developer/model-driven-apps/define-ribbon-actions
Domain : Develop integrations
Q20 : You want to optimize the records retrievals from the Dataverse table using Web API Conditional retrievals.
What should you include in your Web API request to retrieve the record only if it is changed?
A. Prefer
B. ETag
C. Odata.track-changes
D. Deltatoken
E. If-None-Match
Correct Answers: B and E
Explanation
To optimize the records retrieval from the Dataverse when you use the Web API requests, you need to add an If-None-Match header with ETag value. If data has been changed, the response returns “200 OK” HTTP status. If there are no changes, the response returns “304 Not Modified” HTTP status.
The ETag or entity tag is the tag that OData provides with any retrieved record (Number 1). There are two types of ETags: strong and weak validations. The strong validation checks the resource changes on the binary level. The weak validation checks the resource changes on a semantical level. For the records, OData uses weak validation (Number 2).
You can use the ETag to query if the record has been changed. For that, you need to add the If-None-Match (Number 1) header with the ETag value (Number 2) to the request. And if there are no changes, you get the “304 Not Modified” status response (Number 3). You can also use another header, “If-Match,” with ETag value for a conditional retrieval.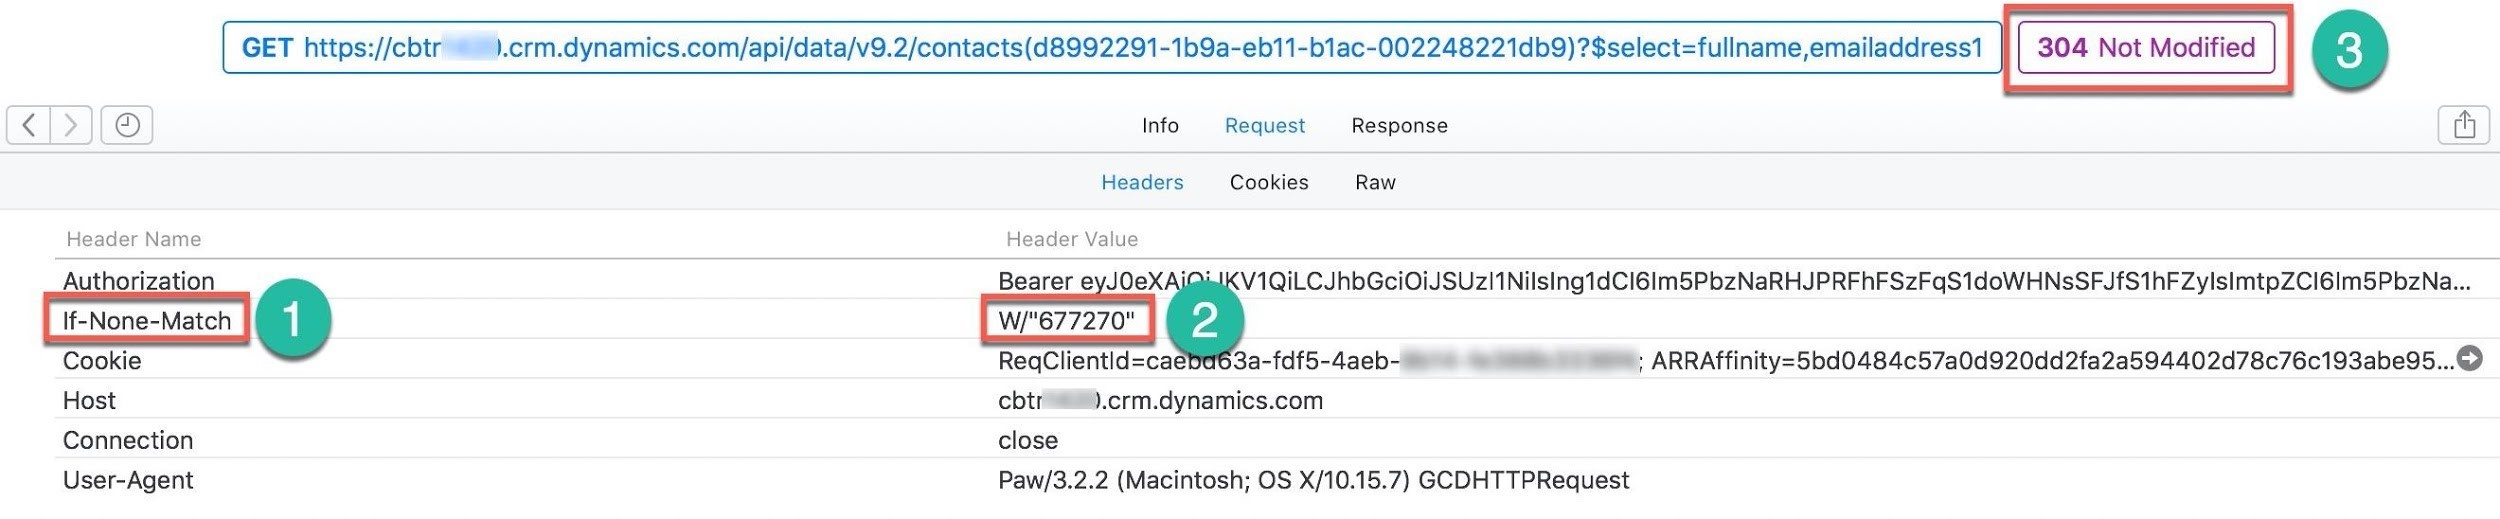
All other options are incorrect.
For more information about the Web API conditional operations, please visit the below URLs: https://docs.microsoft.com/en-us/powerapps/developer/data-platform/webapi/perform-conditional-operations-using-web-api#conditional-retrievals, https://docs.microsoft.com/en-us/powerapps/developer/data-platform/webapi/retrieve-entity-using-web-api, https://docs.microsoft.com/en-us/powerapps/developer/data-platform/webapi/perform-conditional-operations-using-web-api
Domain : Configure business process automation
Q21 : Please select the tool that helps to troubleshoot the flow after you create it.
A. Cloud Flow Activity
B. Power Apps Analytics
C. Flow checker
D. Run history
E. Power Automate Analytics
Correct Answer: C
Explanation
Flow checker is a Power Automate service that monitors the flow. It helps you to spot errors and follow the best design practices. If you made an error or missed a required input, the Flow checker will alert you with a red dot on its icon.
When you click on the marked icon, the Flow checker panel shows the errors and the step names (Number 1). And the warnings with the step names also (Number 2). You can get back to your flow and correct the errors.
Options A is incorrect because Cloud Flow Activity provides information about the runs of the flows in the environment. Still, it does not verify your flow on errors before it is deployed.
Options B is incorrect because Power Apps Analytics provides information about all running apps in the environment, but it does not verify your flow on errors before it is deployed.
Options D is incorrect because Run history provides information about the running flow’s success, but it does not verify your flow on errors before it is deployed.
Options E is incorrect because Power Automate Analytics provides information about all running flows in the environment, but it does not verify your flow on errors before it is deployed.
For more information about the Power Automate Flow checker, please visit the below URL: https://docs.microsoft.com/en-us/power-automate/error-checker
Domain : Extend the platform
Q22 : You test your API using the Postman. You create a collection and need to export it for creating a custom connector.
What are two elements that you need to remove from your collection before the export?
A. Body
B. Content-type
C. Postman-Token
D. Params
E. Authorization
F. Tests
Correct Answers: B and E
Explanation
A custom connector is an API wrapper around the REST API. You can create such a wrapper for Azure Functions, Azure Web Apps, Azure API apps.
When you create your application using one of these services, you need to describe the API’s operations before exporting your application’s APIs. There are three approaches to how to create the API definitions:
- Using a blank custom connector
- Using an Open API definition
- Using a Postman Collection
You can create a custom connector by importing the Postman collection JSON file. After you test your APIs using the Postman, you can export the collection. Postman creates the JSON file with the descriptions of your APIs. But before exporting the collection, you need to remove or disable two elements: Authorization and Content-type.
You can disable Authorization from the Authorization tab (Number 1) on the central Postman panel by selecting the “No Auth” option from the Type drop-down (Number 2). You need to save your changes using the Save button (Number 3).
Next, on the Headers tab (Number 1), you can uncheck the box in front of the Content-Type Key (Number 2) and save your changes (Number 3).
After these operations, you can export your collection from the Postman and import the JSON file as a custom connector definition.
All other options are incorrect.
For more information about preparing and using the Postman collections for the custom connectors, please visit the below URLs: https://docs.microsoft.com/en-us/connectors/custom-connectors/create-postman-collection#export-the-postman-collection, https://docs.microsoft.com/en-us/connectors/custom-connectors/create-postman-collection, https://docs.microsoft.com/en-us/connectors/custom-connectors/define-postman-collection
Domain : Create a technical design
Case Study : A rent-a-car service, “RentMe” has a fleet of 30 cars with locations in three airports. The company recently implemented Dynamics 365 CRM. But RentMe still maintains the customer records in Azure SQL. RentMe developed Power Apps applications for their customers. On their Power Apps portal, customers can create an account, search by location, and reserve a car. If users have any problems with a reservation, they call customer support. Customer support experiences a hefty load of calls during the working day. Most of the calls are about finding the center, office hours, or where the car is. RentMe provides a very detailed Q&A section on their website. Unfortunately, customers are still calling and asking the same questions.
Technology assessment
The company’s development team includes two Power Platform developers and one database/IT admin. RentMe management encourages employees to use the Power Platform no-code approach for their business needs.
Requirements
General
RentMe wants to improve its Power Apps and address issues that customers experienced.
Self-service car rent
RentMe introduces a new self-service car reservation system using a mobile app.
If you are a current customer, you can come directly to the car lot. Choose the car, open a RentMe mobile app, and click on the Rent button. The app starts a simple step-by-step process. It will ask you to take a photo of the car’s plate. Then the app reads the plate and, on the next step, invites you to enter the return date and time, assuming that you are renting today. And that is it. You push a Done button, and the application assigns a car to your account. Also, it reserves money on your credit card and opens the car. RentMe app generates a QR-code for a security check when you drive off the lot.
New customer registration
For the new customer, a RentMe mobile app provides a simple step-by-step process of creating a new account. It asks you to take pictures of your driver’s license first and then a credit card. The app processes provided data. Next, it presents a new customer record for your review with your first, middle, and last names, date of birth, address, and other information. And, of course, your credit card info. After you review your data and push the Create button, you can proceed with self-service car rent.
Improvements
RentMe wants to add a new field — NumberOfDays to the RentInfo table. It will store the number of full days that the customer expects to rent the car. The app should auto-populate the field on a form.
The company considers adding a customer satisfaction survey using five smiley faces ranging from very unsatisfied to very happy. RentMe is planning to ask customers to rank their cars and services at the departure and return times. The app should store this information in a custom Survey table.
RentMe wants to link the information from the Survey table with RentCenters, Customers, and CarFleet tables. In the end, the Survey table should include information about the car type, make and model.
The registration form should provide the custom button to email the registration. The button is visible after a customer saves the registration.
RentMe created a plug-in that updates the legacy data in Azure SQL using the Azure function.
One of the developers is working on a new Web app that uses the Dataverse Web API.
Issues
Customers complain that the email button’s caption is misspelled.
One of the makers (maker1) reports that she cannot see the data on the forms and flows that she created.
The Dataverse plug-in integration with the Azure Function generates the “503-Service Unavailable” Status code from time to time.
The developer registered his application with Azure AD. But has authentication problems accessing the Dataverse data using Postman.
Communication
After a mobile application generates a QR-code, the RentMe office team at the rent location should receive a message in their Microsoft Teams channel with a short description of the rented car and return date.
Chatbot
RentMe chatbot should use FAQ information from the current website.
The chatbot needs to provide the following information:
-
Current local weather
-
Direction to the lot for each RentMe location
-
Current information about the car inventory for each RentMe location:
-
by car types (like compact, mid-size, full-size, premium, etc.)
-
by car make and model within every type
-
For all other questions, the bot should transfer a chat to the live customer support agent.
At the beginning of a conversation, the RentMe bot should ask users to select their location. If a customer asks about car type inventory at the lot, a bot shows the number of cars for this type.
New RentMe portal
The company is testing the new RentMe portal. Currently, only the customers who received an email invitation can register and access the portal. For the customers who previously rented premium cars (“premium” customers), RentMe wants to show a new page with targeted promotions.
Additional requirements
The car inventory is temporarily stored in three SharePoint lists — one per location. The information includes the car type, make, model, year, and plate number. Whenever a customer rents or returns the car, the app updates the list.
Q23 : Please select the four steps you should take when you create a Survey table.
A. Create a connection between Survey and CarFleet tables
B. Create N:1 relationship between Survey and Customers tables
C. Create N:N relationship between Survey and Customers tables
D. Create 1:N relationship between CarFleet and Survey tables
E. Create 1:1 relationship between RentCenters and Survey tables
F. Create a mapping between Survey and Customers tables
G. Create 1:N relationship between RentCenters and Survey tables
H. Create a mapping between Survey and CarFleet tables
Correct Answers: B, D, G and H
Explanation
Dataverse identifies the two types of relationships between tables: One-to-Many (1:N) and Many-to-Many (N:N).
A One-to-Many relationship is a Parent-Child relationship, like between a company and its employees.
A Many-to-Many relationship is when multiple records from one table have the relationship with the multiple records in another table and vice versa. When users create a Many-to-Many relationship, Dataverse creates a specific intersect matching table between the records in two tables. After you create an N:N relationship, you cannot edit records in both tables. Connections are a special case for the Many-to-Many relationships. They are flexible and don’t have the limitations of the N:N relationship.
The Survey table has a relationship with three tables: RentCenters, Customers, CarFleet. Every record in a Survey table has the lookup field for the rent center code or name, the customer id, and information about the car: car id, type, make, and model. The Survey table has a Many-to-One relationship between all three tables. When we want to extend information from the parent table, we can create a mapping between tables. As a result, the mapped field will be copied to the related table, like car type, make, and model from the CarFleet table.
Options B is correct because we need to create a One-to-Many relationship between Customers and the Survey table or Many-to-One from the Survey table.
Options D and G are correct because we need to create One-to-Many relationships between CarFleet and Survey tables and between RentCenters and Survey tables.
Option H is correct because we need to map the fields from the CarFleet table into the Survey table.
You can view the mappable columns in the classic interface (Number 1) for the entity (Number 2) and 1:N Relationships (Number 3). The Type (Number 4) drop-down helps to filter the mappable table and columns (Number 5).
All other options are incorrect.
For more information about the Dataverse types of table relationship, please visit the below URLs: https://docs.microsoft.com/en-us/powerapps/maker/data-platform/map-entity-fields, https://docs.microsoft.com/en-us/powerapps/maker/data-platform/data-platform-entity-lookup, https://docs.microsoft.com/en-us/powerapps/maker/data-platform/create-edit-entity-relationships
Domain : Create and configure Power Apps
Q24 : A rent-a-car service, “RentMe” has a fleet of 30 cars with locations in three airports. The company recently implemented Dynamics 365 CRM. But RentMe still maintains the customer records in Azure SQL. RentMe developed Power Apps applications for their customers. On their Power Apps portal, customers can create an account, search by location, and reserve a car. If users have any problems with a reservation, they call customer support. Customer support experiences a hefty load of calls during the working day. Most of the calls are about finding the center, office hours, or where the car is. RentMe provides a very detailed Q&A section on their website. Unfortunately, customers are still calling and asking the same questions.
Technology assessment
The company’s development team includes two Power Platform developers and one database/IT admin. RentMe management encourages employees to use the Power Platform no-code approach for their business needs.
Requirements
General
RentMe wants to improve its Power Apps and address issues that customers experienced.
Self-service car rent
RentMe introduces a new self-service car reservation system using a mobile app.
If you are a current customer, you can come directly to the car lot. Choose the car, open a RentMe mobile app, and click on the Rent button. The app starts a simple step-by-step process. It will ask you to take a photo of the car’s plate. Then the app reads the plate and, on the next step, invites you to enter the return date and time, assuming that you are renting today. And that is it. You push a Done button, and the application assigns a car to your account. Also, it reserves money on your credit card and opens the car. RentMe app generates a QR-code for a security check when you drive off the lot.
New customer registration
For the new customer, a RentMe mobile app provides a simple step-by-step process of creating a new account. It asks you to take pictures of your driver’s license first and then a credit card. The app processes provided data. Next, it presents a new customer record for your review with your first, middle, and last names, date of birth, address, and other information. And, of course, your credit card info. After you review your data and push the Create button, you can proceed with self-service car rent.
Improvements
RentMe wants to add a new field — NumberOfDays to the RentInfo table. It will store the number of full days that the customer expects to rent the car. The app should auto-populate the field on a form.
The company considers adding a customer satisfaction survey using five smiley faces ranging from very unsatisfied to very happy. RentMe is planning to ask customers to rank their cars and services at the departure and return times. The app should store this information in a custom Survey table.
RentMe wants to link the information from the Survey table with RentCenters, Customers, and CarFleet tables. In the end, the Survey table should include information about the car type, make and model.
The registration form should provide the custom button to email the registration. The button is visible after a customer saves the registration.
RentMe created a plug-in that updates the legacy data in Azure SQL using the Azure function.
One of the developers is working on a new Web app that uses the Dataverse Web API.
Issues
Customers complain that the email button’s caption is misspelled.
One of the makers (maker1) reports that she cannot see the data on the forms and flows that she created.
The Dataverse plug-in integration with the Azure Function generates the “503-Service Unavailable” Status code from time to time.
The developer registered his application with Azure AD. But has authentication problems accessing the Dataverse data using Postman.
Communication
After a mobile application generates a QR-code, the RentMe office team at the rent location should receive a message in their Microsoft Teams channel with a short description of the rented car and return date.
Chatbot
RentMe chatbot should use FAQ information from the current website.
The chatbot needs to provide the following information:
-
Current local weather
-
Direction to the lot for each RentMe location
-
Current information about the car inventory for each RentMe location:
-
by car types (like compact, mid-size, full-size, premium, etc.)
-
by car make and model within every type
-
For all other questions, the bot should transfer a chat to the live customer support agent.
At the beginning of a conversation, the RentMe bot should ask users to select their location. If a customer asks about car type inventory at the lot, a bot shows the number of cars for this type.
New RentMe portal
The company is testing the new RentMe portal. Currently, only the customers who received an email invitation can register and access the portal. For the customers who previously rented premium cars (“premium” customers), RentMe wants to show a new page with targeted promotions.
Additional requirements
The car inventory is temporarily stored in three SharePoint lists — one per location. The information includes the car type, make, model, year, and plate number. Whenever a customer rents or returns the car, the app updates the list.
Q24 : What should you use to update the “Full days of Rent” field on the Power Apps form?
A. Business rule
B. Business Process flow
C. Power Automate
D. Client script
E. Dataverse plug-in
Correct Answer: D
Explanation
When a user provides the car return date, RentMe model-driven application updates the “Full days of rent” field on a form. The easiest way is to use the business rules to do that. But the business rules are working on the form load or refresh. The JavaSript or Typescript client script is the best way to update the form in “real-time” after the input of the return date. The script must calculate the full days of rent and update the “Full days of rent” field on a form.
All other options are incorrect.
For more information about the use of the client scripts in model-driven apps, please visit the below URLs: https://docs.microsoft.com/en-us/powerapps/developer/model-driven-apps/client-scripting, https://docs.microsoft.com/en-us/learn/modules/automate-business-process-flow-client-script-power-platform/2-best-practices
Domain : Extend the platform
Case Study : A rent-a-car service, “RentMe” has a fleet of 30 cars with locations in three airports. The company recently implemented Dynamics 365 CRM. But RentMe still maintains the customer records in Azure SQL. RentMe developed Power Apps applications for their customers. On their Power Apps portal, customers can create an account, search by location, and reserve a car. If users have any problems with a reservation, they call customer support. Customer support experiences a hefty load of calls during the working day. Most of the calls are about finding the center, office hours, or where the car is. RentMe provides a very detailed Q&A section on their website. Unfortunately, customers are still calling and asking the same questions.
Technology assessment
The company’s development team includes two Power Platform developers and one database/IT admin. RentMe management encourages employees to use the Power Platform no-code approach for their business needs.
Requirements
General
RentMe wants to improve its Power Apps and address issues that customers experienced.
Self-service car rent
RentMe introduces a new self-service car reservation system using a mobile app.
If you are a current customer, you can come directly to the car lot. Choose the car, open a RentMe mobile app, and click on the Rent button. The app starts a simple step-by-step process. It will ask you to take a photo of the car’s plate. Then the app reads the plate and, on the next step, invites you to enter the return date and time, assuming that you are renting today. And that is it. You push a Done button, and the application assigns a car to your account. Also, it reserves money on your credit card and opens the car. RentMe app generates a QR-code for a security check when you drive off the lot.
New customer registration
For the new customer, a RentMe mobile app provides a simple step-by-step process of creating a new account. It asks you to take pictures of your driver’s license first and then a credit card. The app processes provided data. Next, it presents a new customer record for your review with your first, middle, and last names, date of birth, address, and other information. And, of course, your credit card info. After you review your data and push the Create button, you can proceed with self-service car rent.
Improvements
RentMe wants to add a new field — NumberOfDays to the RentInfo table. It will store the number of full days that the customer expects to rent the car. The app should auto-populate the field on a form.
The company considers adding a customer satisfaction survey using five smiley faces ranging from very unsatisfied to very happy. RentMe is planning to ask customers to rank their cars and services at the departure and return times. The app should store this information in a custom Survey table.
RentMe wants to link the information from the Survey table with RentCenters, Customers, and CarFleet tables. In the end, the Survey table should include information about the car type, make and model.
The registration form should provide the custom button to email the registration. The button is visible after a customer saves the registration.
RentMe created a plug-in that updates the legacy data in Azure SQL using the Azure function.
One of the developers is working on a new Web app that uses the Dataverse Web API.
Issues
Customers complain that the email button’s caption is misspelled.
One of the makers (maker1) reports that she cannot see the data on the forms and flows that she created.
The Dataverse plug-in integration with the Azure Function generates the “503-Service Unavailable” Status code from time to time.
The developer registered his application with Azure AD. But has authentication problems accessing the Dataverse data using Postman.
Communication
After a mobile application generates a QR-code, the RentMe office team at the rent location should receive a message in their Microsoft Teams channel with a short description of the rented car and return date.
Chatbot
RentMe chatbot should use FAQ information from the current website.
The chatbot needs to provide the following information:
-
Current local weather
-
Direction to the lot for each RentMe location
-
Current information about the car inventory for each RentMe location:
-
by car types (like compact, mid-size, full-size, premium, etc.)
-
by car make and model within every type
-
For all other questions, the bot should transfer a chat to the live customer support agent.
At the beginning of a conversation, the RentMe bot should ask users to select their location. If a customer asks about car type inventory at the lot, a bot shows the number of cars for this type.
New RentMe portal
The company is testing the new RentMe portal. Currently, only the customers who received an email invitation can register and access the portal. For the customers who previously rented premium cars (“premium” customers), RentMe wants to show a new page with targeted promotions.
Additional requirements
The car inventory is temporarily stored in three SharePoint lists — one per location. The information includes the car type, make, model, year, and plate number. Whenever a customer rents or returns the car, the app updates the list.
Q25 : Please select steps to integrate the Dataverse events with Azure Function that would avoid the 503 Status code errors.
A. Register New Step with Synchronous PostOperation stage of execution
B. Register New Assembly
C. Register New Step with Asynchronous PostOperation stage of execution
D. Registry New Service Endpoint
E. Register New Step with Asynchronous PreOperation stage of execution
F. Register New Web Hook
Correct Answers: C and F
Explanation
The Dataverse provides a way to publish events to external services by using web hooks. You can Register the New Web Hook using the Dataverse’s Plug-in Registration Tool and attach it to the Dataverse events. After a web hook registration, you need to Register a New Step when the web hook transfers the data to the Azure Function.
There are three stages in plug-in event pipeline execution:
- PreValidation — an initial stage before the main operation. You can include the logic for canceling the event before the data transaction.
- PreOperation — the next stage before the main operation but within the data transaction. You can make changes to the data in operation.
- PostOperation — the stage after the main operation and still within the data transaction. You can call other actions using the Organization service before the message returns to the caller.
The data transfer using a web hook has a 60 seconds timeout. If a web hook cannot rack the endpoint within this time, the 5xx Status code returns back. To avoid this type of error, you need to register the New Step for the WebHook with the Asynchronous PostOperation stage of execution.
All other options are incorrect.
For more information about the Dataverse webhooks integration, please visit the below URLs: https://docs.microsoft.com/en-us/powerapps/developer/data-platform/register-web-hook, https://docs.microsoft.com/en-us/powerapps/developer/data-platform/use-webhooks, https://docs.microsoft.com/en-us/azure/azure-functions/functions-scenario-database-table-cleanup
Domain: Develop Integrations
Question 26: Drag and Drop – Arranging
Suppose there is an entity in the Dataverse which contains the lookup column “Groups (Related Table Group)”.
The requirement is to fetch Security Group from Azure AD and create a record in the Group table so that those groups are available in the lookup record.
Note: You don’t have global admin permission on Azure AD
Arrange the steps for the development logic you will follow to achieve the requirement.
- Add an action “Apply to Each”
- Add an action “Get Group”
- Add an action “List my owned Groups”
- Add an action “Add a New Row”
- Fetch the Group Name
Correct sequence – 3, 1, 2, 5, 4
Explanation:
The requirement indicates that automated cloud flow should be able to fetch groups from Azure AD which is of type “Security” and store the group name in the entity as a record.
- “List my owned Groups” action belonging to the “Office 365 Groups” trigger that is used to fetch all the groups from Azure AD which is owned by you.
- After getting all the groups, loop through the group and extract the group id and use it in the “Get Group” action which will return the details of each group.
- Group Name gets fetched from the above steps. Use the “Add a New Row” action of the Dataverse trigger and store the group name by creating a record in the entity.
Reference: https://docs.microsoft.com/en-us/connectors/office365groups/, https://docs.microsoft.com/en-us/connectors/azuread/
Question 27: Drag and Drop- Arranging
Suppose you design a custom Dataverse table where you have added timeline control.
Whenever notes are added to the timeline control, records get created in the “Annotation” table of standard type.
The requirement is that whenever new notes are added to the timeline, the same notes record should get updated automatically in the “Annotation” table.
Drag the 5 required steps for the development logic you will follow to achieve the requirement of updating the “Annotation” table.
- Add a trigger condition in Power Automate “when a row is added (Dataverse)”
- Register an App in Azure AD
- Add an HTTP action to get the access token using the POST method.
- Add an HTTP action using POST method OData request to update the record using record id from trigger body
- Add and allow Application User a System Administrator Permission to Power Platform Environment
- Add an HTTP action using Patch method OData request to update the record using record id from trigger body
Answer:
- Register an App in Azure AD
- Add and allow Application User a System Administrator Permission to Power Platform Environment.
- Add a trigger condition in Power Automate “when a row is added (Dataverse)”
- Add an HTTP action to get the access token using the POST method
- Add an HTTP action using Patch method OData request to update the record using record id from trigger body
Explanation:
As per the requirement, we need to perform an update operation in the Annotation Dataverse entity of type “Standard” with the help of Power Automate.
- To update the record using an API call in Power Automate, we need to use the “HTTP” action.
- Before that we must register an azure app to AD i.e., it will grant permission to make API call operation to Dataverse.
- Assign system administrator role to Azure App in Power Platform Environment.
- Use HTTP action and input token URL using POST OData request it will be used to generate a token.
- Using the token generated from the above “HTTP” action into another HTTP action to authenticate the API update operation to the “Annotation” entity. (Patch method will be used as we are updating the record.)
Question 28: Drag and Drop- Ordering
There is a Security Group in the Azure AD that contains around 150 members including inactive members.
The requirement is to change the business unit of all the members in bulk using the XRM tool.
Arrange the steps for the development logic you will follow to achieve the requirement.
(Left side)
- Export the list of enabled users as CSV from Azure AD
- Assign the business unit to all the enabled users using XRM Tool
- Apply the VLOOKUP formula to filter out the enabled users in the security Group
- Export the list of members of the security group in Excel from Azure AD
Correct Answer: 4, 1, 3, 2 (to be dragged to the right side)
Explanation:
As per the requirement, you have to find logic to change the business units of multiple users which can be achieved by the XRM tool and excel.
- We need to pass all the user emails stored in CSV format to the XRM tool which assigns the business unit together in a batch of 200 but there should be no such email whose account is disabled.
- For that reason, we can export the list of members from that group as CSVl but there is no such possibility to extract only enabled users from that group.
- We need to extract the user a CSV from Azure AD by applying filters only enabled.
- As we are able to extract two CSV files from Azure AD. One CSV file contains a list of all the enabled Users in Azure AD and another CSV file contains the email id of the list of all the members(enabled and disabled) in one particular group.
- Combine both the excels file in excel in two different sheets
- Suppose Sheet1 contains the list email id of the list of all the members(enabled and disabled) in a group and Sheet 2 contains details of the list of all the enabled Users in Azure AD. Apply the VLOOKUP formula to filter out those email IDs from sheet 1 whosoever status is enabled in sheet 2.
Reference: https://docs.microsoft.com/en-us/answers/questions/239938/export-ad-users-to-csv-file.html,
Question 29: Multiple Responses
You have set up a new environment for your client in Power Platform. You need to deploy a solution from your development environment to the client environment. The solution contains automated cloud flow which is used to send approvals to the users in Teams and Outlook due to which you are getting dependency errors while importing.
Which of the two options are the possible reasons for the dependency error?
- Innovation Challenge
- Microsoft Flow Approvals Core Solution
- Default Solution
- Microsoft Flow Approvals
Answer: B and D
Explanation:
Options B and D are correct: These two solutions are dependent solutions in an environment that contains all the Standard type Approvals entities where all the data related to Approvals is stored.
Since cloud flow uses the “Approval” action, it requires all the tables related to Approvals as a dependency.
Option A is incorrect: Innovation Challenge is responsible for installing sample apps & data in the environment.
Option C is incorrect: Default Solution is responsible for Microsoft Dataverse default publisher.
Question 30: Single Choice Select
You have the requirements from a client that you need to pull all the Azure AD groups and their corresponding members into a Dataverse table with the help of Power Automate and Azure AD trigger actions.
Which of the following do you need to use Azure AD trigger actions?
- Global Admin Consent
- Global Admin Permission in Azure AD
- System Administrator of Dataverse Environment
- Premium Connector License in Power Automate
Answer: A
Explanation:
Option A is Correct: To use Azure AD trigger action for development purposes, Global Admin Consent is required as Global Admin of Azure AD will give consent on behalf of the organization.
Option B is incorrect: Assigning Global Admin Permission to Azure AD will give full access to Azure AD which is not a feasible solution.
Option C is incorrect: Assigning the System Administrator security role to the user, will only make the user an Admin of that Power Platform Environment. There is no access related to Azure AD.
Option D is incorrect: Premium Connector License is used for accessing the premium connector in Power Automate.
Reference:https://docs.microsoft.com/en-us/azure/active-directory/manage-apps/configure-admin-consent-workflow
Summary
Did you find these PL-400 questions and answers helpful and would like to try and practice more? Find more PL-400 Practice questions(link) at Whizlabs official page. Prepare well and pass the certification exam in the first attempt. Keep Learning with us!
- 25 Free Questions on MS-101: Microsoft 365 Mobility and Security - November 13, 2022
- What is Snowpipe & how does it works? - October 7, 2022
- Preparation Guide on DP-420 Designing and Implementing Cloud-Native Applications Using Microsoft Azure Cosmos DB Certification - September 12, 2022
- Preparation guide on MB-910: Microsoft Dynamics 365 Fundamentals (CRM) Certification Exam - August 5, 2022
- Snowflake Certifications – Which snowflake certification is best for you? - July 11, 2022
- All you need to know about Certified Ethical Hacker Certification - June 16, 2022
- What are Hands-On Labs? A beginner’s guide to Hands-on Labs - May 17, 2022
- 25 Free Question on Salesforce Administrator Certification - April 26, 2022