The serverless architecture AWS approach lets you build as well as deploy the applications and services with the infrastructure resources with zero administration.
As the application can operate on the servers, the tasks that are relevant to the server management are taken care of by AWS. It means there is no need to handle tasks such as scaling, provisioning, and maintaining the servers to run the applications, storage, and database systems. In this blog article, we will demonstrate how we can deploy a serverless architecture AWS in the Amazon web services to create static web pages.
This tutorial is intended for cloud architects and cloud developers as well as those who want to pursue an AWS Certified Developer Associate.
![]()
An Overview of Serverless Architecture AWS
Serverless architecture AWS offers a revolutionary approach to application development and deployment. With AWS Lambda at its core, this paradigm eliminates the need for traditional servers, allowing you to focus solely on your code. By leveraging serverless computing, you can achieve unparalleled scalability, cost-efficiency, and agility for your applications.
Serverless AWS empowers developers to respond rapidly to changing demands while reducing operational overhead. Whether you’re building APIs, processing data, or deploying web applications, serverless architecture AWS simplifies the process. Embrace the future of cloud computing with AWS and unleash the full potential of serverless technology.
What are the prerequisites for deployment activity?
While initiating the deployment activity, it is essential to meet the following requirements:
- The users who are involved in this project must know about AWS services such as Amazon S3, API Gateway, AWS Lambda, and DynamoDB
- Must have a basic understanding of HTML, Javascript, and CSS
- Some of the hardware requirements such as a Laptop/Desktop and a fast and reliable Internet connection are required.
Read More : How to Deploy a Highly Available Web Application Combining Server & Serverless Concepts| Hands on Labs
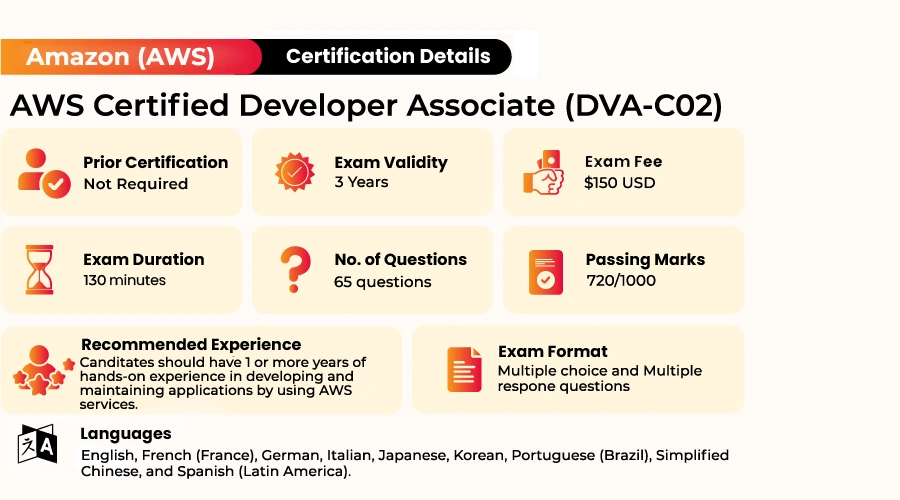
Exam Overview of AWS Certified Developer Associate (DVA-C02)
Setting up a lab environment
To set up the AWS lab Environment, follow the below steps:
- To launch the project environment, Click on the start project button.
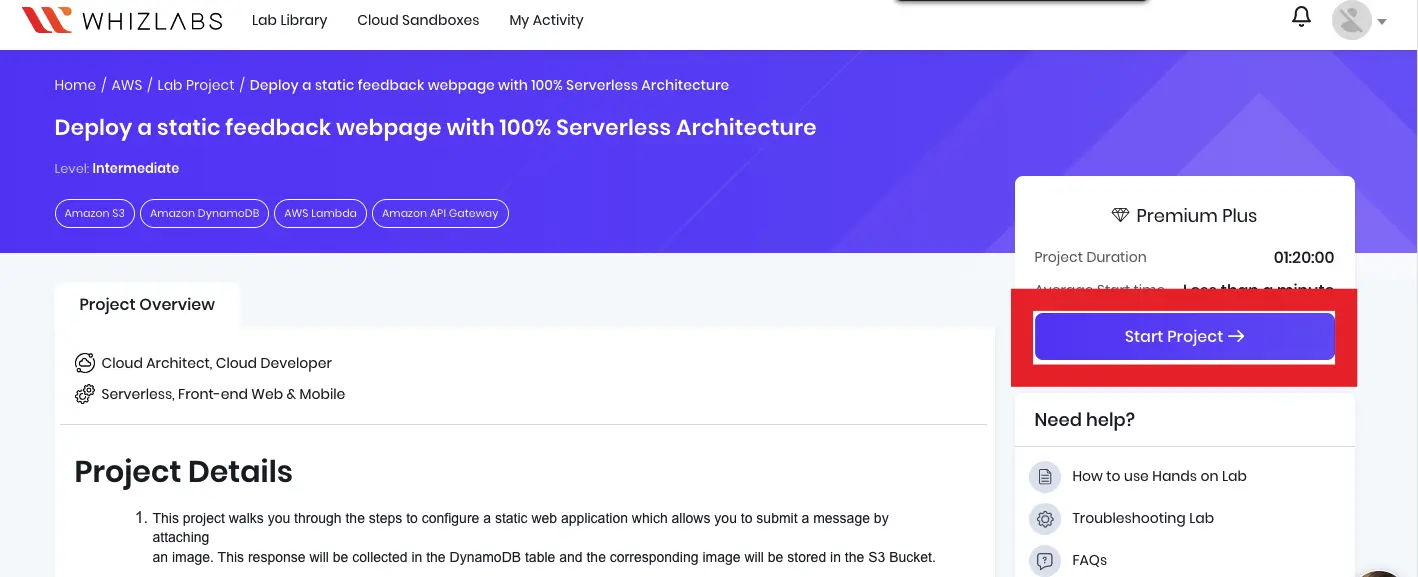
- You have to wait for a minute until the cloud environment gets provisioned.
- Once the Lab is started, you will be provided with an IAM username, Password, Access Key, and Secret Access Key
Architecture Diagram of Serverless Architecture AWS
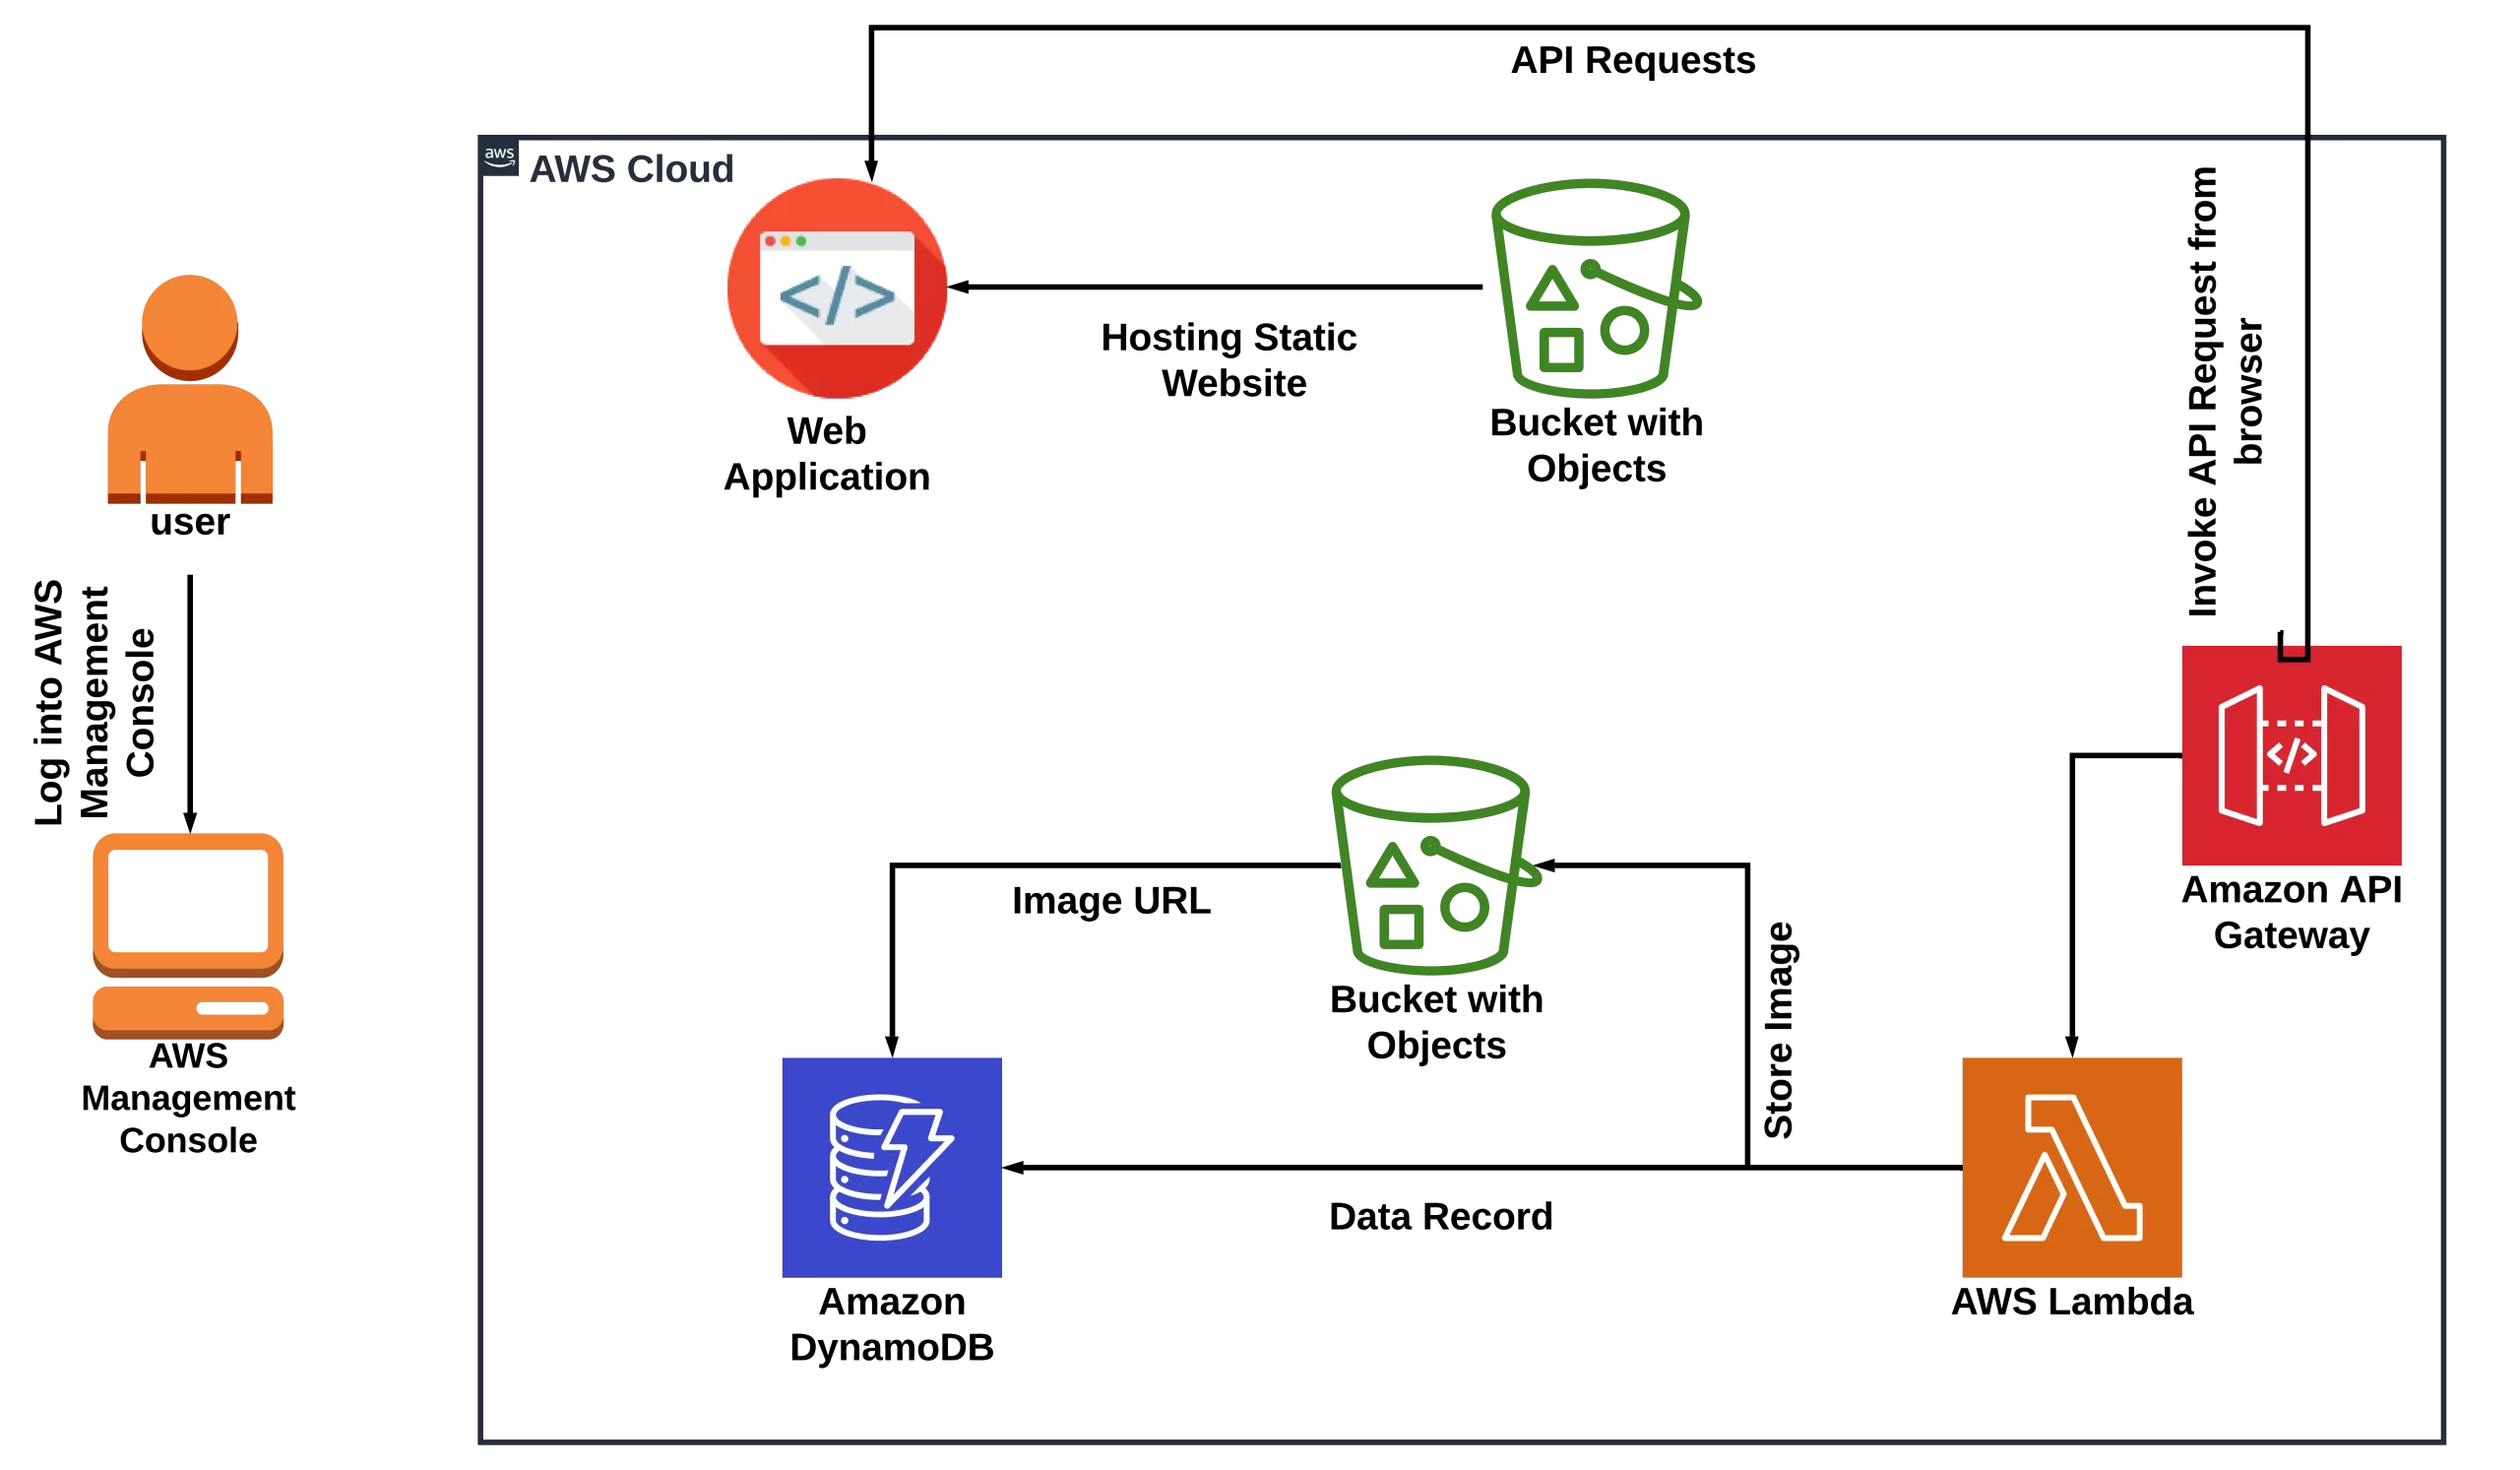
How to Deploy a static feedback webpage with 100% Serverless Architecture?
To build the static webpage with the help of serverless architecture, the below steps need to be followed:
Step 1: Access the AWS Management Console
To begin, click on the provided button, which will open a new browser tab and take you to the AWS Console.
Once you reach the AWS sign-in page, please follow these steps:
- Keep the Account ID field as it is. Do not edit or remove the 12-digit Account ID displayed in the AWS Console. Editing it may prevent you from proceeding with the lab.
- In the Lab Console, copy your User Name and Password.
- Paste the copied Username and Password into the respective fields labeled IAM Username and Password on the AWS Console sign-in page.
- After entering your credentials, click on the “Sign in” button.
Once you’ve successfully signed in to the AWS Management Console, make sure to set the default AWS Region to “US East (N. Virginia)” by selecting “us-east-1.”
Also Read : A Guide to Serverless Architecture
Step 2: Creating a DynamoDB table
To create the DynamoDB table for storing form submission details:

- Ensure that you are in the “US East (N. Virginia) US-east-1” Region.
- Click on the “Services” menu, located under the “Database” section.
- Select “DynamoDB.”
- Click on “Create table.”
- In the “Table details” section:
- Enter “whiz_table” as the Table name.
- For the Partition key, enter “id” and select the type as “String.”
- Leave all other settings as their default values.
- Finally, click on the “Create table” button to create the DynamoDB table.
Step 3: Creating an S3 Bucket for Image Storage and Adding Bucket Policy
- Ensure that you are in the “US East (N. Virginia) US-east-1” Region.
- Navigate to S3 by clicking on the “Services” menu, located under the “Storage” section.
- Click on the “Create bucket” button.
- Enter a unique name for your bucket, such as “whiz-s3-image-data,” and select the region as “us-east-1.”
- In the “Block Public Access settings for this bucket” section:
- Uncheck the option “Block all public access” and acknowledge the option.
- Leave all other settings as their default values and click “Create bucket.”
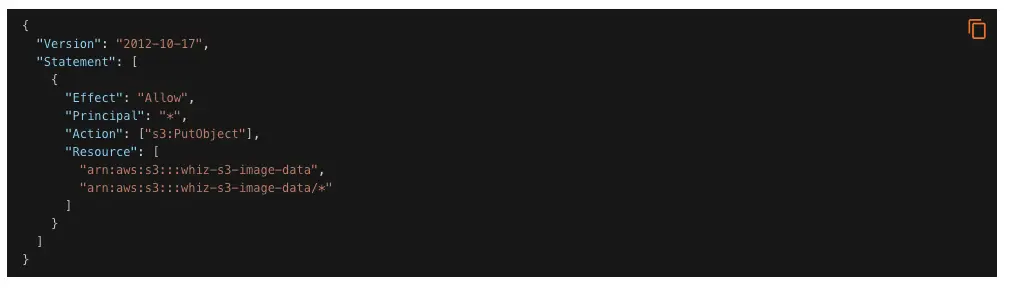
- To create the Bucket policy, click on the newly created bucket and go to the “Permissions” tab.
- Scroll down to the “Bucket Policy” section and click on “Edit.”
- Paste the following bucket policy and click “Save changes.”
Step 4: Creating an S3 Bucket for Web Page Content

- Ensure that you are in the “US East (N. Virginia) US-east-1” Region.
- Navigate to S3 by clicking on the “Services” menu, located under the “Storage” section.
- Click on the “Create bucket” button.
- Enter a unique name for your bucket, like “whiz-webpage,” and select the region as “us-east-1.”
- In the “Block Public Access settings for this bucket” section:
- Uncheck the option “Block all public access” and acknowledge it.
- Under “Bucket Versioning,” click “Enable.”
- Leave all other settings as their default values and click “Create bucket.”
- Once your S3 bucket is created, click on it to open it.
- To create the Bucket policy, click on the bucket and go to the “Permissions” tab.
- Scroll down to the “Bucket Policy” section and click on “Edit.”
- Paste the following bucket policy and click “Save changes.”
Step 5: Hosting the Static Webpage

- Download the zip file named “Whiz_App.”
- Unzip the files from “Whiz_App.zip” into your local directory and review the code.
- Return to your S3 bucket and click on the “Upload” button to upload your webpage content. You can drag and drop the files from the unzipped folder.
- Your webpage content is now hosted in your S3 bucket. To access it, click on the “Properties” tab in your bucket and select “Static website hosting.”
- Click on “Edit” and choose “Enable.” In the “Hosting type,” select “Host a static website.”
- Enter the name of your index document (typically “index.html”) and the name of your error document (typically “error.html”).
- Click “Save changes,” and your static website is now hosted on your S3 bucket. You can access it using the endpoint URL provided in the “Static website hosting” settings.
Step 6: Creating a AWS Lambda function
- Navigate to the AWS Lambda function in the US East (N. Virginia) region.
- Click on “Create function.”
- Fill in the following details:
- Function name: send_data_to_table
- Runtime: Choose Python 3.9
- Under Permissions, choose “Use an existing role” and select whiz_lambda_role.
- Click “Create function.”
Step 7: Creating a Rest API
- Navigate to the AWS API Gateway service in the US East (N. Virginia) region.
- Click on “Get started.”
- Select “Build” under REST API.
- Choose the protocol as REST.
- In the “Create new API” section, choose “New API.”
- Under Settings, set:
- API name: whiz_api
- Description: “Trigger the Lambda function”
- Click “Create API.”
Step 8: Creating a Resource and Method for the API
- After creating the REST API, click “Actions” and choose “Create Resource.”
- Enter “submit” as the Resource Name and check the option for “Enable API Gateway CORS.”
- Click “Create Resource.”
- Once the resource is created, select it (/submit) and choose “Create Method.”
- Choose the method as POST and click the tick mark.
- In the POST method:
- Choose “Integration type” as Lambda Function.
- Enter the lambda function name (send_data_to_table).
- Click “Save,” and then click “OK” on the pop-up window.
Step 9: Testing the API
- You can now test if the Lambda integration is working.
- Click on “Test.”
- In the Request Body, enter the parameters to check if the configurations are correct.
- The data entered in the Request Body should be updated in the DynamoDB table, and the image file should be stored in the S3 bucket.
After the creation of those web pages, the users can suggest their thoughts in the form of images, and that data will be retained in an AWS Database such as Amazon DynamoDB. The whole deployment process gets automated and thus allows for more accessible updates to a webpage.
Step 10: Enabling CORS and Deploying the API
After successfully creating the resource and method, you can proceed to deploy the API.
- Select the POST method, click on “Actions,” and choose “Enable CORS.”
- Keep all the settings as default and click on “Enable CORS and replace existing CORS headers.”
- Next, click on “Actions” again and select Deploy API.
- In the “Deploy API” section:
- For Deployment stage, select [New stage].
- Enter a Stage name, such as “staging.”
- Click “Deploy.”
- Once the API is deployed, make a note of the Invoke URL for the /submit method. You can find this URL by navigating to the staging > /submit > POST.
Step 11: Modify the index.html Page
- Open the contents of the Whiz_App in any text editor. You need to insert the API Gateway endpoint URL you noted down previously into Line 64 of the index.html file.
- Save the file to update it and then upload the updated index.html to the static web page hosting S3 bucket.
- Navigate to Amazon S3 by clicking on the “Services” menu, under the “Storage” section, and select your static web page hosting bucket.
- Click on the “upload” button and upload the updated index.html page to the bucket.
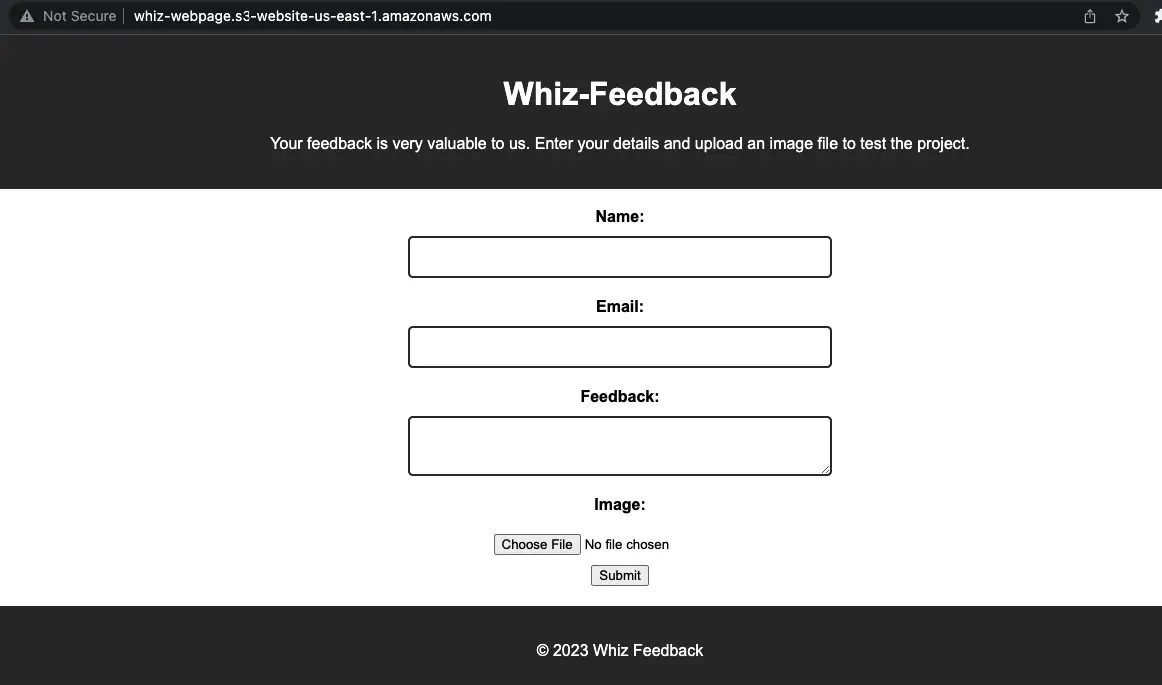
Step 12: Testing the Web Page Now
You can test the web page using the CloudFront domain name. Follow these steps:
- On the web page, fill in the details in the form:
- Click on the “Submit” button.
- You should see a submission message at the top of the web page, indicating whether the form submission was successful or not.
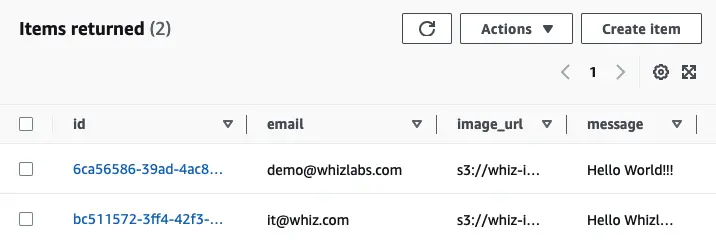
- Next, navigate to the DynamoDB table to check if the submitted form’s details are recorded.
- Verify that the entry has been made in the DynamoDB table.
- Finally, go to the S3 bucket that was created to confirm whether the uploaded image is present.
Benefits of AWS Hands-on Labs

Summary
Hope this blog post shows how the serverless architecture AWS approach helps in creating static webpage creation in real-time settings. By following the above steps, you can get feedback in prior and make the right decisions on time.
By the generation of automatic updates to web pages, the users can become highly satisfied. To know more about serverless architecture AWS and its concepts, you can take AWS certified developer associate certification.
If you are seeking any study materials for AWS certified developer associate (DVA-C02) certification, make use of our DVA-C02 Study Guides, DVA-C02 practice exams, and so on, and get prepared for AWS developer associate exam questions.
To sharpen your practical skills, simply rely upon our AWS hands-on labs and AWS sandboxes.
- Study Guide DP-600 : Implementing Analytics Solutions Using Microsoft Fabric Certification Exam - June 14, 2024
- Top 15 Azure Data Factory Interview Questions & Answers - June 5, 2024
- Top Data Science Interview Questions and Answers (2024) - May 30, 2024
- What is a Kubernetes Cluster? - May 22, 2024
- What are the Roles and Responsibilities of an AWS Sysops Administrator? - March 28, 2024
- How to Create Azure Network Security Groups? - March 15, 2024
- What is the difference between Cloud Dataproc and Cloud Dataflow? - March 13, 2024
- What are the benefits of having an AWS SysOps Administrator certification? - March 1, 2024