
To create a virtual machine within the Azure portal, you have to wait for a longer duration to successfully deploy a storage account. Recognizing this issue, Microsoft came up with a template called ARM Template to define resources and create the infrastructure.
Azure Resource Manager Templates offer an integrated and straightforward approach to establishing and controlling your Azure environments to assist both the developers and administrators. By utilizing uncomplicated JSON files, you can ensure a uniform deployment of your environment.
In this blog post, you will walk through Azure resource manager(ARM) in AZ-900 Certification, the benefits of ARM, how to create and deploy ARM templates and ARM Best Practices, and so on.
Let’s dive in!
What is Azure resource manager(ARM)?
While working with the Microsoft Azure cloud, the Azure resources have to be created. To manage such kinds of resources, Microsoft introduced solutions such as Azure Resource Manager (ARM) to deploy, configure, and manage the resources that exist within the Azure platform.
Microsoft Azure Resource Manager(ARM) is an advanced, cheap, and efficient way of resource management. It integrates resources such as Azure resource groups, Azure resources, and resource providers to develop an aligned cloud environment. It can be achieved with the help of Azure Portal, Azure CLI, Azure PowerShell, and SDKs.
To ace the AZ-900 certification exam, having basic knowledge of the ARM Template can be beneficial.
What are ARM Templates?
An ARM (Azure Resource Manager) template is like a set of instructions written in a special code. These instructions describe how your project’s framework and settings should be put together. These instructions are written using a format called JSON (JavaScript Object Notation).
This template contains all the details about the parts you need for your project. Using this template makes it easy to set up everything quickly and consistently. It’s like having a step-by-step guide to automatically build your project.
You can go through some of the ARM Templates benefits:
- ARM Templates serve as a comprehensive solution for defining network infrastructure, storage, and diverse resources.
- They ensure consistent resource deployment throughout the development lifecycle, allowing for repeated and dependable provisioning.
- Templates offer the advantage of parallel deployment, where a single command triggers the setup of all specified resource configurations.
- Modularization is supported, enabling the segmentation of intricate configurations into smaller units within a parent template.
- Deployment scripts, including PowerShell or Bash Scripts, can be seamlessly integrated into templates to enhance their functionality and customization.
- The ARM template toolkit facilitates the testing and validation of ARM Templates, offering a way to preview their functionality before actual deployment.
- The preview feature allows users to visualize impending resource creation or removal actions to achieve transparency and confidence.
- Integration with Continuous Integration (CI) and Continuous Deployment (CD) tools is a notable capability to enable the automation of release processes.
- This integration streamlines resource deployment and management to achieve efficient development workflows.
Also Read : 7 pro tips for the AZ-900 exam: Microsoft Azure Fundamentals Certifications
ARM Deployment Modes
Two approaches for deploying ARM templates are incremental and complete modes. These modes handle existing resources not defined in the template in distinct ways.
In both modes, the Resource Manager service aims to create all template resources. If a resource already exists and aligns with the template, it remains unchanged. If you were to execute previous commands, Azure wouldn’t take any action.
When you modify a resource’s property values, Azure responds by updating the resource with fresh values. For instance, in the case of a storage account, shifting from Standard LRS to Standard GRS as the storage SKU prompts Azure to carry out the update.
How to create and deploy ARM Template?
Here is a step-by-step guide to create and deploy an ARM Template:
1. Creating ARM Template
Once you have familiarized yourself with the structure of ARM Templates, it’s time to dive into creating and deploying them. To write a template, any JSON editor will suffice.
Microsoft offers Visual Studio Code as a tool, for coding in formats, including JSON. You can obtain Visual Studio Code from the Microsoft website or store.
If you have access to the Azure Portal you don’t need any tools as it is already equipped with built-in editors.
Here, we will be using the Azure Portal. Let’s proceed by visiting and logging into your Azure Portal then follow along as we walk through the steps of creating and deploying ARM Templates.
- To create the ARM template, it’s necessary to generate the resources within the Azure Portal.
- Refer to the image provided, where you can locate the possibilities for resource creation within the Azure Portal.
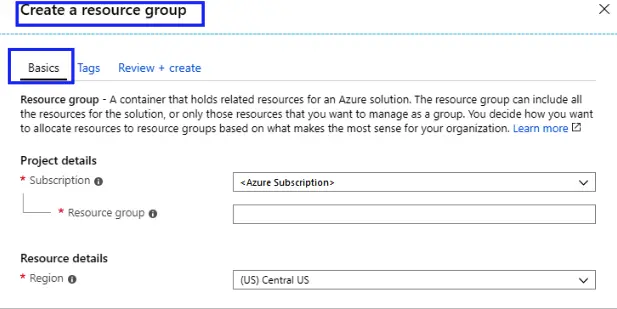
- Select the ‘Create a Resource’ button.
- In the subsequent window, you’ll encounter a range of choices to initiate resource creation. You can create the template with the desired choices such as Windows systems, Ubuntu instances, Web Applications, SQL Databases, and more.
- Since we aim to use a template for resource creation, direct your attention to the search bar.
- Input your desired template and click on Template Deployment (deploy using a custom template).
- Finally, click on the Create button to create the template.
- After selecting the ‘Create’ button in the previous steps, the Azure Portal will display the ‘Custom Deployment’ window.
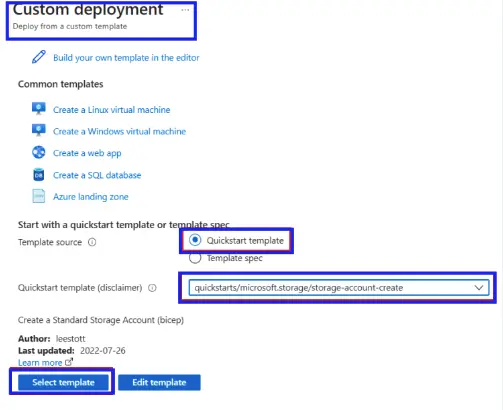
- To generate a template from scratch, choose the ‘Build your template in the editor’ option. This option also applies if you wish to import your template for creation.
- Following this, the ‘Template Editor’ window will be opened within the Azure Portal. Within this editor, a straightforward layout of the ARM Template will be accessible. You can utilize this format to compose and integrate your code.
- The options highlighted at the top in the image below present various selections. These selections allow you to incorporate a resource, utilize an Azure quickstart template, upload your template file, and obtain the created template through download.
If you are a beginner, creating a template from scratch is challenging. In such cases, you can utilize quickstart templates in the Azure portal.
To use Azure quickstart templates, instead of selecting the ‘Build your template in the editor, you can follow the below steps:
Step 1) Click the ‘Quickstart template‘ radio button.
Step 2) Select the drop-down button to see all the quickstart templates and select any one of them. Next, search for the ARM template. Here, we selected a basic template for creating the storage account and turned on security for it.
Step 3) Click on ‘Edit template‘ to alter and make the changes in the quickstart template before getting involved in the deployment process.
Within the template editor window, you can make the necessary modifications. On the left-hand side of this editor, you’ll find sections for parameters, variables, and the resources that this code will generate.
Additionally, the menu above can be used to download this template. Once you’ve finalized the template code, select the ‘Save’ button.
Upon saving the template, a next window will appear, confirming all the resources that this template is set to create. Once you’ve verified the details, you can initiate template deployment and acquire the associated resources.
2. Deploying the ARM Template
For deploying the template, you can opt for either Azure CLI or Azure PowerShell. Utilize the resource group you established and assign a distinctive name to the deployment. This name aids in effortless identification within the deployment history. To enhance convenience, create a variable containing the template file’s path.
This variable streamlines the deployment process by negating the need for repetitive path entry during deployments. Make sure to substitute {provide-the-path-to-the-template-file} and the enclosed curly braces {} with the actual path to your template file.
The deployment command will yield results, and you should focus on the ‘ProvisioningState’ to determine the success of the deployment.
For verification, you can inspect the deployment status through the Azure portal:
- Log in to the Azure portal.
- Access the left-hand menu and choose “Resource groups.”
- Select the checkbox adjacent to ‘myResourceGroup,’ then choose ‘myResourceGroup.’
- Opt for the resource group you created earlier (usually named ‘myResourceGroup’). As it’s a blank template, no resources are currently present.
- In the Essentials section at the center of the overview, observe the deployment status beside ‘Deployments’. Click on the ‘1 Succeeded’ option.
- This displays a deployment history for the resource group. Mark the checkbox next to ‘blank template,’ then select ‘blank template.’
- You’ll find a concise overview of the deployment. Given the absence of deployed resources in this instance, the summary might not contain much information. However, as your deployment history expands, this summary can prove valuable. On the left side, you can explore inputs, outputs, and the template employed during the deployment.
ARM Template Best Practices
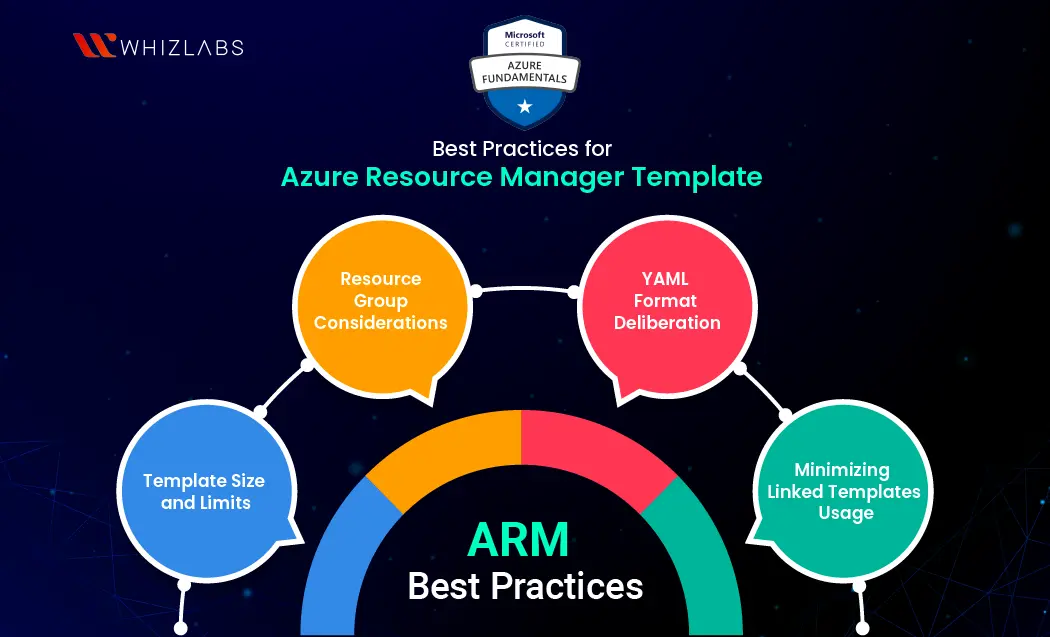
When creating ARM templates, adhering to certain best practices is essential. These practices contribute to streamlined management and the efficient configuration of your resources.
Template Size and Limits: It is essential to maintain your templates within a 4MB size limit, including all iterative resource definitions, variables, and parameters. Furthermore, parameters should not exceed 64KB. It is important to be aware of certain limits for templates, which include:
- A maximum of 24,576 characters in a template expression
- Up to 64 output values
- A cap of 800 resources (including copy count)
- Limitations to 256 variables and 256 parameters
Resource Group Considerations: Resource groups serve as repositories for your resources’ metadata. This metadata is stored within the same location as the group itself.
Consequently, if a region containing a resource group becomes inaccessible, managing or updating resources within that group becomes unfeasible until region access is restored.
For failover scenarios, we can safeguard the metadata by duplicating it in the failover region. This ensures ongoing control even when the primary group is inaccessible.
YAML Format Deliberation: While ARM templates are typically structured in JSON format, consider transitioning to YAML, particularly as the complexity of your deployment increases.
Though JSON serves well for simple templates, it becomes less human-readable as resource count and intricacies increase. YAML, on the other hand, can enhance template readability and allow you to explain the rationale behind resource definitions. This commenting feature is especially beneficial when multiple team members collaborate on template development.
Although the deployment format remains JSON, you can compose templates in YAML and subsequently convert them before deployment.
Minimizing Linked Templates Usage: Azure Resource Manager offers linked templates for breaking down resources into distinct templates, subsequently connected and tied to a single deployment source.
However, this linking necessitates public accessibility or accessible deployment pipelines, which introduces potential vulnerabilities. While access can be managed via a SAS token, security concerns persist.
Moreover, linked templates confine you to parameter URI or parameter object usage, limiting your flexibility in handling sensitive information within templates. Instead of working around these challenges, contemplate leveraging standard templates.
By employing deployment pipelines, you can ensure that dependent templates are deployed collectively to attain better outcomes similar to linked templates but with increased security.
FAQs
What is ARM Template in Azure?
ARM (Azure Resource Manager) template refers to a set of instructions written in a special code. These instructions describe how to create the foundation and setup for your project. These instructions use a simple and clear language called JSON (JavaScript Object Notation). It’s like having a recipe that tells Azure how to set up everything you need for your project.
What are the components of the ARM Template?
The components of the ARM Template are:
- Header Section: Schema, ContentVersion, and API profile.
- Parameters: Customizable values for tailored deployment.
- Variables: Reusable values for efficient template management.
- Functions: Predefined actions for calculations and dynamic content.
- Resources: Definition of Azure resources to be deployed.
- Outputs: Extraction of specific deployment information.
How much does Azure Resource Manager cost?
The Azure Resource Manager offered as a free Azure service to Azure customers and service providers.
Conclusion
Hope this article has provided us with an understanding of Azure Resource Manager Templates and their significance in deploying resources. You also gained knowledge about using these templates to create and deploy setups in the AZ-900 Certification platform.
However, it’s important to note that this azure resource manager blog primarily focuses on the foundational aspects of ARM Templates. So, you can try out a fundamental level exam like AZ-900 Certification if you want to step into the Azure platform.
If you’re interested in delving deeper into the Azure Cloud and its underlying structure, you can explore our Azure hands-on labs and interactive Azure sandboxes for a more comprehensive learning experience.
If you have any questions about this blog post, feel free to comment to us!
- Top 25 AWS Data Engineer Interview Questions and Answers - May 11, 2024
- What is Azure Synapse Analytics? - April 26, 2024
- AZ-900: Azure Fundamentals Certification Exam Updates - April 26, 2024
- Exam Tips for AWS Data Engineer Associate Certification - April 19, 2024
- Maximizing Cloud Security with AWS Identity and Access Management - April 18, 2024
- A Deep Dive into Google Cloud Database Options - April 16, 2024
- GCP Cloud Engineer vs GCP Cloud Architect: What’s the Difference? - March 22, 2024
- 7 Ways to Double Your Cloud Solutions Architect Role Salary in 12 Months - March 7, 2024