
Are you creating Virtual Private Cloud for the first time? Here we’ve got you covered with this lab session!
In this lab session, we will create a Virtual Private Cloud (VPC) without using the VPC wizard. This VPC will include a frontend Web Server and a backend Relational Database Services (RDS).
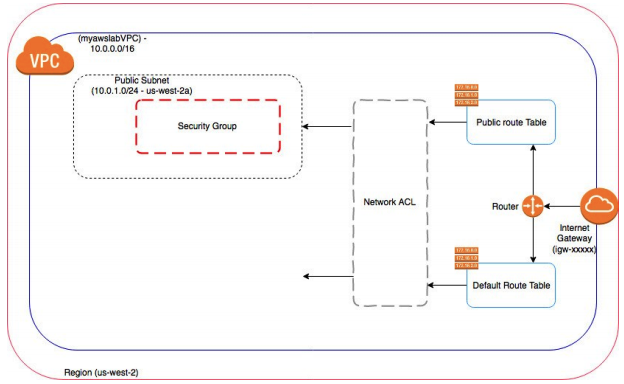
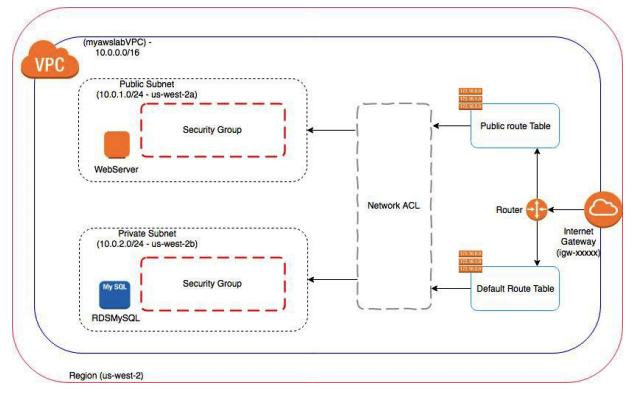
Here is an overview of the VPC you will create:
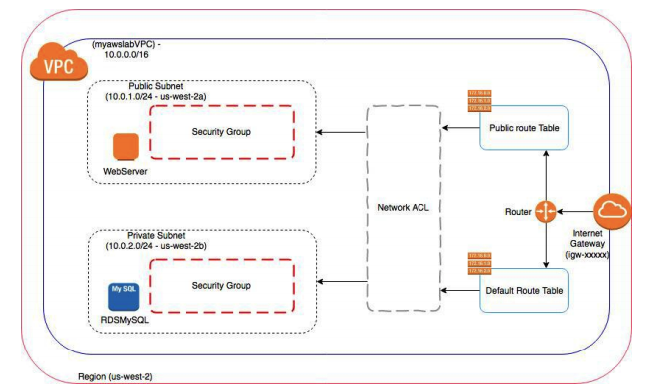
Looks Scary? Don’t worry follow along, and we shall achieve our goal.

Understand Few Terms to Create a Virtual Private Cloud (VPC)
Region
AWS Region is an independent collection of AWS computing resources in a defined geography. Each AWS Region has multiple, isolated locations known as Availability Zones.
Amazon Virtual Private Cloud (VPC)
Amazon Virtual Private Cloud (Amazon VPC) lets you provision a logically isolated section of the AWS Cloud where you can launch AWS resources in a virtual network that you define. You have complete control over your virtual networking environment, including the selection of your own IP address range, the creation of subnets, and the configuration of route tables and network gateways. You can use both IPv4 and IPv6 in your VPC for secure and easy access to resources and applications.
Subnet
A subnet (short for “subnetwork”) is an identifiably separate part of an organization’s network. These are the logical subdivisions of an IP network.
Public Subnet
A logical subnet whose instance can be reachable over the internet directly.
Private Subnet
A logical subnet whose instance cannot be reachable over the internet directly.
Security group
A security group acts as a virtual firewall for your instance to control inbound and outbound traffic.
Network ACL
A network access control list (ACL) is an optional layer of security for your VPC that acts as a firewall for controlling traffic in and out of one or more subnets.
Route Table
A route table contains a set of rules, called routes, that are used to determine where network traffic is directed.
Internet Gateway
An Internet gateway is a horizontally scaled, redundant, and highly available VPC component that allows communication between instances in your VPC and the Internet.
Also Read: How to Improve Connectivity and Secure your VPC Resources?
What are We Going to Cover in this Lab?
In this lab, you will not only learn to create Amazon Virtual Private Cloud (VPC) but also how to launch a frontend and backend server. In brief, you will learn to
- Create a base Amazon Virtual Private Cloud (VPC)
- Create a public subnet for your web server
- Create an Internet Gateway
- Add a route to your main VPC route table so that people can access your web server from the internet
- Create a security group to restrict only HTTP traffic to your web server
- Launch a frontend web server
- Create a private subnet for your Backend MySQL server
- Create a security group for your private subnet to only allow MySQL traffic from the public subnet
- Launch a backend Amazon RDS MySQL server instance
During the workshop or after, at any point, if you need any assistance – kindly write us at Whizlabs Helpdesk and we will respond you in no time to resolve your query!
- To get to the AWS Learning account, log in to https://aws.amazon.com/console/
- Click on “Sign In to the Console”
- Provide the email address used for signing in the text box “Email address of your AWS account”
- Provide the “IAM username” and “Password” used while signing in. The default IAM user could be root.
- Click on “Sign In”
- Alternatively, you can also sign in using root credentials using the “Sign-in using root account credentials” link on the login page.
- If you do not have an AWS account, you can create one by clicking on “Create a new AWS account” and filling in your details that will be used for signup.
After launching the AWS console, ensure you have selected the region as “Oregon” (us-west-2). This is the region, where we will be using the AWS resources during the workshop.

Task 1: Create a Virtual Private Cloud (VPC)
In this task, you will create a VPC.
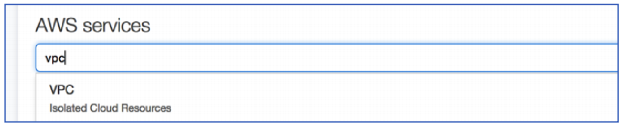
- In the AWS Management Console, on the search bar, type VPC, from the drop-down click on VPC.
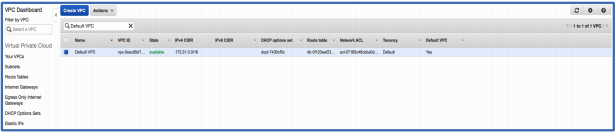
- In the navigation pane on the left, click Your VPCs on the VPC dashboard.
WATCH OUT: There is a default VPC that has been created while your account is set up. A default VPC is ready for you to use so that you don’t have to create and configure your own VPC. You can immediately start launching Amazon EC2 instances into your default VPC. However, we are not going to use this for our workshop. We will build a new VPC for the entire workshop.
You are requested, not to delete any of the existing VPC, Subnets, Route Tables, Internet Gateways, Security Groups, and Network ACLs.
Okay, let’s proceed to create a new VPC for our lab.
- Click Create VPC.
- In the Create VPC window use the following:
Name tag: myawslabVPC
IPv4 CIDR block: 10.0.0.0/16
Ensure Tenancy: Default
Click Yes, Create

Task 2: Create a Public Subnet
In this task, you will create a public subnet to launch your frontend web server into.
- In the Navigation pane on the left, click Subnets.
- Click Create Subnet
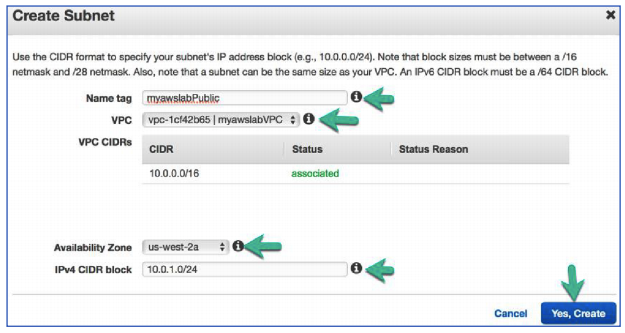
- In the Create Subnet window configure the following:
Name tag: myawslabPublic
VPC: myawslabVPC
Availability Zone: Select the first one in the list us-west-2a
IPv4 CIDR block: 10.0.1.0/24
Click Yes, Create
And there you go, you just created a Public subnet.
![]()
Are we all set to launch our web server?? Well, not yet.
Even though your subnet is labelled Public, it is not a public subnet. Do you know why it is not public subnet? By definition a public subnet must have an Internet Gateway. In the next task, you will add an Internet Gateway so that the instances in your public subnet can access the Internet.

Task 3: Create an Internet Gateway
- In the navigation pane on the left, click Internet Gateways.
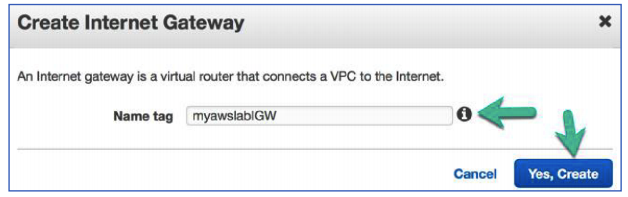
- Create an Internet Gateway by configuring the following:
Click Create Internet Gateway
Name tag: myawslabIGW
Click Yes, Create
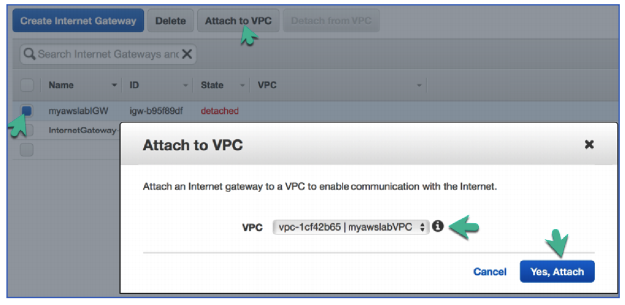
- Click Attach to VPC
- Click Yes Attach
This will attach the Internet Gateway to your VPC.
Even though you created an Internet Gateway and attached it to the VPC, you still have to tell the instances within your public subnet how to get to the Internet. In the next task, you will add a route to your main VPC route table to tell traffic in your public subnet how to get to the Internet.
Task 4: Route Tables and Routes
- In the navigation pane on the left, click Route Tables.
There is currently one default (main) route table associated with the VPC (myawslabVPC) that you created.
- Select the route table that is associated with myawslabVPC

- Click the Routes tab.

Notice that there is one route in your route table that is associated with your default network. This route allows traffic from the 10.0.0.0/16 network to pass to other nodes within the network, but it does not allow traffic to go outside of the network.
- Click the Subnets Associations tab.

Every single time we create a new subnet it’s going to be associated by default to our main route table. You can browse this same tab when we create another subnet (the private subnet) later during our lab. Now for that reason, we don’t want our main route table to have a way out to the internet, because every time you create a subnet it shall become internet accessible.
Let’s create a new route table.
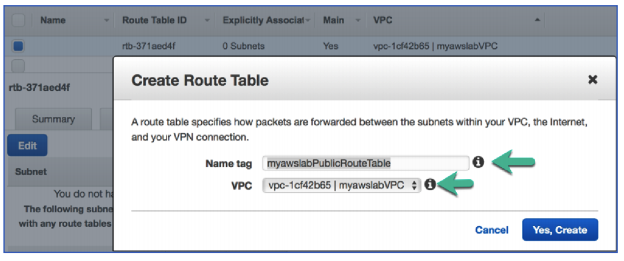
- Click the Create Route Table.
Name tag: myawslabPublicRouteTable
VPC: Select myawslabVPC from the drop down
Click Yes, Create.
Great, we are now ready to create a route to internet.
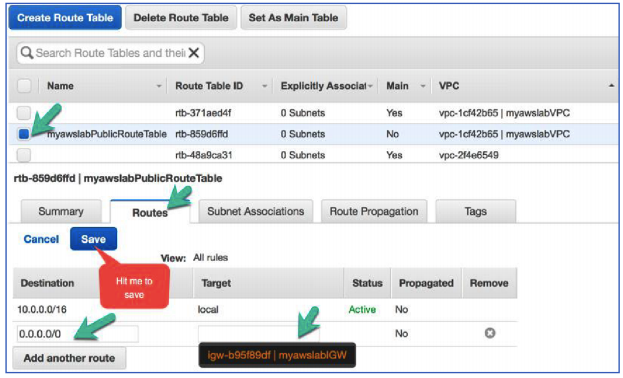
- Select the Route Table (myawslabPublicRouteTable) we just created.
- Click on the Routes tab.
- Click on Add another route.
- Click the Destination field and enter 0.0.0.0/0
- Click the Target field. Auto-complete will display the name of the Internet Gateway that you created earlier.
- Click the Internet Gateway that you created (myawslabIGW)
- Click Save.

- Click Subnet Associations.
- Click Edit.
- Select myawslabPublic subnet
- Click Save.
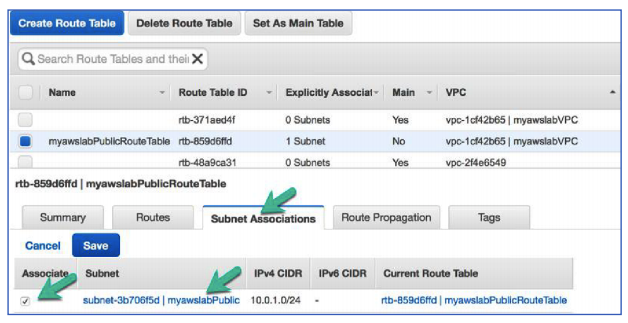
This will associate our Public subnet to the Public Route Table. You have now configured your public subnet so that traffic within it can get out to the internet. Before you create your web server and launch it in the public subnet, you need to control the traffic that is allowed to access your web server. You can do this by creating a security group that only allows HTTP traffic and attaching the security group to your web server.
NOTE: A security group acts as a virtual firewall for your instance to control inbound and outbound traffic. Security groups act at the instance level, not the subnet level.
If you don’t specify a particular security group at launch time, the instance is automatically assigned to the default security group for the VPC.
Task 5: Create A Security Group For Your Public Subnet
In this task, you will add a security so that people can access your web server using HTTP.
- In the Navigation pane on the left, click Security Groups.
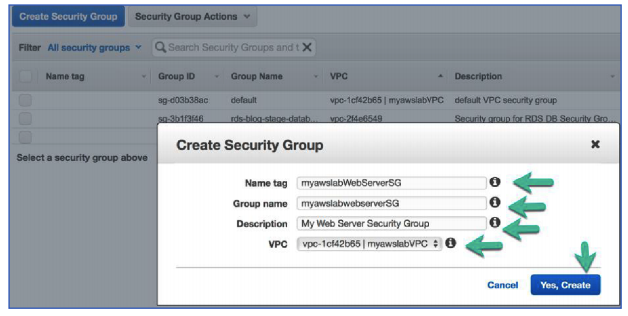
- Click Create Security Group.
- In the Create Security Group window, configure the following:
Name tag: myawslabWebServerSG
Group Name: myawslabWebServerSG
Description: My Web Server Security Group
VPC: myawslabVPC
Click Yes, Create
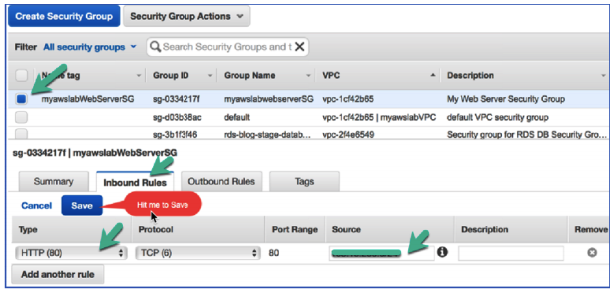
- Select your myawslabWebServerSG security group.
- Click the Inbound Rules tab.
- Click Edit.
- Click the Custom TCP Rule drop-down arrow and select HTTP (80).
- Click the Source box and enter the IP address of your laptop/network: viz. 100.10.150.0/24
- Click Save. And we are done.

You have been AWESOME so far and a security guru.
Did you realize, what have you created, so far – Let’s recall?
Done?
Ok, Let’s Visualize.
Wondering, when did we create the Network ACL? And that’s not the quiz ☺
The Network ACL is created by default when you create the VPC. We are not going to create a separate Network ACL for our subnets and consider using the default Network ACL instead.
You can browse Network ACL by going to the Navigation pane on the left and clicking Network ACLs
Click on Inbound Rules and Outbound Rules and view various rules.
By default, all traffic is allowed via Network ACLs.
In the next task, you will launch your web server in your public subnet. Yes, finally, the fun stuff, we have been laying the network platform so far.
Task 6: Launch a Web Server In Your Public Subnet
- On the Services menu, click EC2.
- Click Launch Instance.
- On 1. Choose an Amazon Machine Image AMI, on the Navigation pane on the left, click Quick Start, in the search tool box, select the Amazon Linux 2 AMI HVM, SSD Volume Type – ami-xxxxxxxx and click on Select

- On 2. Choose Instance Type, click Next: Configure Instance Details.
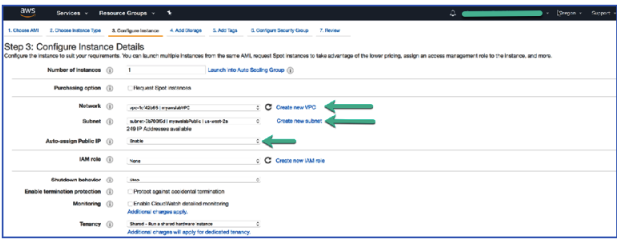
- On 3. Configure Instance Details, configure the following:
Network: Select myawslabVPC
Auto-assign Public IP: Enable
- On same page scroll down, Expand >Advanced Details
Copy and paste the code snippet below into the text box:

This snippet of code is run the first time the instance is launched. It installs the web server on EC2 instance and configures it.

- Click Next: Add Storage.
- On 4. Add Storage, click Next: Add Tags.
- On 5. Add Tags, click Add Tag and configure the following:
Key: Name
Value: Webserver
51. Click Next: Configure Security Group.
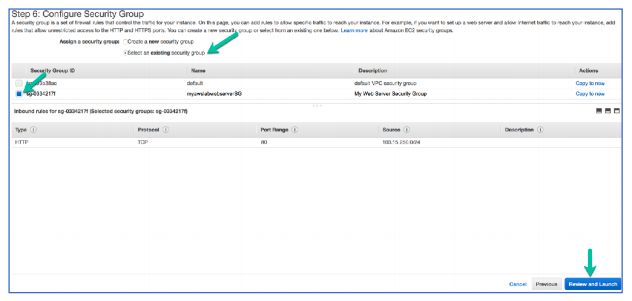
52. On 6. Configure Security Group, configure the following:
Click Select an existing security group
Click the myawslabWebServerSG security group
53. Click Review and Launch
54. At the Warning screen, click Continue.
55. On 7. Review, configure the following:
Review the settings
Click Launch
56. On the Select an existing key pair or create a new key pair window, configure the following:
Click the I acknowledge that … checkbox
Click Launch Instances
57. Click View Instances.
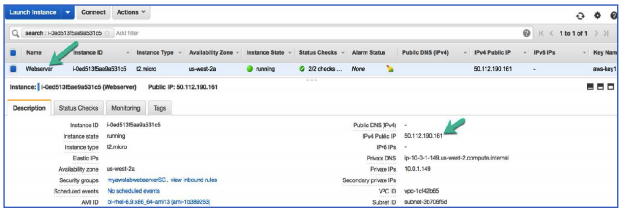
This brings you to the Instances window, where you can watch your web server launch and view its details.
58. Wait for your web server to fully launch. It should display the following:
- Instance State: running
- Status Checks: 2/2 Checks
You can click the refresh icon to refresh your instance status.
59. Select your instance
60. Copy the IPv4 Public IP address of the instance to your clipboard.
61. Open a new browser tab and paste the IP address into the browser.
62. Press Enter to go the web page.
Well, Congratulations. If you configured everything the way the directions were written, you should be able to see the index page of your web server.
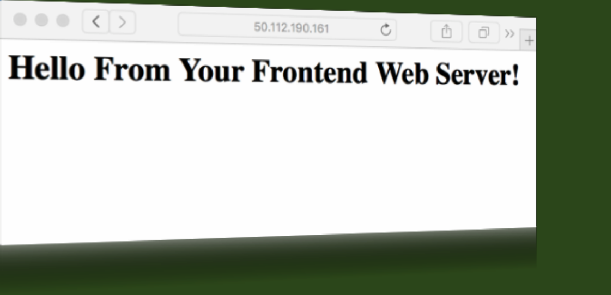
Amazing, isn’t it. You have been awesome, so far.
Let’s continue to configure our (Private) Backend infrastructure.
Task 7: Create A Private Subnet For Your Backend MySQL Server
To deploy your RDS database, your VPC must have at least one subnet in at least two Availability Zones in the region where you want to deploy your DB instance. In RDS, this is termed as Multi-AZ deployment and is best practice for high availability.
In this task, we are going to deploy RDS instance in single Availability Zone for simplicity. You will create your first private subnet for your soon to be created Amazon RDS Instance.
63. On the Services menu, click VPC.
64. In the navigation menu on the left, click Subnets.
65. Click Create Subnet.
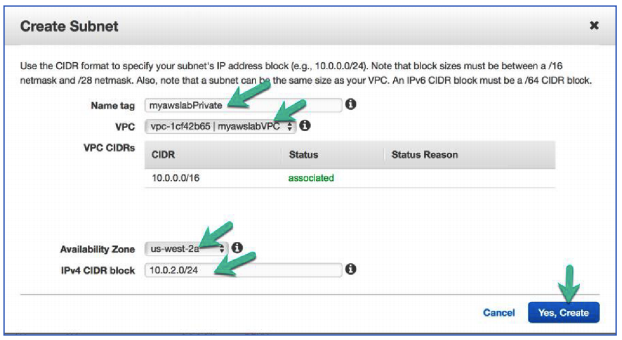
66. In the Create Subnet window configure the following:
Name tag: myawslabPrivate
VPC: myawslabVPC
Availability Zone: us-west-2a
IPv4 CIDR block: 10.0.2.0/24
Click Yes, Create
Task 8: Create A Second Private Subnet For Your Backend MySQL Server
We will need to create a secondary additional Private Subnet. You must have two private subnets available to create an Amazon RDS DB subnet group for an RDS DB instance to use in a VPC. Let’s add a second private subnet to the VPC.
67. On the Services menu, click VPC.
68. In the navigation menu on the left, click Subnets.
69. Click Create Subnet.
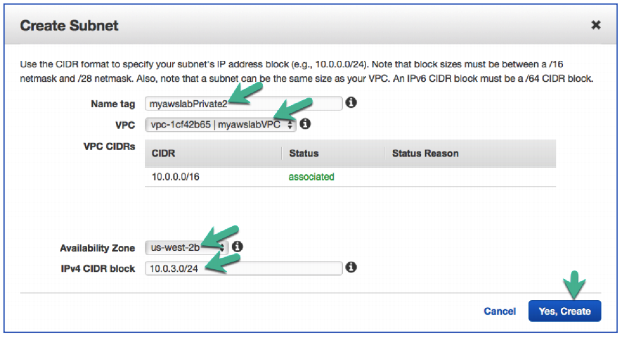
70. In the Create Subnet window configure the following:
Name tag: myawslabPrivate2
VPC: myawslabVPC
Availability Zone: us-west-2b
IPv4 CIDR block: 10.0.3.0/24
Click Yes, Create
Task 9: Create A Security Group For Your Backend MySQL Server
Now that private subnets are configured, you’ll want to secure the types of traffic that can access your MySQL database. In this task, you’ll create a security group to only allow MySQL traffic from your public subnet.
71. In the Navigation pane on the left, click Security Groups.
72. Click Create Security Group.
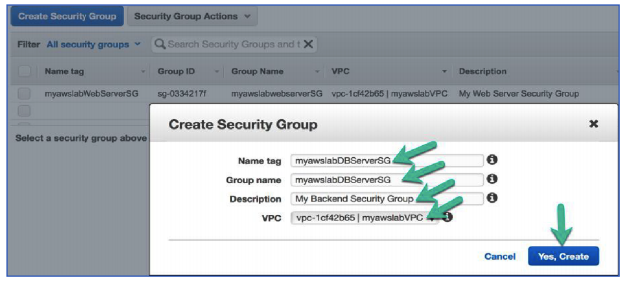
73. In the Create Security Group window, configure the following:
Name tag: myawslabDBServerSG
Group Name: myawslabDBServerSG
Description: My Backend Security Group
VPC: Select myawslabVPC
Click Yes, Create
74. Select your myawslabDBServerSG security group.
75. Click the Inbound Rules tab.
76. Click Edit.
77. Click the Custom TCP Rule drop-down and select MySQL/Aurora (3306)
78. Click the Source box and enter 10.0.1.0/24
79. Click Save.

This rule states that only MySQL traffic coming from your public subnet is allowed to access the database in the Private Subnet.
Task 10: Create a Backend Amazon RDS Database
80. On the Services menu, click RDS.
81. In the RDS Dashboard, click Instances.
82. Click Launch DB Instance.
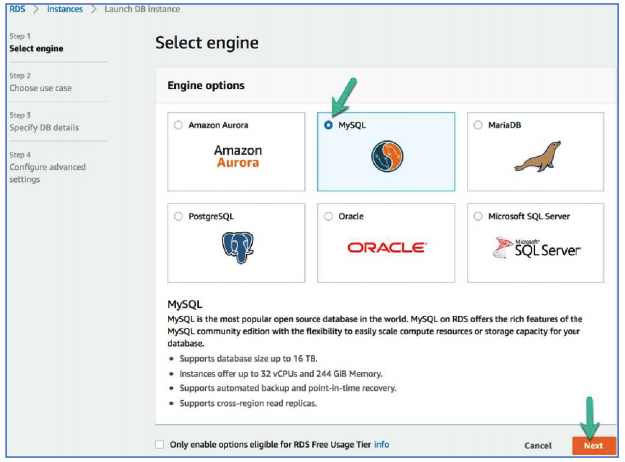
83. On Step 1: Select engine, configure the following:
Click MySQL
Click Next
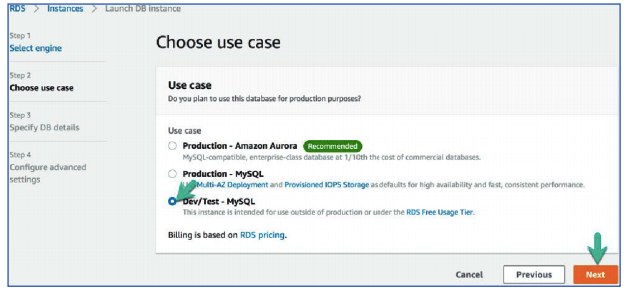
84. On Step 2: Choose use case, configure the following:
Click Dev/Test – MySQL
Click Next
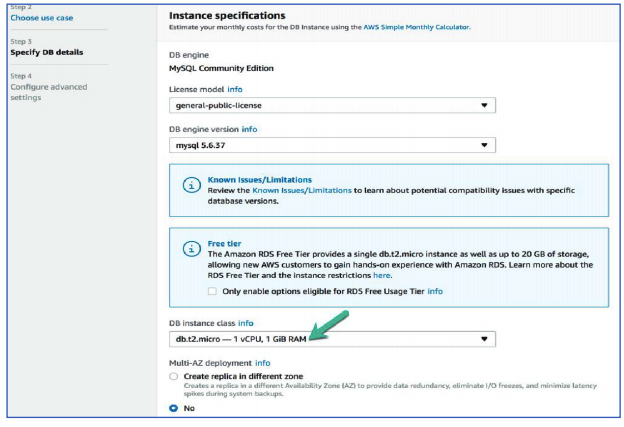
85. On Step 3: Specify DB details, configure the following:
Instance specifications
DB instance class: db2.t2.micro – 1 vCPU, 1 GiB RAM
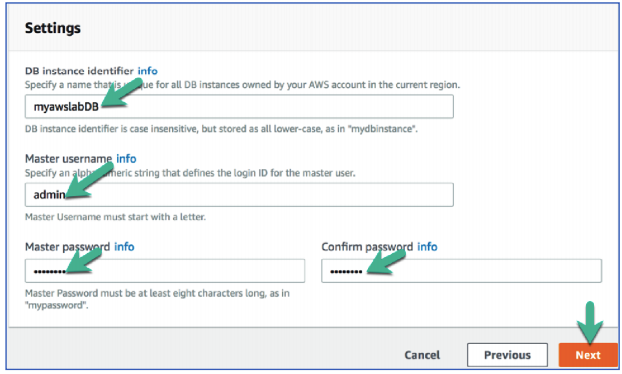
Settings
DB instance identifier: myawslabDB
Master username: admin
Master password: pAssw0rd
Confirm password: pAssw0rd
Click Next
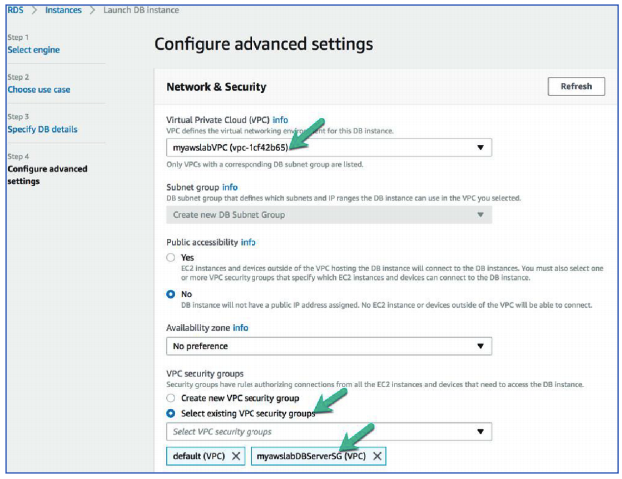
86. On Step 4: Configure advanced settings, configure the following:
Network & Security
VPC: myawslabVPC
VPC security groups: Select existing VPC security groups
From drop-down, select myawslabDBServerSG(VPC)
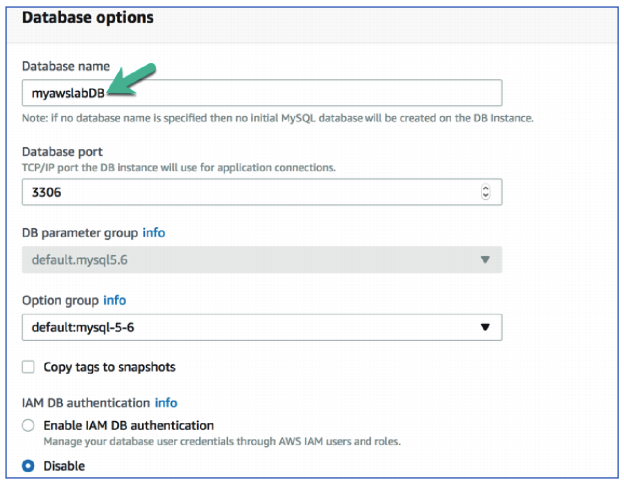
Database Options
Database name: myawslabDB
87. Scroll to the bottom of the page.
88. Click Launch DB instance.
89. Click View DB instance details.
It will take a few minutes for your MySQL database to become available.
90. Review the configuration of your database.
In the RDS Dashboard, click Instances.
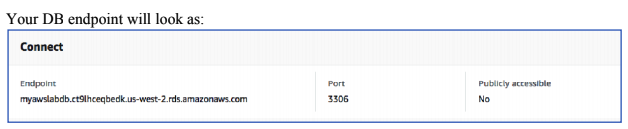
Select the database instance you just created (myawslabdb), click the link on the instance.
This page provides all the information about your DB instance – Summary, CloudWatch, Connect – this provides you with the Endpoint you can connect your DB on from the web server, Details – various DB configurations, CloudWatch alarms, Snapshots, Tags, Logs, Recent events, Replication.
Congratulations! You have configured everything properly, and now you have a VPC that consists of one public and two private subnets. You should be able to access the web server through your public subnet. Your Amazon RDS database should also be accessible by your web server.
Yay!! You have achieved your goal. Yes, we created an entire ecosystem. Here is the end state you created.
It’s the Time to End the Lab
Follow these steps to close the console and end your lab.
Delete the RDS DB instance
91. In the RDS Dashboard, click Instances.
92. Select the DB instance myawslabdb
93. Click on Instance actions
94. Click Delete
95. Under Options
Are you sure you want to Delete the myawslabdb DB Instance? Create a final snapshot? Select No
Mark the checkbox against – I acknowledge that upon instance deletion, automated backups, including system snapshots and point-in-time recovery, will no longer be available.
96. Click Delete
Delete the EC2 instance – the web server
97. On the Services menu, click EC2.
98. Select the Web server instance.
99. Click on Actions, click Instance State and select Terminate.
100. On the confirmation page Terminate Instances, click Yes, Terminate
Delete the VPC myawslabVPC
101. On the Services menu, click VPC.
102. Select the VPC you created myawslabVPC.
103. Click on Actions, select Delete VPC.
104. On the confirmation page Delete VPC, click Yes, Delete.
This will wipe off all the VPC components we created, viz. Subnets, Route Tables, Routes, Internet Gateways, Security Groups
Wrapping Up
So, in this lab, you created a VPC with a single public subnet and two private subnets. AWS provides you with access to multiple Availability Zones at no additional cost. The best practice is to mirror servers across two Availability Zones and then use load balancing and other techniques in order to distribute traffic between them.
Security group rules can be very precise or quite loose. You need to ensure that your security groups are as restrictive as possible.
Congratulations, you have now successfully:
- Created an Amazon Virtual Private Cloud(VPC).
- Created a Public as well as two private subnets.
- Created an Internet Gateway.
- Created a route in your main route table to route traffic to the internet.
- Created a security group for your frontend web server to only allow HTTP traffic to your web server.
- Created a security group for your backend MySQL server to only allow MySQL traffic to it from your public subnet.
- Deployed a frontend web server into your public subnet.
- Deployed a backend RDS server into your private subnet.
- Removed the resources you no longer use.
Thinking to validate your skills and experience of working on the AWS platform? Just go for AWS certifications! We at Whizlabs are aimed to help you to become a certified professional and so we offer AWS certifications training and practice tests. With our AWS certifications training courses, your exam preparation will get a new edge. Also, you will be confident enough to pass the certification exam in the first attempt only.
Have any query related to AWS? Just put it in the comment box below or submit in Whizlabs forum and it will be resolved by the AWS experts!
- Top 20 Questions To Prepare For Certified Kubernetes Administrator Exam - August 16, 2024
- 10 AWS Services to Master for the AWS Developer Associate Exam - August 14, 2024
- Exam Tips for AWS Machine Learning Specialty Certification - August 7, 2024
- Best 15+ AWS Developer Associate hands-on labs in 2024 - July 24, 2024
- Containers vs Virtual Machines: Differences You Should Know - June 24, 2024
- Databricks Launched World’s Most Capable Large Language Model (LLM) - April 26, 2024
- What are the storage options available in Microsoft Azure? - March 14, 2024
- User’s Guide to Getting Started with Google Kubernetes Engine - March 1, 2024
At step 6, after launching the front end code and im getting this site cant be reached and timed out . i have entered my IP address only