
Recently, we have covered a topic on Implementation of to NAT Gateway. In this article, let’s understand the implementation of Elastic Network Interface.
Exam Objective
The topic “Elastic Network Interface” addresses the Design and Implementation of AWS Networks topic as highlighted in the AWS Blueprint for the exam guide

What is Elastic Network Interface?
AWS Elastic Network Interface is simply a virtual interface that can be attached to an instance in a Virtual Private Cloud (VPC). Followings are the attributes of a network interface:
- A primary private IPv4 address
- One Elastic IP address (IPv4) per private IPv4 address
- One or more secondary private IPv4 addresses
- One public IPv4 address
- One or more security groups
- One or more IPv6 addresses
- A source/destination check flag
- A MAC address
- A description
By default, each instance will have a primary network interface. This can be seen while the instance is being created.

This IP will get a Private IP address. It will also get a public IP address if the setting has been enabled for the Subnet in which the instance is located in. You can also add Secondary IP addresses to an Elastic Network Interface.
You can also add Secondary Network Interfaces to an Instance.
In our Implement example, we will see how to swap network interfaces between 2 instances. This can be done for implementing fault tolerance for an application.
Let’s say we have 2 Instances, one is a primary instance which hosts a web application. This has been assigned a secondary network interface. This interface has an Elastic IP assigned which is accessed by external Users. Let’s say that you have a standby instance which has the same web server installed but is in the non-active state. Only if the primary instance fails for any reason, then a failover happens to the secondary instance.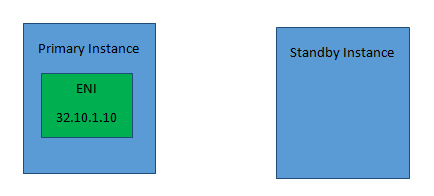
So now to ensure that the failover happens from the primary to secondary instance seamlessly so that the same Elastic IP address can be used for standby instance, the ENI can be shifted to the secondary Instance. It needs to be ensured that the subnets for the instances belong to the same availability zone.
So now let’s look at the implementation of this.
Note: CIDR is one of the important terms an AWS Network Engineer should know about. CIDR offers the benefits of effective management of available IP address space and reduces the number of routing table entries. If you are still wondering what does CIDR stand for, learn more!
Implementation of Failover using the Elastic Network Interface
Followings are the steps to implement Elastic Network Interface:
Step 1) Firstly we will create 2 Instances of the type Amazon Machine Image. These Instances will be created in the subnet of the same availability zone
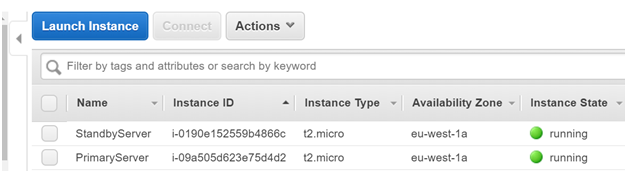
Here the Servers have been named as Primary and Standby Server. Each of these servers only has the primary network interface
Step 2) On the PrimaryServer and Standby Server, we are going to install a Web server known as nginx via the following commands
sudo yum update
sudo yum install nginx
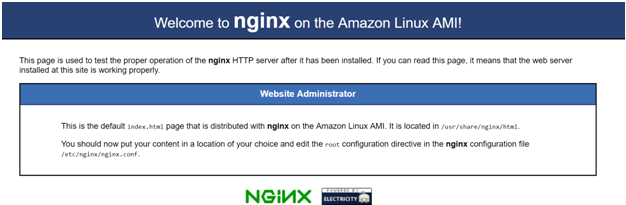
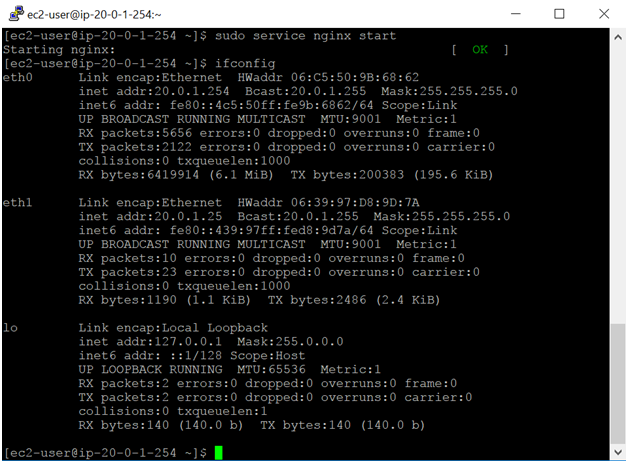
Once done, we need to start the nginx service on the primary server
sudo service nginx start
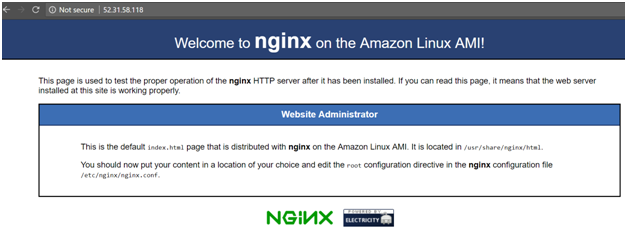
When you go to the Public IP of the Primary Server, you should get the following page. Ensure that the Security Group of the PrimaryServer allows traffic on port 80.
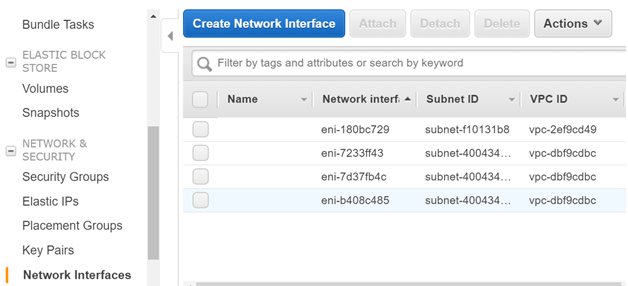
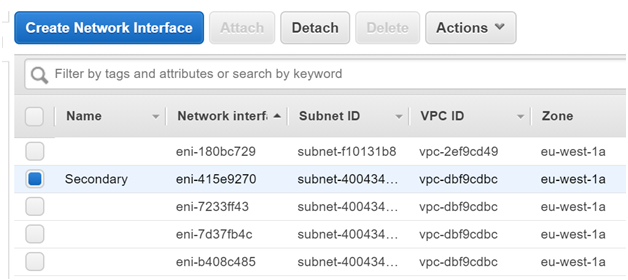
Step 3) Now let’s create a Secondary Network Interface. This will be attached to the Primary Server. In the EC2 Dashboard, click on Create Network Interface
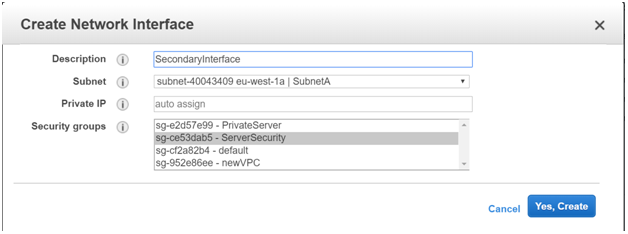
Give a description of the new network interface. Create it in Subnet A, because that is where the PrimaryServer resides. Attach the Security Group of the Primary Server to the Elastic Network Interface.
Then Create the Interface.
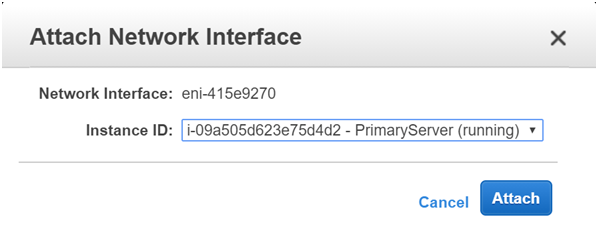
Once the Interface has been created, click the Interface and click on Attach
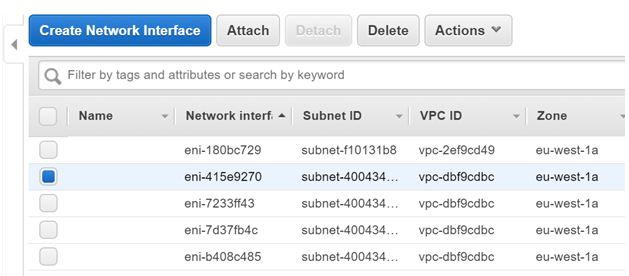
Attach it to the Primary Server
Once the network interface has been attached, this will reflect in the Instance configuration.
In the EC2 dashboard, for the Primary Server, you will see 2 Private IP’s now.

Note that we chose the Amazon Machine Image because the configuration happens automatically for this AMI. If you choose another Linux Instance like Ubuntu, you need to do the configuration manually for the secondary network interface.
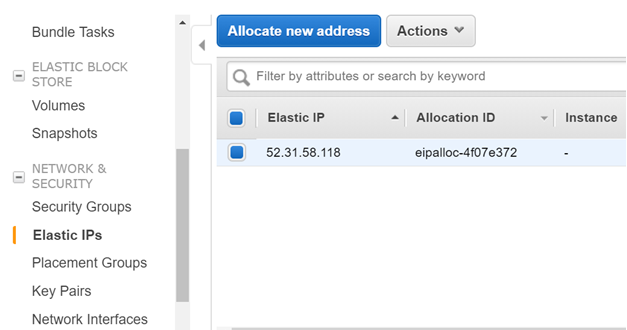
Step 4) Now let’s attach an Elastic IP to the Secondary ENI which we have attached to the primary instance.
Go to the Elastic IP section. Allocate a new Elastic IP address if one is not present.
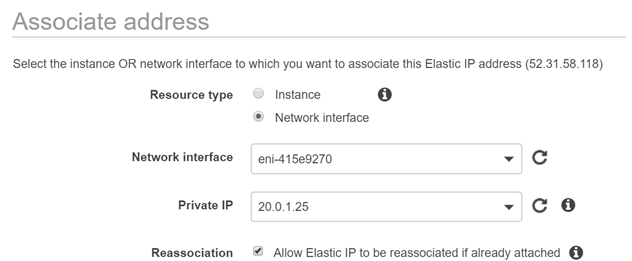
Let’s now associate it to the Secondary Private IP on the PrimaryServer
Step 5) To ensure the web server is running on the Elastic IP of the primary server, you need to ensure the Secondary private IP is entered in the configuration file for the Web server. For nginx, this setting will be in the /etc/nginx/nginx.conf file. First, stop the nginx server, change the Private IP and port number to the below. This IP is the private IP of the secondary ENI attached to the primary server.
server {
listen 20.0.1.25:80;
listen [::]:80 default_server;
server_name localhost;
root/usr/share/nginx/html;
Then start the nginx server to confirm it is running, now on the Elastic IP
Step 6) Now to initiate a proper failover we need to perform the following
- Install nginx on the SecondaryServer
- Now we are going to modify the home page displayed by nginx just to understand that when we browse to this server, it is reflecting the page on this server
We need to go to the /usr/share/nginx/html folder and modify the index.html file. So if you browse to the home page of the web server on the Secondary Server, it would look like the below
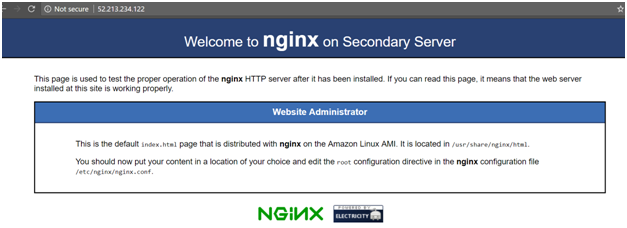
Here the Welcome to message says “Welcome to nginx on Secondary Server”
- Next, we need to ensure to modify the nginx.conf file on this server as well to ensure it listens to the private IP as shown below. This is so that when the switch happens, the Elastic IP would anyway point to the below private IP and that would point to the web server on the secondary server.
server {
listen 20.0.1.25:80;
listen [::]:80 default_server;
server_name localhost;
root /usr/share/nginx/html;
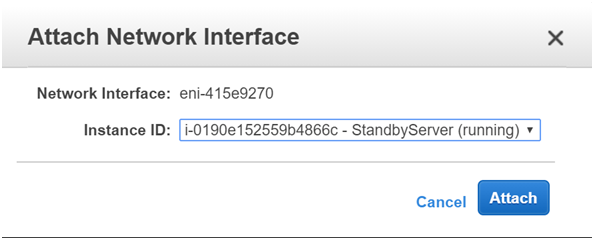
Step 7) Now let’s swap the Secondary ENI from the primary to the standby server
First Detach the Secondary Network Interface
Once detached, attach it to the Standby Server
Now when you browse to the Elastic IP, you will get the home page of the Standby Server

Important Points About Elastic Network Interface
- You can attach a network interface in one subnet to an instance in another subnet in the same VPC; however, both the network interface and the instance must reside in the same Availability Zone.
- You may require to bring up the second interface manually for the hot or warm attach of the additional network interface. So, it is advised to first configure the private IPv4 address, and then modify the route table according to that.
- The procedure of the attachment of another network interface to an existing instance (for example, a NIC teaming configuration) cannot be used to increase the network bandwidth to or from the dual-homed instance.
- If two or more network interfaces from the same subnet are attached to an instance, you may encounter networking issues such as asymmetric routing. It is recommended to use a secondary private IPv4 address on the primary network interface, if possible.
The aim of Whizlabs is to help the individuals in their journey of preparing and passing AWS Certified Advanced Networking Specialty certification exam. We deliver the best and high-quality preparation material to evolve professional career. Whizlabs content is prepared by the industry experts who have a great knowledge and passion for cloud computing. We are continuously growing our cloud expert’s community.
Preparing for AWS Certified Advanced Networking Speciality Certification? Pass in 1st Attempt. Start with Whizlabs Free and Practice Tests Now!
- Top 20 Questions To Prepare For Certified Kubernetes Administrator Exam - August 16, 2024
- 10 AWS Services to Master for the AWS Developer Associate Exam - August 14, 2024
- Exam Tips for AWS Machine Learning Specialty Certification - August 7, 2024
- Best 15+ AWS Developer Associate hands-on labs in 2024 - July 24, 2024
- Containers vs Virtual Machines: Differences You Should Know - June 24, 2024
- Databricks Launched World’s Most Capable Large Language Model (LLM) - April 26, 2024
- What are the storage options available in Microsoft Azure? - March 14, 2024
- User’s Guide to Getting Started with Google Kubernetes Engine - March 1, 2024

Very nicely explained. Thanks a lot.
it is an interesting post. from this post, I gain my knowledge.
Good and clear explanation. (Y)
Thank you Abhishek.
I am trying to understand why would I follow this complex setup instead of just attaching/detaching the elastic IP from Primary to Secondary in case of failover?
This process is for ENI. Otherwise your point is valid
Excellent and to the point. thank you
Thank you
Clear explanation
what is the purpose of ENI? If it is just for fail over then how it is different than ELB?
ENI will be useful to recover from single point of failure. For example consider a situation in which you have one server for LB and every client request is sent to the LB first then it is redirected to available servers. In this case if LB server fails we lost all the clients at this point ENI will come handy.