
Looking for a guide to learn about Azure Storage? Here we bring the Azure storage tutorial that will help you learn Azure storage in detail!
Azure storage is a managed storage service by Microsoft that operates within the cloud environment. The best thing about relying upon Azure storage is that it is durable, redundant, scalable, and highly available on demand. The cost for such storage service by Azure is very minimal, as compared to the services offered by Azure. Azure has brought an ideal alternative to manual storage management with its impeccable cloud services. Integrating it into the operational space will ensure reliability for the safe and secure storage of crucial data.
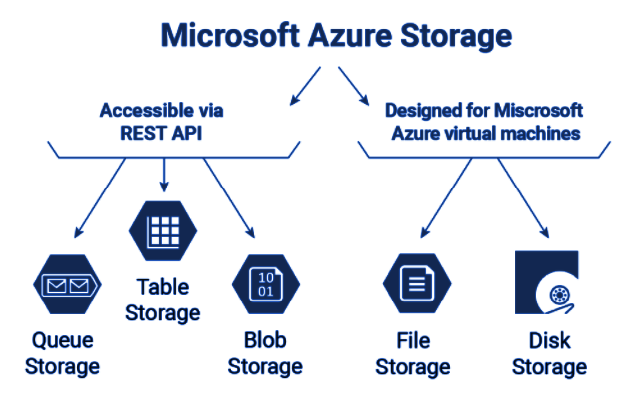
Azure storage has categorized its service offering in the forms of tables, queues, blobs, and files. Depending upon the requirement and necessity of data storage, one can pick the ideal services to implement within their storage accounts. Moreover, the Azure storage services are accessible with HTTP, and the Azure SDK is also offering a huge client library for providing easy accessibility for clients into the storage.
This article indicates that you are already aware of what Azure storage is and its overview. If you are unaware of those concepts and overview fundamentals, then check out this Azure Overview article. Moving on, this Azure storage tutorial article is dedicated to giving you a basic tutorial on how you can use Azure Storage.
Enroll Now: Microsoft Azure Certifications Training Courses
Storage Accounts for Azure Storage
The Azure storage account is the powerhouse of the entire Azure Storage concept. It is the hub that contains all of the queues, file shares, blobs, disks, and tables, as stored by you. The job of a storage account offers a unique namespace for the data that you are planning on storing and accessing over Azure. The storage account holds data that is accessible from almost anywhere.
The linked article within the intro of this tutorial guide has brief information on the types of storage accounts. If you haven’t gone through that, refer to that, and then return to this guide to know the further steps on how you can create or delete a storage account over Azure storage.
How to Create & Delete A Storage Account?
Now that you are already aware of Azure Storage Accounts, it is important for you to get an idea of the steps on how to create a storage account. The easiest way of creating the same is to do it through your Azure portal. You can also create it through PowerShell, Azure CLI, and a given Template. If you need to get an idea of those steps, then check out the official documentation by Microsoft. But, if you want to approach the creation steps through your Azure portal, then here are steps for the same:
- Log into your Azure Portal by giving your credentials.
- Go to the left menu of your main portal page.
- Select the ‘Storage Accounts’ tab from the menu.
- You will see the list of the Azure Storage Accounts available within it.
- If you want to create one, then go ahead and click on the ‘Create’ tab.
- Head to the Basics Tab, and give your essential information.
- You can now click on the ‘Review and Create’ tab to complete the creation of your storage account. But, if you wish to configure some of the exclusive options onto your storage account, then move onto the other tabs for the same.
- Head to the advanced tab where you can customize some of the fields according to your needs, thereby enabling secure transfer, infrastructure encryption, Blob public access, Storage Account key access, and others. Some of these settings can be configured even after creating an account, but some require configurations before the creation of the account.
- Head to the networking tab, where you can optimize the connectivity method and routing preference for the new storage account. Even though you have created the storage account in the previous steps, you can still go ahead and make these changes.
- Head to the Data Protection tab, where you can enable options such as point-in-time restore for containers, soft deletion for blobs, soft delete for containers, soft delete for file shares, versioning for blobs, and blob change feed. These settings or changes can also be done after the creation of the storage account.
- Head to the tags tab, where you can specify the Resource Manager tags to organize the selected Azure resources.
- If you waited to complete all of these settings before creating the storage account, then now, you can head to the ‘Review + Create’ tab. On clicking that, Azure will then run the validation prospects over the settings that you have enabled and will then allow you to proceed with the creation of the storage account.
- If the validation is not successful, then you will be notified about the settings that you need to change.
To delete the storage account, you just need to head to the portal, choose the ‘Storage Accounts’ tab, and select the storage account from the list that you want to delete.
Migrating a Storage Account within Azure Storage
Azure Storage offers you the services to migrate your existing storage account to a different Azure environment. There are different case scenarios under which you can seek and avail migration of a storage account. The case scenarios are as follows:
1. Moving Storage Account to Other Subscription
Users can seek to use Azure Resource Manager for integrating options to implement the migration of a resource from one subscription to another. You will be changing its resource ID when you decide upon moving the resource. One or multiple values are also changed within that resource path once it gets migrated over to a new subscription. To know more about how it is possible, you can refer to this documentation!
2. Moving the Storage Account to a Completely Different Resource Group
Not just subscription, but with the healthy integration of Azure Resource Manager, you can seek migration of the storage account to a completely new resource group. You can use the portal, Azure CLI, or other available options to do the needful. Check this documentation to know more about how you can do the needful.
3. Migrating the Storage Account to a Different Region
Moving or migrating a storage account is pretty much easy and convenient over Azure. Even though you wish to shift your storage account to a different region, Azure Storage has the right implementation for it. For doing that, you need to first create a copy of your existing storage account within the other region where you want to migrate. Once you have successfully done that, you can use the service AzCopy, to move your data within the existing storage account to the copy of it over the other region. You do not have to necessarily use AzCopy, as you can use any other tool that you prefer for the same. For more added information, this Azure documentation will be of good assistance.
Also Read: Microsoft Azure Certification Path
4. Upgrade the Existing Storage Account to General-Purpose v2 Storage Account
With Azure Storage, you also get the potential to upgrade any of the general-purpose v1 accounts into the superior version. The v1 storage account is usually referred to as a Blob storage account that can be converted to a general-purpose v2 account. You can use Azure Portal, CLI, or PowerShell to do the needful. The steps that you need to follow for upgrading a storage account over the Azure portal are:
- First, sign in to the Azure Portal.
- Now, go ahead and navigate the storage account that you want to convert.
- Head to the ‘settings’ tab, and look for the ‘Configuration’ option.
- Now, look for the ‘Account Kind’ tab, and choose ‘Upgrade’ from the available options.
- Under the ‘Confirm Upgrade’ tab, you will have to then enter the storage account name.
- Move to the bottom of that page, and click on ‘Upgrade.’
You need to keep in mind that this migration is irreversible! To know the other steps of upgrading an existing storage account to a v2 storage account using PowerShell and Azure CLI, refer to this documentation.
5. Migration of a Classic Azure Storage Account into Azure Resource Manager
The Azure Resource Manager is a superior deployment model as compared to the classic storage account model. It is because it offers high scalability, functionality, and security. The steps that you need to follow within the Azure Portal for availing of this migration are:
- Log into your Azure Portal at first.
- Reach out for the storage account that you wish to migrate to Azure Resource Manager.
- Now, go to the settings section, and look for the option, ‘Migrate to Azure Resource Manager.’
- Now, you can click on ‘Validate’ to let the system check for migration feasibility.
- After the validation passes, you need to click on ‘Prepare.’ It will create a migrated storage account.
- Now, type ‘Yes’ to confirm the migration process, and then click on ‘Commit’ to finish the process.
To know more about the migration of an Azure Storage Account to Resource Manager, check out this Azure Documentation.
Learn About the Storage Account Endpoints
It is important to cover the storage account endpoints within this Azure Storage tutorial. As you all know, that storage account offers a unique namespace within Azure for all data that is stored within the environment. All of the objects that you store within the Azure storage account come with an address consisting of the unique name that you allotted. And then, Azure forms respective endpoints for the storage account.
Therefore, while you are naming the storage account, you need to keep in mind some of the crucial rules, like:
- The name of the storage account you pick should be between 3 & 24 characters within the length. You must use lowercase letters and numbers for the same.
- The name of your storage account should be unique within Azure. You cannot use an already-existing name within Azure Storage. No two accounts are supposed to hold the same name within Azure storage.
You need to check on the format of the endpoint for each of the respective Azure storage services for your knowledge and reference. The endpoint formats are as follows:
- Blob storage- https://<storage-account>.blob.core.windows.net
- Azure Files- https://<storage-account>.file.core.windows.net
- Table storage- https://<storage-account>.table.core.windows.net
- Data Lake Storage Gen2- https://<storage-account>.dfs.core.windows.net
- Queue storage- https://<storage-account>.queue.core.windows.net
You need to construct these URLs for object access within the storage account. In this process, you need to append the location of the object within the storage account to the endpoint. Moreover, you can also put in your team to configure the storage account for using a customized domain for blob storage. For that, you need to again follow some of the steps for customizing or mapping a domain:
But, before commencing with the steps for the same within this Azure storage tutorial, you must know that a custom domain might be briefly unavailable for the users. Now, go ahead and follow the steps for customizing your domain:
- Get the name of your host within the storage endpoint.
- Now, you have to create a canonical name or CNAME record within the domain provider.
- Register the custom domain within Azure.
- Now, test the custom domain.
There are specific sub-steps that you have to follow for each of the above steps that are highlighted in brief over this documentation. Learn the detailed steps, and execute them to ensure that you attain your custom domain name.
Final Words
This was an in-depth Azure Storage tutorial, which intends to help you learn the steps that you need to adapt in order to execute the data storage operations within Azure. You need to get your hands into Azure Storage to understand its concept and its operational efficacy.
Preparing for the Azure interview? Don’t miss to go through these frequently asked Azure interview questions and get ready to ace the interview.
Azure Storage offers you the potential of authorization, data protection, security, redundancy, disaster recovery, object replication, and a lot more to ensure the reliability of users upon Azure storage for handling their data. You can refer to the official documentation of Azure Storage to study and educate yourself about all of the core fundamentals within it. This Azure storage tutorial was to educate you about the important fundamentals to start your journey while there is still more to it.
- Top 20 Questions To Prepare For Certified Kubernetes Administrator Exam - August 16, 2024
- 10 AWS Services to Master for the AWS Developer Associate Exam - August 14, 2024
- Exam Tips for AWS Machine Learning Specialty Certification - August 7, 2024
- Best 15+ AWS Developer Associate hands-on labs in 2024 - July 24, 2024
- Containers vs Virtual Machines: Differences You Should Know - June 24, 2024
- Databricks Launched World’s Most Capable Large Language Model (LLM) - April 26, 2024
- What are the storage options available in Microsoft Azure? - March 14, 2024
- User’s Guide to Getting Started with Google Kubernetes Engine - March 1, 2024