

Azure has its own Content Delivery Network (CDN), which is a global solution for organizations to adapt and deliver high bandwidth content. One can host the Azure CDN within Azure or any other specific location. With the help of Azure CDN, you can prefer to cache static objects that are loaded from a web application or Azure blob storage by using the nearest Point of Presence (POP). You can also cache the static objects from any of the publicly accessible web servers.
Planning to get Azure certified? Check out Microsoft Azure Certification Training Courses!
You can prefer to use Azure CDN for dynamic content as well. It offers a global solution for developers to rapidly deliver high-bandwidth content to the users upon their requests. It offers a better user experience by reducing the latency or loading time for the users. Azure CDN is important for applications that require multiple round trips to speed up the process!
This article intends to offer you detailed knowledge on Azure CDN, with all of its operational attributes and service efficacy. Follow on till the end to know the right ways of implementing Azure Content Delivery Network.
Working of the Azure Content Delivery Network
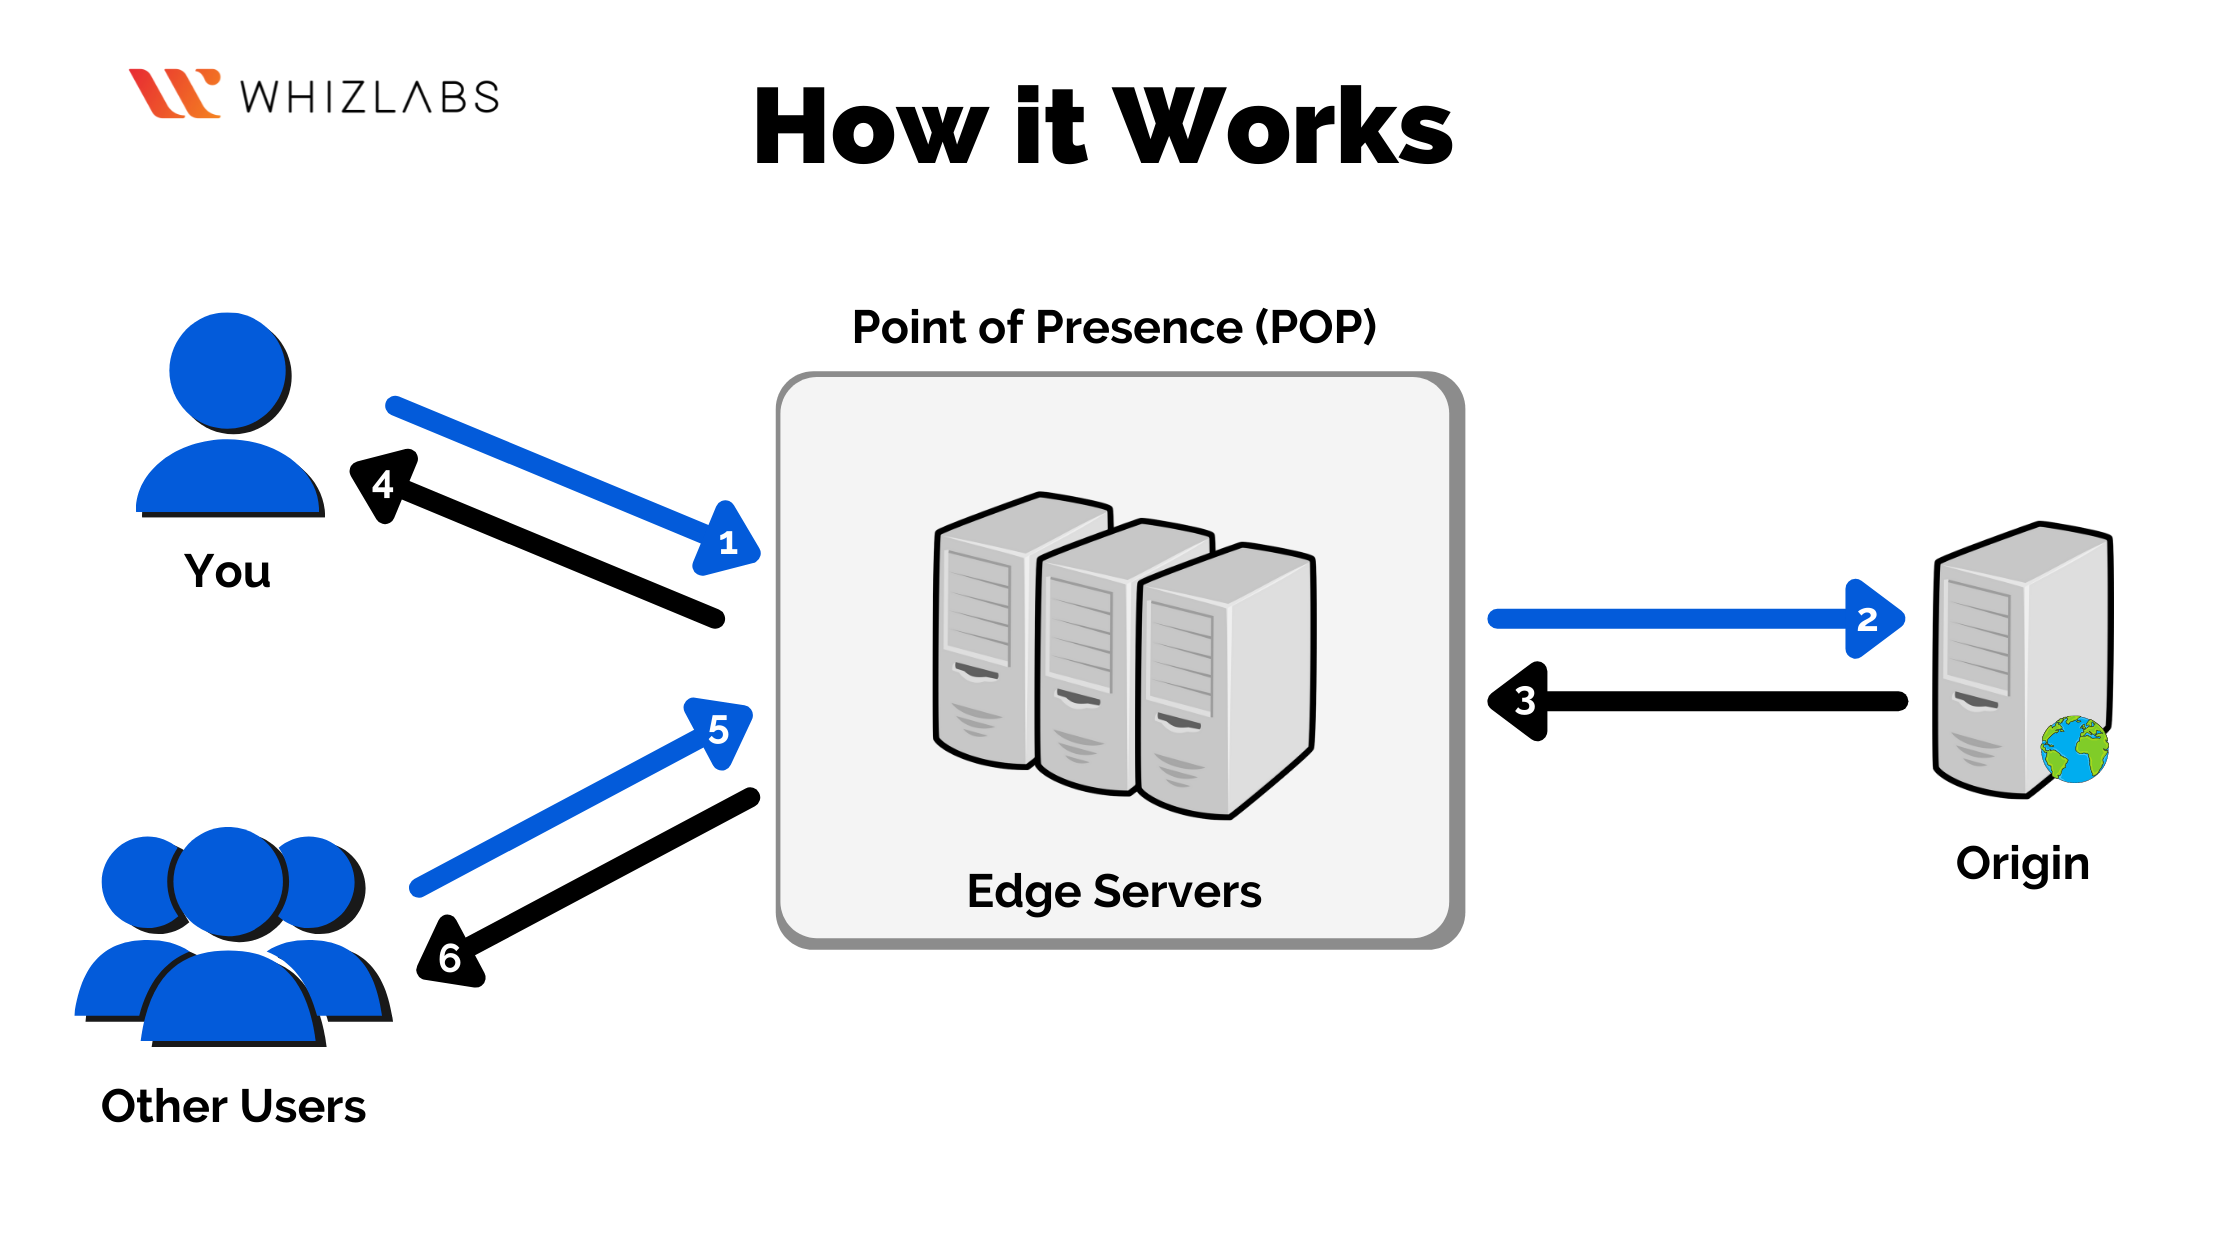
Before inching towards the steps on how to implement Azure CDN and other such crucial information, it is important that you should understand the working process. The basic agenda of Azure CDN is that it distributes the user requests and serves the content directly to the end-users from the edge servers. In this way, the traffic sent to the origin server is less, which reduces the latency, and optimizes the loading time for the end-user.
The working of the Azure CDN commences when a user requests a file or asset with the help of an URL. They use a specific domain name for putting up their request, which can also be a custom domain or an endpoint hostname. The DNS is then responsible for directing the request to the nearest POP location. It automatically picks the POP that is closed to the geographical location of the user.
If the files are available within the cache of the edge servers, then it instantly draws them and processes the request. But in case, the edge servers within the POP do not have those files in their cache; the POP will then put up the request from the origin server for that file. The origin server to which the POP requests for the file can either be Azure Cloud Service, Azure Web App, or Azure Storage Account. The origin can also be a web server that has public accessibility.
Exam AZ-900: Microsoft Azure Fundamentals checks and validates your fundamental knowledge of cloud services and how Microsoft Azure provides the cloud services, irrespective of any specific role. Looking for a Training Course? Try Whizlabs Online Course Now!
The origin server then processes the POP’s request for the file and transfers it to the edge server within the POP. Now, the role of the edge server is to cache the file and then return it to the user who requested the same. It caches the file within the POP to make it available for other users who request it next time. But, there is a limitation for that file to remain in the cache. It will be available within it until TTL (time-to-live), which is the expiry time for it, as specified by the HTTP headers.
In case the origin server doesn’t specify any of the TTL for the files that are processed to the POP, the default TTL is specified as 7 days. Until the TTL is not expired, the POP can process the request of that file directly from the cache, without the necessity of urging the origin server yet again. The other users, who want to access the same file or asset, can preferably use the same URL for redirecting themselves to the same POP, where the file is cached, for even faster access!
Requirements Essential for Using Azure CDN
Here are some of the requirements that you need to fulfill in order to be eligible for using Azure CDN:
- You must have an active subscription to Azure.
- You need to go ahead and create your CDN profile that will have the CDN endpoints. Each of the endpoints intends to represent the specific configuration of accessibility and behavior of the content delivery.
- You must create multiple profiles to organize the respective endpoints with the help of web applications, internet domains, and other such criteria.
- The pricing of Azure CDN depends upon the CDN profile levels. For using the mix of pricing tiers, you need to go ahead and create multiple CDN profiles.
Steps to Create an Azure CDN Profile & Endpoint
As you have understood and implemented the prerequisites or requirements for enabling Azure CDN, here are the steps that you need to follow in order to create your profile:
Creating Azure CDN Profile
- You need to sign in to the Azure Portal within the Azure Account. For that, log onto this link, and enter your credentials to access the portal.
- CDN profile is the container of all the CDN endpoints, so creating it is quite crucial to avail Azure CDN services. Look for ‘Create a resource’ within the Azure portal. You will mostly find it on the upper left side of the portal page.
- A ‘New’ pane will appear on the screen.
- Search for ‘CDN,’ and then click on the ‘Create’ option. Now, you will see the CDN pane will appear on your screen.
- Now, you need to enter values for the given fields such as name, subscription, resource group, resource group location, and pricing tier.
- Do not check the ‘Create a New CDN Endpoint Now’ box.
- Now, click on ‘Create’ to process the creation of the CDN Profile.
Creating Azure CDN Endpoint
- Go back to the Azure portal, select the CDN profile within the dashboard that you created.
- If you are not able to find the profile, then you can open up the resource group to track it. It is better to use the search bar on the top to type out the name and look for the CDN profile.
- When you reach the CDN profile page, look for the option ‘+Endpoint.’ Click on that!
- ‘Add an Endpoint’ pane will appear on your screen!
- Now, you will be asked to fill the required fields with some of the specific values such as name, origin type, and origin hostname. Leave the default values as it is, for origin host header, protocol, optimized for, and origin port fields. Do not fill anything on the ‘origin path’ field.
- Select the ‘Add’ tab to create the CDN endpoint. Once you have created that, it will then be displayed in the lists of endpoints contained over this profile.
The propagating time for an endpoint creation varies, depending upon the pricing tier that you chose at the time of creating the CDN profile. Under the Standard Akamai tier, the propagation completes within just one minute, whereas for Standard Microsoft, it takes up to 10 minutes, and for Standard Verizon & Premium Verizon, it takes 30 minutes. Therefore, choose your tier accordingly!
You can also rely upon the ARM template for creating the CDN profile and endpoints. To know about how to use those ARM templates for the purpose, you must refer to this Azure documentation.
Billing of the Azure CDN Services
Azure has a specific billing structure for its Content Delivery Network services. The entire billing of Azure CDN depends upon the region. The billing region is specified as the geographical area that is used for determining the chargeable rate for the delivery of objects within Azure CDN. Currently, Azure has specified some of its billing zones and their respective regions for the ease of billing.
- For Zone 1 billing, they have Europe, North America, Africa, and the Middle East.
- For Zone 2 billing, they include the Asia Pacific region that includes Japan as well.
- For Zone 3 billing, Azure includes the South America region.
- For Zone 4 billing, Azure includes New Zealand and Australia.
- For Zone 5 billing, Azure includes the country India.
The Azure CDN billing regions are based upon the location of the source server that is delivering the content as per the end users’ request. The physical location of the user who has requested a file is not considered as the billing region. The POP locations within these regions are used for processing the user requests for files or assets, and such use of regions is replicated in the Azure CDN billing.
All of the HTTP(S) requests that are terminated at the Content Delivery Network are transactions that will be billed under Microsoft Azure CDN. It includes both success and failure responses. Different responses might generate different traffic counts, which will impact the overall billing of Azure CDN services.
The use of Azure CDN also comes with some additional usage charges upon the services that are used as the object origins. These are small costs that add up to the overall CDN usage cost or final billing. For instance, if you are using Azure Blob storage as the content origin server, then you will have to pay the storage charges for the cache filling, depending upon the GB of storage used, the transactions required for filling the cache, and the data transfer within the process.
If you wish to manage the expenses over the use of Azure CDN, then you should prefer to set the longest TTL as possible upon the content. Check out the detailed pricing structure in terms of different zones and data transfers.
Practice Tests with Exhaustive explanation can help you clear the exam in first attempt! Check out the Practice Tests with 380+ questions now!
Features of Azure CDN
Now that you are aware of how to integrate the Azure CDN aspects to enhance the user experience for your website or application, it is time to enlighten you with some of the features that make it special and important. The features include:
-
Dynamic Site Acceleration
The content of today being served to the users is mostly in real-time. It is supposedly due to the booming social media and e-commerce sector. The caching of content for dynamic web applications is not possible within the edge locations. It is because the server generates content only in response to the user behavior. Therefore, speeding up the delivery of such content is usually complex, as compared to static content caching. Therefore, with the use of Azure CDN dynamic site acceleration or DSA optimization, the web pages, even with the dynamic content, tend to give measurably better performance.
-
CDN Caching Rules
Azure CDN comes with certain caching rules that educate you on the right ways to use it. Basically, it offers few ways with which you can control the caching of your files. It offers global caching rules, custom caching rules, and query string caching. You can prefer setting up a global caching rule for the specific endpoints within the profile. It will affect all of the user requests that are made to that endpoint. The global caching rule is meant to override any of the HTTP cache-directive headers.
With custom caching, you can set one or multiple custom rules for each of the endpoints. The custom rules intend to match the specific file extensions and specific paths to process in order and also bypass the global caching rule. The query string caching allows you to adjust the caching functionality of Azure CDN for the requests that are with the query strings.
-
HTTPS Custom Domain Support
Azure CDN supports HTTPS upon CDN endpoint hostname as a default service offering. It means that if you are creating a CDN endpoint, it will automatically have HTTPS enabled in it. Enabling the HTTPS protocol over the custom domain intends to ensure you that the sensitive data is connected via SSL and TLS.
These are just a few of the many features of Azure CDN that you still have to explore. To know more about these features associated with Azure CDN, refer to this documentation of Azure CDN product features.

Bottom Line
It is the complete overview and tutorial to educate you about the Azure CDN services. People, who are well acquainted with the service efficacy of Azure, are well versed with what CDN has to offer them.
So, make sure you study and implement all of the concepts and steps highlighted in this guide. Get hands-on experience over Azure CDN to know more about its practical benefits.
- Top 20 Questions To Prepare For Certified Kubernetes Administrator Exam - August 16, 2024
- 10 AWS Services to Master for the AWS Developer Associate Exam - August 14, 2024
- Exam Tips for AWS Machine Learning Specialty Certification - August 7, 2024
- Best 15+ AWS Developer Associate hands-on labs in 2024 - July 24, 2024
- Containers vs Virtual Machines: Differences You Should Know - June 24, 2024
- Databricks Launched World’s Most Capable Large Language Model (LLM) - April 26, 2024
- What are the storage options available in Microsoft Azure? - March 14, 2024
- User’s Guide to Getting Started with Google Kubernetes Engine - March 1, 2024