
Whether you are an experienced IT professional or new to the industry, cloud computing skills are no longer just good to have. It is a mandatory and highly sought-after credential that companies look for when hiring tech professionals. And the best way to kick off is to go for certification programs. Amazon Web Services (AWS) certifications are a go-to upskilling resource for cloud computing players. AWS courses keep you up-to-date in the cloud domain.
However, passing these courses requires in-depth knowledge of the AWS cloud platform and getting hands-on with the nitty-gritty of platform solutions. AWS hands-on labs are the best way to get started. This blog will run you through top hands-on labs for AWS and their features. But before that, let’s glance at what AWS certifications are.
A sneak peek into AWS certifications
Amazon Web Services (AWS) certifications are a series of qualifications provided by Amazon Web Services to verify and showcase your expertise in various aspects of AWS cloud computing. These certifications hold high regard in the IT industry. They are valuable for individuals and organizations, as they help demonstrate the skills required to design, deploy, and manage applications and infrastructure on the AWS platform. Here are some of the key AWS certifications:
- AWS Certified Cloud Practitioner: This entry-level certification is designed for individuals seeking a foundational understanding of AWS and its cloud computing services. It’s suitable for both technical and non-technical professionals.
- AWS Certified Solutions Architect – Associate: This certification is for individuals who can design distributed systems on the AWS platform, focusing on best practices for building secure and scalable applications.
- AWS Certified Developer – Associate: Geared towards developers working with AWS services, this certification validates the ability to write, deploy, and debug code for serverless applications.
- AWS Certified SysOps Administrator – Associate: This certification concentrates on system administration tasks, highlighting the operational aspects of AWS, including managing and monitoring AWS resources.
Popular Hands-on Labs for AWS
To help you kickstart your AWS certification journey, here are a few popular hands-on labs to refer to.
Creating NAT gateways to access the internet, for instance, in private subnets using Terraform
In this lab, you will be guided through the process of setting up a NAT Gateway and enabling internet access for an instance in a private subnet using Terraform.
Task Details
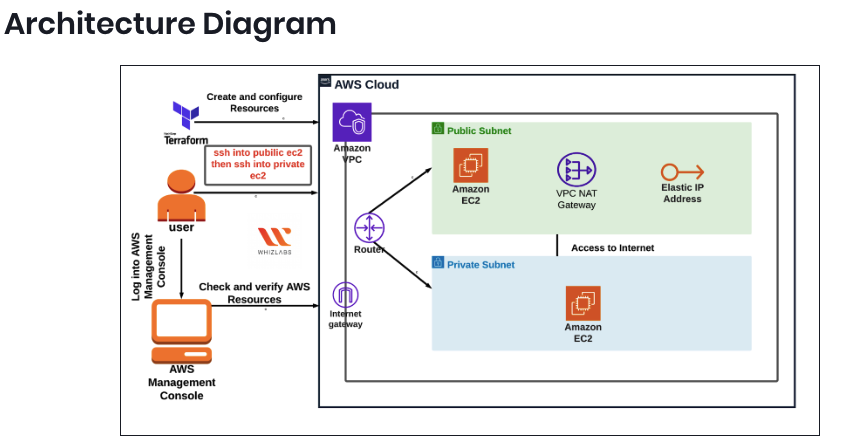
- Log in to the AWS Management Console.
- Generate a Key Pair.
- Configure Visual Studio Code.
- Establish a variable file.
- Construct a VPC in the main.tf file.
- Define Public and Private Subnets in the main.tf file.
- Create an Internet Gateway within the main.tf file.
- Formulate a Public route table and configure it in the main.tf file.
- Launch Public and Private Instances in the main.tf file.
- Create an output file.
- Verify the Terraform installation by checking the version.
- Apply Terraform configurations.
- Review the AWS Console for the deployed resources.
- SSH into Public and Private EC2 instances and test internet connectivity.
- Create a NAT Gateway in the main.tf file.
- Update the route table and configure the NAT Gateway in the main.tf file.
- Validate the internet connection from an instance inside the Private Subnet.
- Complete the lab validation.
- Remove AWS Resources when no longer needed.
Building CRUD Todo apps with Flutter via Amplify datastore to save and restore data in cloud databases
This project provides a comprehensive walkthrough for installing and configuring the Amplify Command Line Interface (CLI). After the initial setup, you will create a new Flutter project and define the data model your application will utilize. Subsequently, you will seamlessly integrate the Amplify DataStore with your application, gaining proficiency in using the generated data model to perform various operations, such as creating, updating, querying, and deleting Todo items. As you continue to develop the app, you will also create the backend using Amplify and ensure effective synchronization with the cloud, ensuring a robust and fully functional application.
Task Details
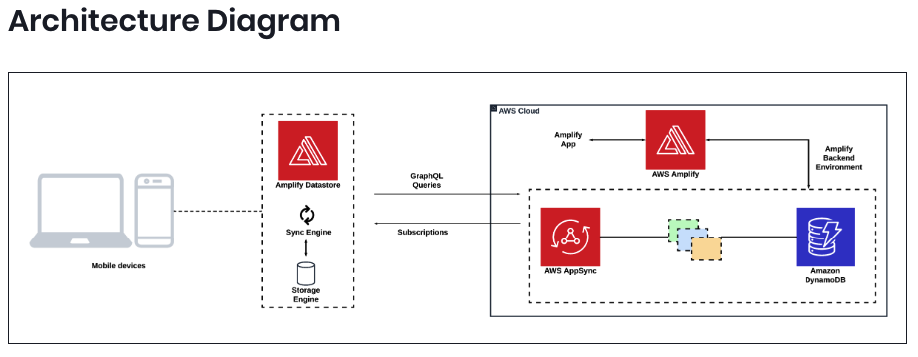
- Initiating the Lab Environment.
- Installing and Setting up the Amplify CLI.
- Building a fresh Flutter application and incorporating Amplify.
- Defining the data model for your application.
- Generating local data models.
- Seamlessly integrating Amplify Datastore into your application.
- Configuring Amplify for your project.
- Crafting a new Todo item.
- Efficiently querying Todos and monitoring real-time updates.
- Managing updates and deletions of Todo items.
- Deploying the Amplify Sandbox to the backend.
- Implementing authentication in your application.
- Ensuring real-time cloud sync verification.
- Resource cleanup and management.
Beginning with Docker – Installation and Setup
This extensive lab will walk you through comprehending and setting up Docker on an EC2 instance. Within this lab, you will acquire hands-on experience using Amazon Machine Images (AMI) to initiate Amazon EC2 instances and configure the Docker containerization platform on top of them.
Task Details
- Log in to the AWS Management Console.
- Create an EC2 instance with your preferred specifications.
- Securely access the EC2 instance via SSH using the provided key pair.
- Install Docker for the Linux platform.
- Initiate the Docker service and ensure it’s enabled.
- Deploy a sample container and confirm its successful launch.
Deploying highly available feedback web apps combining server and serverless modalities
This project is a step-by-step guide for setting up a resilient static web application that enables users to submit messages and attached images. These submissions are stored in a DynamoDB table, while the associated images are saved in an S3 Bucket.
Within this project’s infrastructure, you’ll find an Application Load Balancer alongside an Auto Scaling Group of Elastic Compute Cloud (EC2) Instances, all operating within a custom VPC. The deployment of the website is facilitated through CodePipeline. Users can easily input data and upload images stored in the S3 Bucket, while the accompanying data is recorded in the DynamoDB table.
Task Details
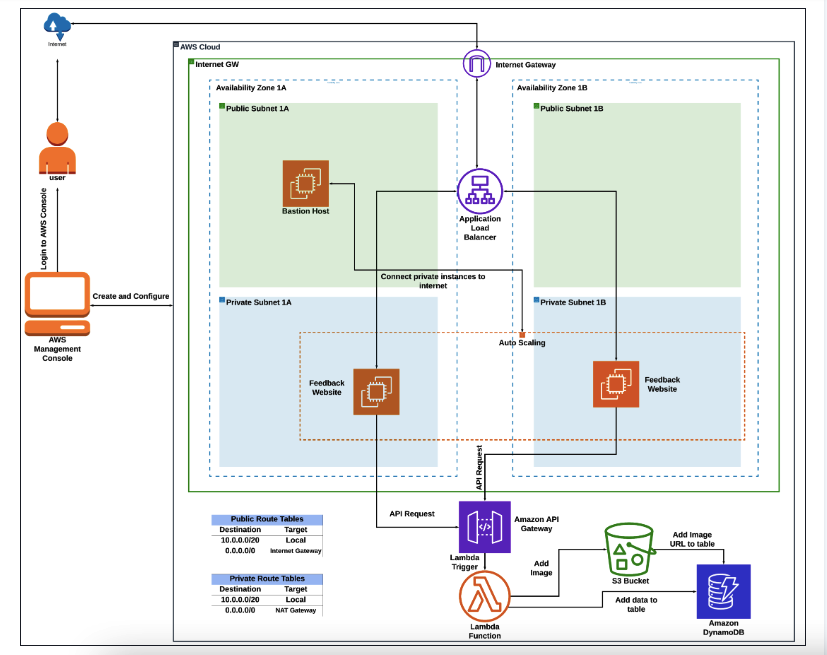
- Establishing a DynamoDB table.
- Crafting an S3 bucket for image storage and configuring the bucket policy.
- Creating a Lambda function.
- Developing a Rest API.
- Defining a Resource and Method for the API.
- Testing the API.
- Activating CORS support and deploying the API.
- Initiating a CodeCommit Repository.
- Configuring Git credentials for secure HTTPS access.
- Setting up IAM User permissions to access CodeCommit.
- Generating and downloading HTTPS Git credentials for AWS CodeCommit.
- Creating an Environment in CloudShell.
- Connecting to CodeCommit and cloning the repository.
- Adding the web application code to your CodeCommit Repository.
- Building a customized VPC.
- Crafting Public and Private Subnets across two Availability Zones.
- Creating an Internet Gateway and linking it to the VPC.
- Establishing and configuring Route tables.
- Creating a NAT Gateway.
- Setting up a Bastion host server.
- Formulating an Application Load Balancer.
- Establishing a Security group for EC2 Instances.
- Defining IAM Roles for Launch Templates and CodeDeploy.
- Constructing a Launch Template.
- Generating an Auto Scaling group.
- Confirming the SNS subscription.
- Creating an application in CodeDeploy.
- Creating a deployment group for the CodeDeploy application.
- Initiating a CodePipeline.
- Testing the web page.
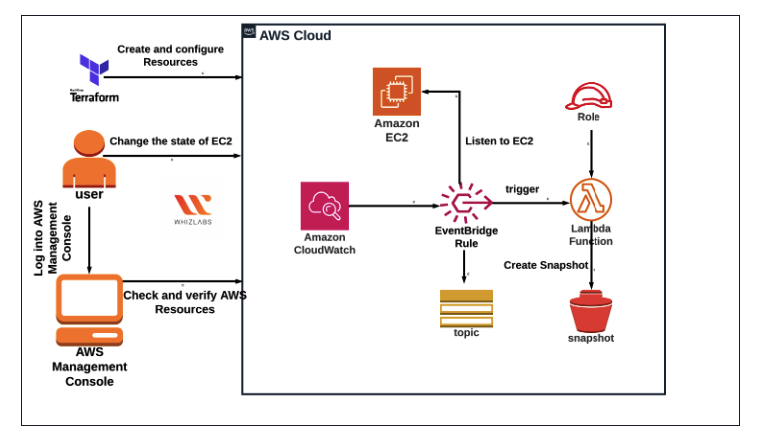
Automating EBS Snapshot with CloudWatch Event and obtaining SNS notifications using Terraform
In this lab, you will be guided through the process of automating the generation of EBS snapshots using Terraform, CloudWatch, and SNS.
Task Details
- Log in to the AWS Management Console.
- Configure Visual Studio Code.
- Establish a variable file.
- Initiate an EC2 instance within the main.tf file.
- Define an SNS Topic in the main.tf file.
- Craft a Lambda Function in the main.tf file.
- Set up a CloudWatch Event Rule within the main.tf file.
- Integrate an SNS Destination with Lambda in the main.tf file.
- Attach a CloudWatch Event Target to Lambda in the main.tf file.
- Generate an output file.
- Verify the Terraform installation by checking the version.
- Execute Terraform configurations.
- Examine the resources in the AWS Console.
- Validate the lab’s functionality.
- Remove AWS Resources when they are no longer needed.
Also Read : Top Hands-On Labs To Prepare For AWS Certified Cloud Practitioner Certification
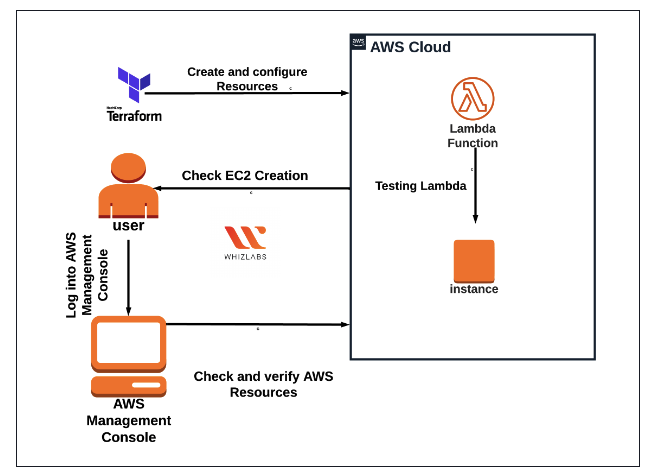
Launching EC2 Instances using AWS Lambda Function using Terraform
This lab guides you through the process of initiating an EC2 instance using AWS Lambda. Within this lab, we will craft a sample Lambda function through Terraform. This Lambda function, once triggered, will handle the provisioning of an EC2 Instance.
Task details
- Log in to the AWS Management Console.
- Configure Visual Studio Code.
- Establish a variable file.
- Develop a Lambda Function within the main.tf file.
- Generate an output file.
- Verify the Terraform installation by inspecting the version.
- Execute Terraform configurations.
- Review the resources in the AWS Console.
- Perform testing on the Lambda Function.
- Verify the creation of the EC2 Instance.
- Remove AWS Resources when no longer needed.
Creating Docker images with Dockerfile
In this in-depth lab, you will be led through the journey of comprehending and setting up Docker on an EC2 instance. Within this lab, you will acquire hands-on experience using Amazon Machine Images (AMI) to initiate Amazon EC2 instances and configure the Docker containerization platform atop them.
Task Details
- Log in to the AWS Management Console.
- Create an EC2 instance with your preferred specifications.
- Securely access the EC2 instance via SSH using the provided key pair.
- Install Docker for the Linux platform.
- Initiate the Docker service and ensure it’s enabled.
Implementing static feedback webpages using a 100% Serverless Architecture
This project provides a detailed guide for configuring a static web application that permits users to submit messages along with attached images. These submissions are collected in a DynamoDB table, while the corresponding images are stored in an S3 Bucket.
Within this project’s infrastructure, you exclusively leverage serverless services to deploy the web page. Users have the convenience of inputting data and uploading images, knowing that the data is recorded in the DynamoDB table and images are securely stored in the S3 Bucket.
Task Details
- Initiating the Lab Environment.
- Establishing a DynamoDB table.
- Crafting an image-storage S3 bucket and implementing a bucket policy.
- Creating an S3 bucket to house your web page content.
- Hosting the static webpage.
- Developing a Lambda function.
- Formulating a Rest API.
- Defining a Resource and Method for the API.
- Conducting API testing.
- Enabling CORS support and deploying the API.
- Adapting the index.html page to incorporate the API Gateway endpoint.
- Testing the Web Page functionality.
- Managing Resource Cleanup.
Dive Deep Into Docker Compose
This extensive lab will lead you through the journey of comprehending and configuring Docker on an EC2 instance. Within this lab, you will acquire hands-on expertise by utilizing Amazon Machine Images (AMI) to initiate Amazon EC2 instances and set up the Docker containerization platform atop them.
Task Details
- Sign in to the AWS Management Console.
- Create an EC2 instance with your preferred specifications.
- Securely access the EC2 instance via SSH using the provided key pair.
- Install Docker for the Linux platform.
- Initiate the Docker service and ensure it’s enabled.
- Launch a sample container and confirm its functionality.
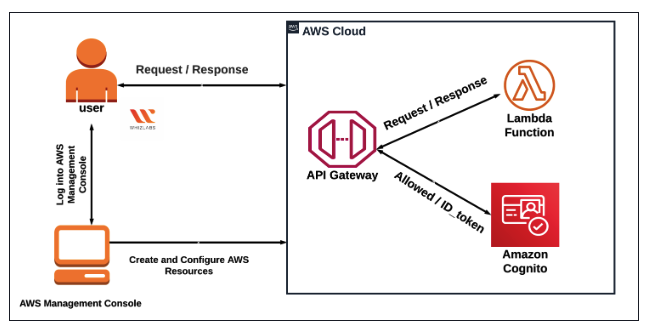
Securing API Gateway using Amazon Cognito User Pools
This lab walks you through the steps to secure your API Gateway with Amazon Cognito User Pools, ensuring that only authenticated and authorized users are able to access your APIs and providing a secure solution for user authentication and authorization for your applications.
Task Details
- Log in to the AWS Management Console.
- Establish a Cognito user pool.
- Generate a User Account.
- Craft a Lambda Function.
- Create an API Gateway Endpoint.
- Formulate a Resource.
- Define a Method.
- Deploy the API.
- Set up a Cognito Authorizer.
- Verify the Authorization Token.
- Configure Authorization to Limit API Access.
- Test the API.
- Validate the Lab’s Completion.
- Remove AWS Resources when they are no longer needed.
Summary
Hope these hands-on labs for AWS blog help you understand the AWS certifications and discover some of the popular labs for AWS. However, these are just a few. You will find more than a hundred hands-on labs on the internet. These labs cater to the needs of innumerable AWS certifications at once, from beginners to advanced-level courses.
However, just locating and operating with any and every hands-on labs for AWS is not the logical way. You must ensure that the lab you are about to access is updated, offers you the latest cloud features to work with, is easy to use, and guides you at the right time. But don’t worry since Whizlabs has got you all covered. Our minutely detailed AWS hands-on labs are curated by industrial experts with years of experience and combine instructive training and hands-on techniques to help you gain confidence and competence to begin your AWS journey.
- 7 Pro Tips for Managing and Reducing Datadog Costs - June 24, 2024
- What is Azure Data Factory? - June 5, 2024
- An Introduction to Databricks Apache Spark - May 24, 2024
- What is Microsoft Fabric? - May 16, 2024
- Which Kubernetes Certification is Right for You? - April 10, 2024
- Top 5 Topics to Prepare for the CKA Certification Exam - April 8, 2024
- 7 Databricks Certifications: Which One Should I Choose? - April 8, 2024
- What are the benefits of having a Google Cloud Database Engineer Certification? - March 18, 2024