Amazon EC2 Auto Scaling assists in maintaining application availability by allowing you to automatically add or remove EC2 instances based on defined scaling policies.
The benefits of AWS auto-scaling for EC2 instances are numerous, primarily focusing on improved fault tolerance, enhanced availability, and efficient cost management.
This article covers a detailed overview of AWS EC2 Autoscaling, EC2 auto-scaling components, steps to create and configure an Amazon EC2 Auto Scaling using the AWS Management Console, and end up with Amazon EC2 Auto Scaling best practices.
Having a thorough understanding of AWS EC2 Autoscaling helps to ace the AWS Certified Solutions Architect – Associate Certification easily.
Let’s dive in!
What is AWS EC2 Autoscaling?
AWS auto-scaling helps to scale up and down the EC2 instances based on the incoming traffic. The scaling up and down of the applications can be carried out in a few minutes depending on the traffic and decreases the application latency to end users.
EC2 Auto Scaling is the counterpart of AWS Auto Scaling service, which offers automatic scaling of Amazon services.
AWS Autoscaling can be integrated with multiple AWS services such as Amazon traffic, Amazon DynamoDB, and Amazon Aurora. When traffic is there, maximum resources will be utilized otherwise only minimum resources will be taken into account.
Also Read: Free AWS Solutions Architect Associate Exam Questions
EC2 Auto Scaling Components
AWS EC2 Auto Scaling comprises of three components:
- Auto Scaling Group (ASG) decides where to launch the EC2 instances
- a launch template helps to find what to scale
- scaling policies define the users when to scale up and down
Auto Scaling Groups
For scaling or administration purposes, Auto Scaling Groups (ASG) divide EC2 instances into logical units. You can indicate the minimum, maximum, and desired number of EC2 instances that you require when setting up an auto-scaling group.
Start up templates
Launch configurations are still offered as a legacy option, but the new launch template is a better method to set up auto-scaling.
The configuration details for newly created instances within an auto-scaling group are specified by launch templates. This contains the security groups, key pair, and Amazon Machine Image (AMI) to utilize when establishing the instance.
Versioning allows you to generate a subset of the parameter set, which you can then utilize to generate more launch templates. One way to generate new versions of a template is to programmatically insert various values into an existing default template that has common configuration parameters.
Policies for scaling and additional choices
There are numerous methods to scale an instance group with EC2 Auto Scaling:
- Adding or removing instances from the auto-scaling group is known as manual scaling.
- keeping a set quantity of instances, scaled by your requirements for the minimum, maximum, and recommended or desirable quantity of instances.
- Target tracking allows for dynamic scaling based on a target load metric value.
- Step scaling strategies include setting multiple thresholds for a given statistic and executing a scaling operation upon reaching each threshold.
- Basic scaling policies are used to reduce and increase the group’s capacity by a predetermined percentage or instance count.
- Growing a group according to the load in a SQS queue is known as scaling based on SQS.
- Scaling on a schedule involves carrying out an event at predetermined times and dates.
How Does EC2 Auto Scaling Work?
The AWS EC2 instance follows a different lifecycle than other EC2 instances. The lifecycle begins when the auto scaling group releases the instances, or when the instances are added manually to a group. The lifecycle terminates when an instance ends or the auto-scaling group eliminates an instance and stops it.
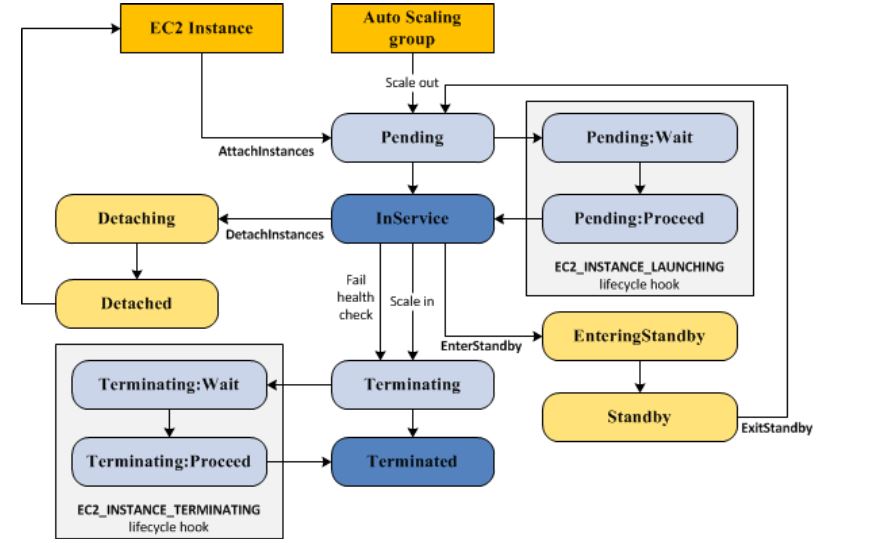
Source: AWS
Scale-Out
Several events are termed scale-out events, which help to convey the autoscaling group to launch new computing instances and add them into the group when:
- Group size is increased manually
- Scaling policy is active, which in turn automatically increases group size when criteria set in the policies are met
- A scheduled scaling event is enabled
When any of these events occur, the auto-scaling group generates new instances based on the group’s launch configuration. Initially, these new instances are in a “Pending” status. You have the option to incorporate lifecycle hooks to automatically execute actions when these instances are created.
Instances in Service
Once an instance is created and any associated lifecycle hooks are executed, it transitions to the “InService” status. It stays in this state until one of the following events occurs:
- A “scale-in” event prompts the scaling group to terminate the instance, reducing its size.
- A user manually places the instance into Standby.
- A user manually detaches the instance from the group.
- The instance fails a health check multiple times, leading to its removal from the group. It is then destroyed and replaced by a new instance.
Scale In
The following “scale-in” events lead an auto scaling group to remove an instance from the group and terminate it:
- A user reduces the size of the group.
- A scaling policy automatically reduces the group’s size when a specific criterion is met.
- A scheduled event is defined to scale down the group at a designated time.
It is crucial to define a scale-in event for every scale-out event to prevent unchecked scaling and instance sprawl.
Notably, there is no additional charge for AWS Auto Scaling itself. You only pay for the AWS resources required to run your applications and Amazon CloudWatch monitoring fees.
However, in certain scenarios, EC2 Auto Scaling may result in high charges due to increased application load. To mitigate this, you can define scaling policies or utilize cost control options like Usage Budgets to limit your costs.
How to create and configure an Amazon EC2 Auto Scaling using the AWS Management Console?
This lab guides you through creating and configuring Amazon EC2 Auto Scaling with Launch templates using the AWS Management Console.
First, you need to visit the Whizlabs hands-on page to do the above task. After reaching the lab’s page, type the lab title in the search bar as Create and Configure Amazon EC2 Auto Scaling with Launch Templates.
Now click on the labs’ page and follow the lab steps to proceed further.
The basic steps involved in EC2 Auto Scaling such as:
- Sign in to AWS Management Console.
- Create a security group for the Launch template
- Create a key pair for the Launch template.
- Create a launch template
- Create an EC2 Auto Scaling group
- Test Autoscaling group
- Validation of the lab
- Deleting AWS Resources
Task 1: Sign in to the AWS Management Console
- Click the “Open Console” button to access the AWS Console in a new browser tab.
- On the AWS sign-in page, leave the Account ID as default. Do not edit the 12-digit Account ID.
- Copy your User Name and Password from the Lab Console to the IAM Username and Password in the AWS Console. Click on the “Sign In” button.
- Once signed in, set the default AWS Region to US East (N. Virginia) – us-east-1.
Task 2: Create a Security Group for Launch Template
- Ensure you are in the N. Virginia Region.
- Navigate to EC2 by selecting “Services” in the Compute section. Set the Security group name to “Launch-template-SG” and the Description to “Security group for Launch template.”
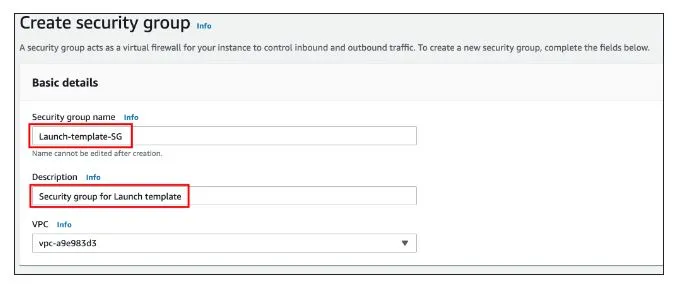
- In the left panel, choose “Security Groups” under the Network & Security section.
- Click on “Create Security Group.”
- Choose the Default VPC and Add a rule under Inbound rules.
- Set Type to “HTTP,” Source to “Custom,” and add “0.0.0.0/0” in the textbox.
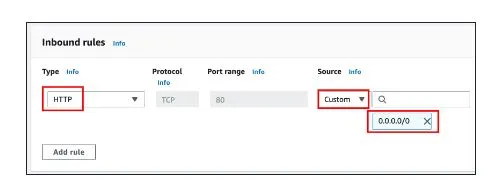
- Click “Create Security Group.”

Task 3: Create a Key Pair for the Launch Template
- Select “Key Pairs” under Network & Security in the left navigation pane and Click “Create Key Pair.”
- Fill in Name as “WhizKeyPair” and select file format (pem for Linux/Mac, ppk for Windows) and Click “Create Key Pair.”

Task 4: Creating a Launch Template
- In the left navigation pane, select “Launch Templates” under Instances.
- Click “Create Launch Template.”
- Set the Launch template name to “whizlabsLC” and the Template version description to “Launch template for whizdemo.”
- Choose Amazon Linux 2 AMI (HVM), SSD Volume Type for Amazon machine image.
- Under Instance type, select “t2.micro.”
- Choose “WhizKeyPair” for the Key pair (Login).
- Under Networking settings, select “Select existing security group” and choose “Launch-template-SG.”
- Expand Advanced details, go to User data, and paste the provided script.
- Click “Create launch template.”
Task 5: Create an Auto-Scaling Group
- Go to EC2 and select “Auto Scaling Groups” under Auto Scaling.
- Click “Create Auto Scaling Group.”
- Set the Auto Scaling group name to “Whiz-ASG” and select “whizlabsLC” as the Launch template.
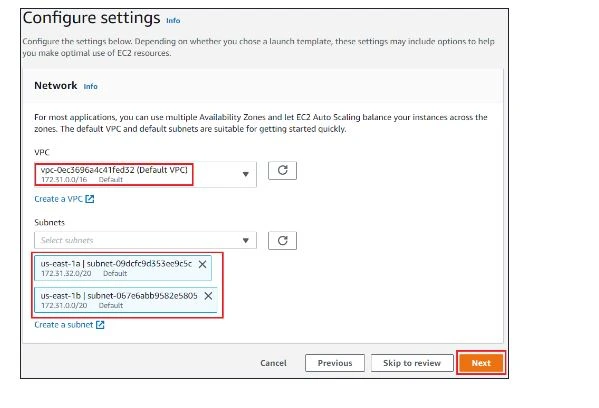
- Configure VPC and subnets, and click “Next.”
- No changes are needed in Configure advanced options, click “Next.”
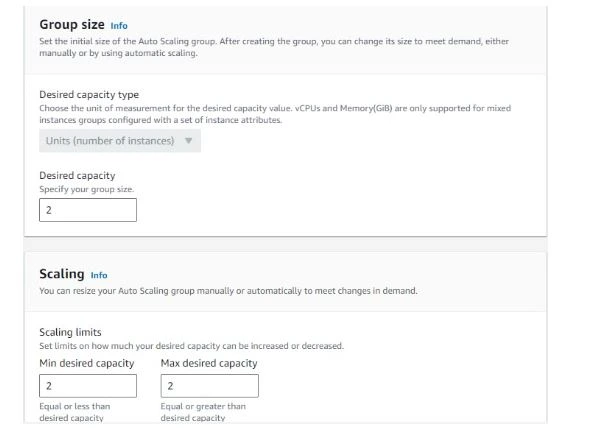
Set Desired capacity, Minimum capacity, and Maximum capacity to 2 under Configure group size and scaling policies.
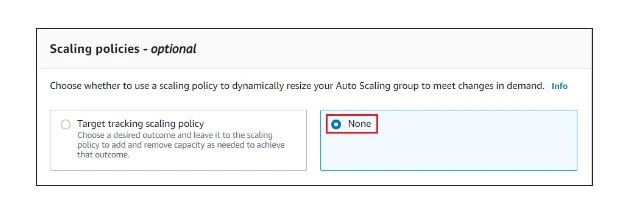
Select “None” under Scaling policies – optional.
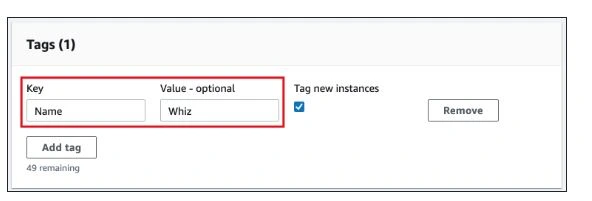
Click through the remaining steps, adding tags if desired.
Review and click “Create Auto Scaling Group.”
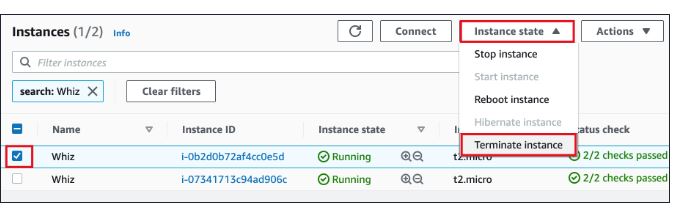
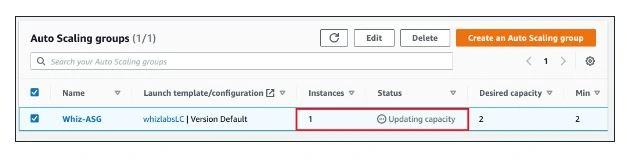
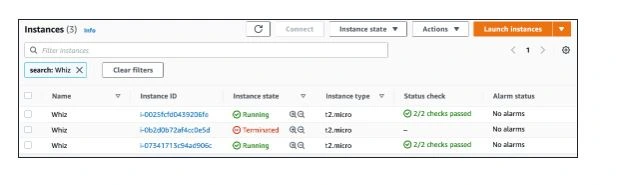
Task 6: Test Auto Scaling Group
Manually terminate one instance in the EC2 console.
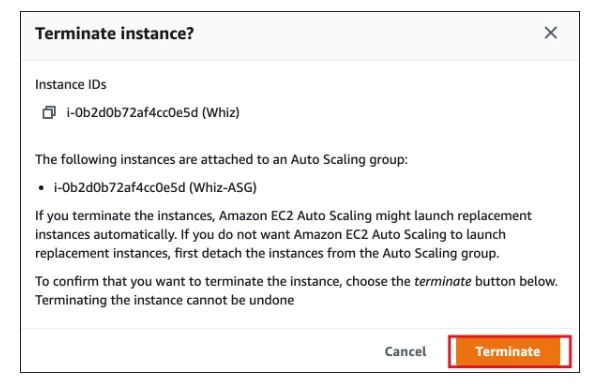
Confirm termination.
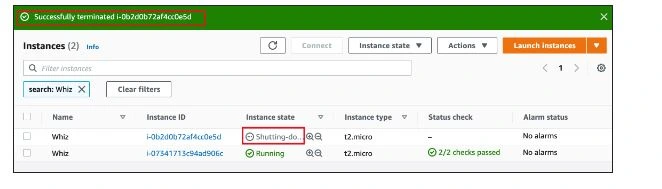
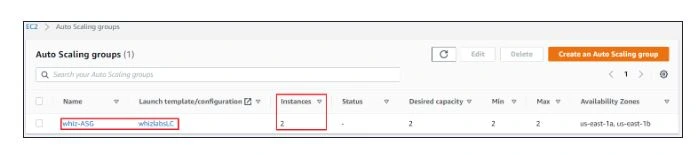
Monitor Auto Scaling Group in the Auto Scaling Groups page or Activity history to observe new instance launches.
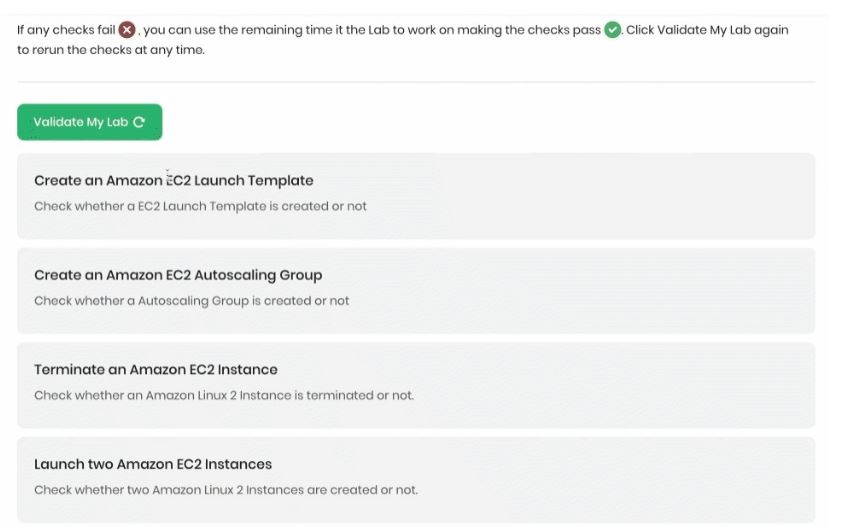
Task 7: Validation Test
Click on the “Validation” button on the left panel to confirm the successful completion of the lab.
Task 8: Delete AWS Resources
- Delete Auto Scaling Group:
- In the EC2 console, navigate to Auto Scaling Groups.
- Select “Whiz-ASG” and click “Delete.”
- Confirm by entering “delete” and clicking “Delete.”
- Delete Launch Template:
- In the EC2 console, navigate to Launch Templates.
- Select “WhizlabsLC,” click “Actions,” and choose “Delete template.”
- Confirm by entering “Delete” and clicking “Delete.”
AWS EC2 Auto Scaling Best Practices
Here are some best practices that can help you to manage the AWS EC2 scaling effectively.
EC2 Instance Frequency
Always make the Amazon EC2 Auto Scaling to be defined based upon load metrics which have a frequency rate of one minute. It ensures faster response to the changing application usage. You can use a scaling metric with a frequency of 5 minutes can slow down the response time, resulting in the scaling of events based on the old data.
By default, AWS EC2 offers basic monitoring, which keeps track every five minutes. It is highly recommended to turn on detailed monitoring to get updates for every single minute. But it may incur additional charges.
Auto Scaling Group Health Check
Ensure that the health check feature has been configured appropriately to detect that the EC2 instances get registered with autoscaling group functions properly. Or else, the auto-scaling group cannot carry out the basic functions such as deleting and replacing the failed instances.
While using Amazon EC2 Auto Scaling to deliver the traffic between the instances within the autoscaling group, ensure that ELB health checks are turned on.
Predictive Scaling Forecast
Predictive scaling employs workload forecasting to determine the future capacity. Predictions must be of higher quality if the workloads follow a cyclical performance pattern.
It is better to run the predictive scaling in the forecast-only mode to find the quality of predictions and scaling actions generated by the policies. If you are okay with the predictions, then change the policy to “forecast and scale”.
Auto Scaling Group Notifications
If you lack an alternative monitoring system for auto-scaling, ensure that your auto scaling group is set up to send email notifications for both scale-out and scale-in events. Enabling notifications involves associating an AWS SNS topic with the auto-scaling group, which then receives scaling events and forwards notifications to the specified email address established during the initial setup.
FAQs
- Top 25 AWS Data Engineer Interview Questions and Answers - May 11, 2024
- What is Azure Synapse Analytics? - April 26, 2024
- AZ-900: Azure Fundamentals Certification Exam Updates - April 26, 2024
- Exam Tips for AWS Data Engineer Associate Certification - April 19, 2024
- Maximizing Cloud Security with AWS Identity and Access Management - April 18, 2024
- A Deep Dive into Google Cloud Database Options - April 16, 2024
- GCP Cloud Engineer vs GCP Cloud Architect: What’s the Difference? - March 22, 2024
- 7 Ways to Double Your Cloud Solutions Architect Role Salary in 12 Months - March 7, 2024